
Product Manual


6
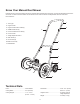
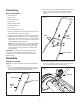
4. Pull both sides of the lower handle bars over the posts
on the mower body. Press inward on the handle bars to
ensure a secure t over the posts.
Operation
Cutting height adjustment
1. The cutting height of the 16" (40.6 cm) reel mower can be
adjusted from 1.1" to 2.9" (27 to 73 mm) by moving the
9-position height adjustment levers to the desired setting.
The height adjustment levers are located next to the
smaller wheels.
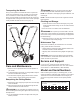
2. In order to set the mower to its lowest cutting position,
pull the adjustment levers on both sides, one at a time,
and set them to position A (Fig. 4).
3. In order to set the mower to its highest cutting position,
move the adjustment levers on both sides to position B
(Fig. 4).
NOTE: The two adjustment levers MUST be set to the
same position (height).
4. Other cutting heights are achieved by moving the
adjustment levers to the settings between the highest and
lowest positions.
Ensuring a clean cut
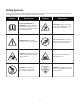
mWARNING! The steel blades are extremely sharp.
To avoid injury, do not touch the blades while making
adjustments.
NOTE: Although the blades are pre-adjusted prior to leaving
the factory, it is recommended that the adjustment be veried
prior to rst use.
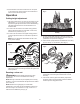
NOTE: Vibrations during shipping can cause blade
misalignment, which often causes the blades to become too
loose or too tight. This will result in a rough, uneven cut, or
make the mower dicult to push (Fig. 5).
1. To verify proper blade alignment, place the mower on a
at surface. Remove the handles and turn the mower reel
upside down to expose the cutting bar.
2. Insert a sheet of paper between the blade reel and cutting
bar, then slowly turn the wheel by hand (Fig. 6).
3. All the blades should slice the paper evenly along the
entire length of the cutting bar while the reel is turned
smoothly.
4. If the mower cuts the paper intermittently, adjustment
should be made to the appropriate side of the blades to
achieve optimal cutting performance.
Adjustment lever
Fig. 4
Lowest
cutting
position
Position A
Highest
cutting
position
Position B
Quality
Fig. 5
Paper
Fig. 6