
Use and Care Manual


8
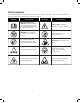
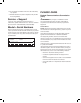
mCAUTION! Wear protective gloves while working with
the pruner. Never touch the blade or blade rail while the tool is
in operation and be aware of the sharp edges even when the
pruner is not in use.
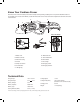
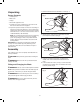
Starting + Stopping
1. To power ON, push and hold the safety lock button with
your ngers, while pressing the On/O trigger switch with
your index nger. Once the On/O switch is pressed, the
removable blade will move down and the two blades will
close to cut (Fig. 6).
NOTE: The safety lock button reduces the risk of accidental
starting.
2. Release the On/O switch, the two blades will open
(Fig. 6).
mCAUTION! Always ensure proper footing and balance
in a clean and clear work environment before switching on the
cordless pruner.
NOTE: The pruner will stop working when the voltage is lower
than 3 Volts. Please recharge as soon as possible if the pruner
stops working.
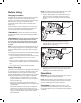
LED lights
The pruner is equipped with two LED lights under the blades
on both sides to provide additional lighting for operation in low
light conditions. The LED lights will turned on when the safety
lock button is pressed and turn o when the safety lock button
is released (Fig. 7).
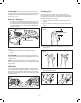
Trimming Tips
The cordless pruner can be used to remove fresh blooms
from the garden; also great for pruning overgrowth, dead and
overlapping stems and twigs, as well as thin and weak growth.
Follow the tips below for operation.
1. Never cut too close to the bud, so the wound can heal
properly.
2. Always make the cut above 0.3 inch (8 mm) from the bud
(Fig. 8).
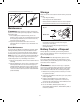
3. The cut should slope away from the bud, so the rain can
run o (Fig. 9).
4. When removing the entire stem, cut back to the point
where it branched (Fig. 10).
R
Fig. 6
Safety lock button
On/O switch
R
R
Fig. 7
Front BackLED lights
Fig. 8
Bud
0.3 inch (8 mm)
Fig. 9
Fig. 10