This unit has been reconditioned by Home and Power Company Do not return to the manufacturer Please contact us via email at info@homeandpower.com We will very happy to assist you Home and Power Customer care.
14-AMP ELECTRIC 3-IN-1 BLOWER/VACUUM/MULCHER Model SBJ605E Form No. SJ-SBJ605E-880E-MR1 A Division of Snow Joe®, LLC OPERATOR’S MANUAL IMPORTANT! 4. Dress properly – Do not wear loose clothing or jewelry as such articles can get caught in moving parts. Wear a protective covering to contain long hair. Wearing rubber gloves and substantial non-slip footwear is recommended when working outdoors. Safety Instructions All Operators Must Read These Instructions Before Use 5.
Additional Safety Instructions 13. Maintain the blower vac with care – Keep the blower tube and the fan area clear and clean for optimal performance and to reduce the risk of injury. Inspect the extension cord periodically and immediately replace it if damaged. Keep the handles dry, clean, and free from oil and grease. Follow the additional recommendations described in the maintenance section of this manual. • Use extra care when cleaning on stairs.
. To reduce the risk of electric shock, this appliance has a polarized plug (i.e. one blade is wider than the other). Use this appliance only with a polarized UL-, CSA-, or ETLlisted extension cord recommended for outdoor, all-weather use, such as the Snow Joe® + Sun Joe® Power Joe SJTW-A 14-gauge 50-foot extension cord with lighted end (Model PJEXT50-B). Visit snowjoe.com to purchase this extension cord online or, to order by phone, call 1-866-SNOWJOE (1-866-766-9563).
Double-Insulated Appliances In a double-insulated appliance, two systems of insulation are provided instead of grounding. No grounding means is provided on a double-insulated appliance, nor should a means for grounding be added to the appliance. Servicing a doubleinsulated appliance requires extreme care and knowledge of the system, and should be performed only by qualified service personnel at an authorized Snow Joe® + Sun Joe® dealer.
Safety Symbols The following table depicts and describes safety symbols that may appear on this product. Read, understand, and follow all instructions on the machine before attempting to assemble and operate. Symbols Descriptions Symbols Descriptions READ THE OPERATOR'S MANUAL(S) – Read, understand, and follow all instructions in the user manual(s) before attempting to assemble and operate. Keep bystanders and children a safe distance away.
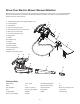
Know Your Electric Blower/Vacuum/Mulcher Read the owner’s manual and safety instructions carefully before operating the electric blower vac. Compare the illustration below to the electric blower vac in order to familiarize yourself with the location of the various controls and adjustments. Save this manual for future reference. 1. Variable blower speed control (speed settings 1 to 6) 2 2. Cord receptacle 3. Cord retainer 3 1 4. Vacuum/mulcher inlet cover 5.
Unpacking 2. Insert the concentrator nozzle onto the end of the blower tube until it locks into position (Fig. 1). NOTE: The concentrator nozzle is used to increase air flow in tight areas (i.e around flower beds, under decks, etc.). Carton Contents • Electric blower/vacuum/mulcher • Blower tube Fig. 1 • Blower concentrator nozzle Notched area • Front vacuum/mulcher tube • Rear vacuum/mulcher tube Slot • Collection bag • Wheel assembly Blower tube • Manual with registration card 1.
Assemble as a Vacuum/Mulcher 4. Insert the collection bag adaptor into the blower air outlet until the collection bag is securely fastened (Fig. 7), then clip the bag to the strap holder. 1. Slide the front and rear vacuum/mulcher tubes together until the lock button engages (Fig. 4). Fig. 7 Fig. 4 Air outlet Collection bag adaptor Rear tube Front tube Strap holder 2. Slide the inlet cover lock button forward to disengage the inlet cover. Hold the cover open (Fig. 5). Collection bag 4.
Starting + Stopping 5. To remove the vacuum/mulcher tube assembly, slide the inlet cover lock button to unlock, then remove the tube assembly from its housing (Fig. 10). 1. To start the electric blower/vacuum/mulcher, slide the ON/OFF switch to the ON position (I) (Fig. 12). NOTE: It may be necessary to remove the blower tube or vacuum/mulcher tubes to clear a blocked tube or impeller. Make sure to disconnect the unit from the power supply before attempting to clear any obstructions. 2.
Blower Mode • When using the unit as a vacuum/mulcher, make sure the bag is properly installed and zipped closed. • Hold the blower firmly with one hand on the main handle and the other hand on the auxiliary handle. Sweep from side to side with the nozzle several inches above the ground or floor (Fig. 14). • Make sure the blower tube nozzle is not directed at anybody or any loose debris before starting the unit. • Verify that the unit is in good working condition.
• As the bag fills, suction power will decrease. When this happens, turn the power switch to the OFF (O) position and unplug the unit from the power supply. Remove the bag and empty the debris. • To remove the bag, press the tube release button (Fig. 9). To empty, hold the plastic handle and grab the nylon handle on the underside of the bag. Turn the bag upside down and shake out any debris and leaves.
Service + Support If your Sun Joe® Blower Joe SBJ605E 3-in-1 electric blower/ vacuum/mulcher requires service or maintenance, please call the Snow Joe® + Sun Joe® customer service center at 1-866-SNOWJOE (1-866-766-9563). Model + Serial Numbers When contacting the company, reordering parts, or arranging service from an authorized dealer, you will need to provide the model and serial numbers, which can be found on the decal located on the housing of the unit.
Optional Accessories mWARNING! ALWAYS use only authorized Snow Joe + Sun Joe® replacement parts and accessories. NEVER use replacement parts or accessories that are not intended for use with this electric blower vac. Contact Snow Joe® + Sun Joe® if you are unsure whether it is safe to use a particular replacement part or accessory with your electric blower vac. The use of any other attachment or accessory can be dangerous and could cause injury or mechanical damage. ® Accessories Item Model 1 18.
NOTES 14
HOME AND POWER RECONDITIONED PRODUCT LIMITED WARRANTY ABOVE ALL ELSE, Home and Power is dedicated to you, our customer. We strive to make your experience as pleasant as possible. Unfortunately, there are times when a product does not work or breaks under normal operating conditions. We think it's important that you know what you can expect from us. That's why we created the Home and Power promise. OUR PROMISE: Home and Power warrants re-conditioned product for 90-days from the date of purchase.