
Use and Care Manual


7
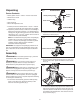
5. Push rmly until the bag clicks into place on the unit body.
NOTE: The collection bag must be attached any time
the unit is being operated. The unit cannot start if the
collection bag is not attached properly.
Operation
Working Mode Selection
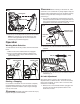
To switch between the working modes, follow the instructions
below.
1. Make sure the unit is switched o and is unplugged.
2. Vacuum mode and blower mode are indicated on the
mode switch. To select, simply rotate the switch to the
desired mode (Fig. 5).
Starting + Stopping
Do not switch on the blower vac until it has been completely
assembled. Before switching on the unit, always check the
appliance cord and the extension cord for signs of damage.
Use only intact cords.
mWARNING! Damaged cords pose a severe risk of injury.
Replace damaged cords immediately.
mWARNING! Before switching on the blower vac, make
sure that it is not in contact with any foreign objects. Keep your
hands and feet a safe distance away from the bottom opening.
Failure to comply with these warnings can result in severe
personal injury.
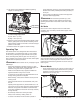
1. Push a loop of the extension cord through the slot on the
extension cord restraint holder from the opposite side and
loop it around the extension cord restraint holder. Connect
the appliance cord and the extension cord (Fig. 6).
2. To start the unit, press the ON/OFF switch (Fig. 7), as
indicated.
3. To stop the unit, press down (O) on the ON/OFF switch, as
indicated (Fig. 7).
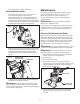
Air Inlet Adjustment
When being used as a vacuum, the air inlet height can be
adjusted to work on dierent terrains. To work on at surface,
lower the air inlet height. To work on lawn or uneven surface,
increase the air inlet height.
1. Make sure the unit is switched o and is unplugged. Turn
the unit to sit on its side to expose the bottom of the
blower/vacuum chute.
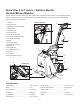
Fig. 4
Foot
Notch
Locking slot
Collection bag
Handle tab
Fig. 5
Vacuum mode Blower mode
Fig. 6
Appliance cord
Extension
cord
Extension cord
restraint holder
Fig. 7
ON (I)
OFF (O)