
Replacement Part List


6
Unpacking
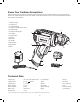
Carton Contents
• Cordless screwdriver
• Bit cylinder (pre-loaded)
• 6 bits (pre-loaded)
• Battery charger
• Manual with registration card
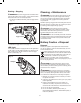
1. Carefully remove the cordless screwdriver and check to
see that all of the above items are supplied.
2. Inspect the product carefully to make sure no breakage or
damage occurred during shipping. If you nd damaged or
missing parts, DO NOT return the unit to the store. Please
call the Snow Joe
®
+ Sun Joe
®
customer service center at
1-866-SNOWJOE (1-866-766-9563).
NOTE: Do not discard the shipping carton and packaging
material until you are ready to use your new cordless
screwdriver. The packaging is made of recyclable
materials. Properly dispose of these materials in
accordance with local regulations.
IMPORTANT! The equipment and packaging material are
not toys. Do not let children play with plastic bags, foils,
or small parts. These items can be swallowed and pose a
suocation risk!
Before Using
mWARNING! Before rst use, the battery requires at least
5 hours charge time to be fully charged. Recharge for 3-5
hours again before resuming operation.
NOTE: The charge level indicator LED light will illuminate red
when the charger is plugged in and is charging the screwdriver.
When the battery is fully charged, the charging process stops
and the charging indicator light will automatically turn OFF.
Charging Procedure
mWARNING! The battery charger supplied matches
the lithium-iON battery installed in the tool. Do not use other
battery chargers.
To reduce the risk of electric shock, do not allow water to ow
into the charger's AC/DC plug.
mWARNING! Continued and excessive overuse of the
ON/OFF trigger switch can permanently damage the lithium-
iON battery.
The charging process starts as soon as the charger is plugged
into both the proper electrical outlet and the tool.
• During the charging procedure, the handle of the tool will
feel slightly warm to the touch. This is normal.
• When no further use is planned for an extended period of
time, disconnect the battery charger from the outlet and the
unit.
• Do not use the tool during the charging procedure.
Battery Charging
The length of service between each charging varies depending
on the type of work you are doing. The battery in this
screwdriver has been designed to provide maximum trouble-
free life. However, like all batteries, it will eventually wear out.
To obtain the longest possible battery life, we suggest the
following:
• Store and charge your screwdriver in a cool area.
Temperatures above or below normal room temperature
will shorten battery life.
• Never store the screwdriver with the battery in a
discharged condition. Recharge the unit immediately after
it is discharged.
• All batteries gradually lose their charge. The higher the
temperature is, the faster they lose their charge. If you
store your screwdriver for long periods of time without
using it, recharge the battery every 6 months. This will
extend battery life.
NOTE: The screwdriver has been shipped in a low charge
condition and should be fully charged before use.
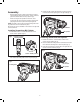
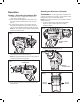
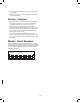
1. Plug the charger adaptor into an appropriate AC power
outlet. Connect the AC adaptor charger plug into the
charging socket of the screwdriver (Fig. 1).
NOTE: The charge level indicator LED light will illuminate red
when the charger is plugged in and is charging the screwdriver.
2. The battery will take approximately 3 hours to charge.
Charging may take up to 5 hours due to the level of
charge left in the battery and the ambient temperature.
NOTE: When the battery is fully charged, the charging process
stops and the charging indicator light will automatically turn
OFF.
R
Fig. 1
Charger
plug
Charger
socket
Charging
indicator light