
User Manual


10
Moving the Machine and Plowing
the Snow
1. Keep the area of operation free of foreign objects that can
become thrown by the rotor blades. Perform a thorough
inspection of the area since some objects may be hidden
from view by surrounding snow. If the snow thrower hits an
obstruction or picks up a foreign object during use, stop
the snow thrower, disconnect the extension cord, remove
the obstruction, and inspect the unit for damage. Repair or
replace any damaged part before restarting and operating
the unit.
2. Keep children, pets, and bystanders away from the area of
operation. Be aware that the normal noise of the machine
when turned on may make it dicult for you to hear
approaching people.
3. When moving the snow thrower, use the wheels on one
side as the pivot point. Slightly tilt the snow thrower on
this pivot point to move it forward or backward.
4. Start your clearing path near the electrical outlet and work
outward, throwing snow in a back and forth motion. To
clear in the opposite direction, step over the cord and
pivot the snow thrower on its wheels. Make sure to overlap
clearing paths.
5. Note the wind direction. If possible, move in the same
direction as the wind so that the snow is not thrown
against the wind (and thus back into your face and onto
the just-cleared path).
6. While moving the snow thrower, do not drag the power
cable violently or roughly. The snow thrower should move
within the range that the cable can safely reach.
7. Do not push the snow thrower with excessive force. You
should push the machine gently and evenly in accordance
with the unit’s throw rate.
8. Do not apply additional man-made load to the engine
since this may cause engine damage.
9. Some parts of the snow thrower may freeze under extreme
temperature conditions. Do not attempt to operate the
snow thrower with frozen parts. If the parts freeze while
the snow thrower is in use, stop the snow thrower, unplug
the extension cord, and inspect for frozen parts. Free all
parts before restarting or operating the snow thrower.
Never force controls that have frozen.
10. When working on pebbles, gravel, or unpaved surfaces,
avoid throwing loose surface material along with the snow
by pushing down on the handle to raise the scraper bar at
the base of the unit above the pebbles or gravel.
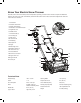
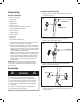
11. For larger areas, a denite pattern of operation is required
to thoroughly clean an area of snow. These patterns
will avoid throwing snow in unwanted places, a well as
eliminate the need for a second removal of snow (Fig. 20).
Pattern A: Throw the snow to the right or left side where
it is possible. For areas such as a long driveway, it is
advantageous to start in the middle. Plow from one end to
the other, throwing snow to both sides.
Pattern B: If the snow can only be thrown to one side of
the area to be cleared, start on the opposite side.
Changing Throw Direction and
Throw Height
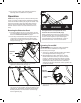
1. The discharge chute can be adjusted 180 degrees by
rotating the chute crank. Rotate the chute control crank
clockwise to move the discharge chute to the left and
counterclockwise to move the chute to the right (Fig. 21).
m WARNING m
Foreign objects, such as rocks, broken glass, nails, wire,
or string, can be picked up and thrown by the snow
thrower, causing serious personal injury.
Remove all foreign objects from the area to be plowed
before operating the snow thrower.
Fig. 20
pattern A
pattern B
m WARNING m
Never direct the snow discharge chute at the
operator, at bystanders, at vehicles, or at nearby
windows. The discharged snow and foreign objects
accidentally picked up by the snow thrower can
cause serious damage and personal injury.
Always orient the discharge chute in the opposite
direction from where you, bystanders, surrounding
vehicles, or windows are located.