
User Manual


12
8. For the user's safety, worn or damaged parts must be
replaced. Replace with original replacement parts only.
Parts from another snow thrower may not t properly,
causing an unsafe situation.
Replacing the Plastic Auger
NOTE: When replacing worn plastic plates, pay close attention
to any dierent types of bolts and nuts and where they are
positioned. This will ensure that the new plastic plates are
installed properly and securely.
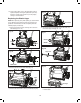
1. Open the two side covers by removing the 4 screws on
each side (Figs. 23 – 24).
2. Remove the belt from the drive wheel (Fig. 25).
3. Remove the drive wheel by turning it clockwise (Fig. 26).
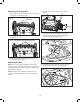
4. Remove the screws and washer on the other side, and
remove the auger axle (Figs. 27 – 28).
5. Remove the old auger from the housing (Fig. 29).
6. Install the replacement auger by following the above steps
in reverse order.
Fig. 23
Screws
Screws
Fig. 24
Side cover Side cover
Fig. 25
Belt
Drive wheel
Fig. 26
Drive wheel
Fig. 27
Screws
Washer
Fig. 28
Auger axle
Fig. 29
Old auger