
User Manual


7
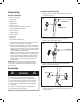
Chute Crank Assembly
1. The cotter pin comes pre-assembled on the unit, as
shown. Remove the cotter pin and proceed to step 2
(Fig. 5).
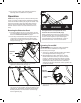
2. Insert the pin-hole end of the lower crank rod into the
opening at the back of the housing with holes aligned
(Figs. 6 – 8).
3. Secure the crank rod in place and replace the cotter pin
(Figs. 9 – 10), as shown.
Fig. 4
Fig. 5
Cotter pin
Fig. 6
Lower crank rod
Housing
opening
Fig. 7
Fig. 8
Fig. 9