
User Manual


12
5. Replace the left panel of the snow blower with all screws
(Fig. 27).
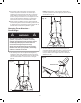
Replacing the Skid Shoes
The skid shoes are located at the bottom of the side panel.
Unfasten the two screws on the side panel to remove the worn
skid shoes (Fig. 30). Install the replacement by fastening it to
the side panel with the same two screws.
Automatic Reset
Both Snow Joe
®
SJ620 and SJ621 models have built-in
automatic reset functions. In the event of a major obstruction
that halts auger movement, simply unplug your unit, clear the
auger obstruction, wait 60 seconds and then resume use of
your machine.
Storage
1. Allow the engine to cool completely before
cleaning, storing or transporting the snow thrower.
Be sure to secure the unit while transporting.
2. Disconnect the extension cord from the snow thrower.
Inspect the extension cord closely for signs of wear or
damage. Replace it if it is worn or damaged.
3. Inspect the snow thrower carefully for worn, loose or
damaged parts. Check connections and screws and
tighten if necessary. For repairing or replacing parts,
contact your authorized Snow Joe
®
+ Sun Joe
®
dealer
or the Snow Joe
®
+ Sun Joe
®
customer service center at
1-866-SNOWJOE (1-866-766-9563).
4. Store the unit, along with the disconnected extension
cord, in a locked, dry place out of the reach of children to
prevent unauthorized use or damage. Cover loosely with
a tarp or with Snow Joe
®
's universal 18-inch electric snow
thrower cover (Model SJCVR) for added protection. Visit
snowjoe.com to purchase the cover online.
Service + Support
If your Snow Joe
®
SJ620/SJ621 electric snow thrower
requires service or maintenance, please call 1-866-SNOWJOE
(1-866-766-9563) for assistance.
Model + Serial Numbers
When contacting the company, reordering parts or arranging
service from an authorized dealer, you will need to provide the
model and serial numbers, which can be found on the decal
on the main cover of the unit to the left of the discharge chute.
Copy these numbers into the space provided below.
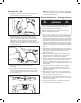
Fig. 29
Belt tension
Small pulley
Belt
Big pulley
Fig. 30
Record the following numbers from the housing or handle of your
new product:
Model #:
Serial #:
S J 6 2