
User Manual


13
Replacing the Belt
NOTE: Under normal operating conditions, it should not be
necessary to replace the auger belt. However, should the auger
jam or malfunction, the belt could be damaged. To replace the
belt, follow the instructions.
NOTE: Determine the left and right hand side of the snow
thrower by standing behind the unit in the normal operating
position.
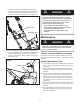
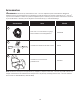
1. Open the left side plate by removing ve screws. (Fig. 26).
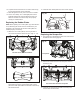
2. Use your right hand to turn the rib side of the belt
up and pull upwards while turning the auger pulley
counterclockwise with your left hand. The belt can be
easily removed from the pulley (Fig. 27).
3. Put the belt on the drive pulley rst and then place the
belt at the lower end of the auger pulley (Fig. 28).
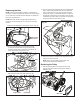
4. Use your right hand to press the belt with the ribbed side
down. While holding the belt down with your right hand,
use your left hand to turn the auger forward so that the
auger pulley rotates in a clockwise direction. The belt will
be gradually pushed down onto the pulley. When the belt
is seated on the pulley, adjust it so that the ribs of the belt
match the grooves on the pulley. (Fig. 29).
5. After belt is installed, replace the side plate and secure it
with the ve screws (Fig. 26).
NOTE: Heavy wet snow puts a load on belts, thus
requiring more frequent belt replacement.
Replacing the Pulley
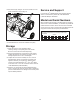
1. Open the left side plate by removing the ve screws
(Fig. 26). Remove the belt by following the directions
above (Fig. 30).
Remove the
vescrews
Fig. 26
Fig. 27
Belt
Fig. 28
Auger pulley Drive pulley
Fig. 29
Fig. 30
Side cover
Belt