
User Manual

5
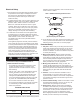
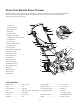
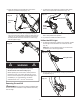
Know Your Electric Snow Thrower
Read the owner’s manual and safety rules carefully before operating your electric snow thrower. Compare the illustration
below to the actual unit in order to familiarize yourself with the location of the various controls and adjustments.
Save this manual for future reference.
1. Handle bar
2. Switch bar lever
3. LED light switch
4. LED light
5. Upper handle
6. Safety switch button
7. Extension cord restraint hook
8. Handle locks
9. Chute crank
10. Crank adjustment knob
11. Appliance cord
12. Center plate
13. Middle handle assembly
14. Auxiliary handle
15. Handle knob (2)
16. Lower handle
17. Wheel (2)
18. Side cover (2)
19. Chute deector
20. Deector knob (2)
21. Discharge chute
22. Auger
23. Scraper bar
24. Crank rod
25. Cotter pin
Technical Data
Rated Voltage ......................... 120 V ~ 60 Hz
Motor ...................................... 15 A
No Load Speed ...................... 1800 rpm
Rotor ....................................... Steel auger with 2 rubber blades
Type of Snow .......................... Light, uy
Tire Size .................................. 8 in. (20 cm)
LED light ................................. 3 W
Clearing Width .................................... 21 in. (53 cm)
Depth of Snow Cut ............................. 12 in. (30 cm)
Throw Distance Max ........................... 20 ft (6 m)
Plowing Capacity Max ........................ 24 tons/hr
............................................................ (21.7 metric tons/hr)
Directional Control .............................. 180º adjustable chute
Weight ................................................ 34.6 lbs (15.7 kg)
2
1
6
7
8
9
10
13
14
16
15
17
18
11
12
19
20
21
22
23
3
4
5
24
25