
User Manual

8
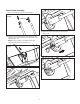
Discharge Chute Assembly
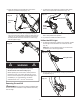
1. Position the chute deector over the discharge chute and
align the holes, placing the washer between the deector
and the chute (Figs. 9 – 10).
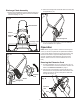
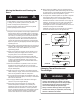
2. Secure the carriage bolts and knobs. Make sure the knobs
are tightened (Fig. 13).
3. Turn the crank knob clockwise to ensure the discharge
chute and deector are in position.
Operation
NOTE: Before using this machine, make sure that the power
source you will use complies with the specications detailed
in this manual. Before inserting the plug into the socket, verify
that the snow thrower’s auger and rubber plates are rmly
secured, and that the rubber plates are facing the correct
direction. Perform a test run to ensure that the rotor turns
freely.
Securing the Extension Cord
1. For safe and ecient use of your snow thrower, use only
a UL-rated extension cord recommended for outdoor use.
Refer to the Extension Cord Chart on page 2.
2. Push the loop of the extension cord through the slot on
the cord lock from the opposite side of the restraint hook.
Position the loop over the hook and pull the cable back
through the slot (Fig. 12).
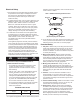
Fig. 9
Chutedeector
Washer
Deector
knob
Discharge chute
Fig. 10
Carriage bolt
Deector
knob
Washer
Fig. 13
Carriage bolt
Fig. 12
Extension
cord
Slot