R 13A ELECTRIC PRESSURE WASHER 2000 PSI MAX PRESSURE AT INITIAL DISCHARGE PER CSA INTERNAL PRESSURE TESTING 1.6 GPM MAX FLOW WITH NOZZLE OPEN AT MINIMUM PRESSURE OPERATOR’S MANUAL A Division of Snow Joe®, LLC © 2021 by Snow Joe®, LLC All rights reserved. Original instructions. Model SPX2598-MAX-RM Form No.
R 13A ELECTRIC PRESSURE WASHER 2000 PSI MAX PRESSURE AT INITIAL DISCHARGE PER CSA INTERNAL PRESSURE TESTING 1.6 GPM MAX FLOW WITH NOZZLE OPEN AT MINIMUM PRESSURE OPERATOR’S MANUAL A Division of Snow Joe®, LLC Model SPX2598-MAX-RM Form No. SJ-SPX2598-MAX-880E-MR3-V2 • Stay alert – Watch what you are doing. Use common sense. Do not operate the pressure washer when you are tired, or under the influence of alcohol or drugs.
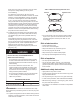
• Risk of explosion – Do not spray flammable liquids. Electrical Safety • Disconnect the tool – Disconnect from the electrical power supply before performing any maintenance task. ATTENTION: If there are problems with the electrical mains, • Keep children away – This high-pressure electric power washer must not be used by children or untrained personnel. short voltage drops may appear when starting the equipment. This can, in turn, influence other equipment (e.g. cause a lamp to blink).
GFCI power cord. Using an extension cord may cause a drop in line voltage resulting in loss of power and overheating. Table 1. Method of Securing Extension Cord Cord set If an extension cord is going to be used, use only extension cords that are intended for outdoor use. These extension cords are identified by marking "Acceptable for use with outdoor appliance; store indoors while not in use". Use only extension cord having an electrical rating not less than the rating of the product.
Product Description Purpose • This electric high pressure washer is intended for residential use only. It is designed for medium-to-heavy duty cleaning jobs on boats, motorcycles, RV’s, ATV’s, trailers, decks, barbecues, siding, patio furniture, and more. Areas of application • Never use the machine in potentially explosive areas under any circumstances! • The operating temperature must be between 32ºF (0ºC) and 104ºF (40ºC).
Safety Symbols The following table depicts and describes safety symbols that may appear on this product. Read, understand, and follow all instructions on the machine before attempting to assemble and operate. Symbols Descriptions Symbols Descriptions READ THE OPERATOR'S MANUAL(S) – Read, understand, and follow all instructions in the user manual(s) before attempting to assemble and operate. WARNING! Electrical shock hazard. SAFETY ALERT – Indicates a precaution, a warning, or a danger.
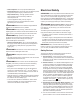
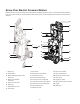
Know Your Electric Pressure Washer Read the owner’s manual and safety rules carefully before operating the pressure washer. Compare the illustration below to the unit in order to familiarize yourself with the location of the various controls and adjustments. Save this manual for future reference. 25 24 1 9 23 10 11 2 12 8 22 13 14 7 15 16 3 4 21 17 6 18 20 19 5 1. Trigger gun 9. Top handle 18. Foam cannon bottle 2. On/Off switch 10. High-pressure hose holder 19. Spray wand protector 3.
IMPORTANT! The equipment and packaging material are not toys. Do not let children play with plastic bags, foils, or small parts. These items can be swallowed and pose a suffocation risk! Technical Data Rated Voltage ........................................................ 120V ~ 60 Hz Motor .............................................................................. 13-amp mWARNING! Do not connect to power supply until Max Water Inlet Temperature ...................................
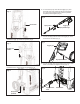
6. To connect the spray wand with the trigger gun, press the wings of the spray wand into the slot of the trigger gun, then twist counterclockwise until the 2 parts are completely locked together (Fig. 6). Fig. 3 Fig. 6 Cord holder Spray wand Trigger gun Spray wand wings 7. Connect the high-pressure hose to the trigger gun. Twist to secure the connection (Fig. 7). 4. Slide the trigger gun holder into position (Fig. 4). Fig. 7 Fig. 4 Trigger gun Trigger gun holder High pressure hose 8.
mWARNING! Keep hose away from sharp objects. mCAUTION! The washer must only be used with clean water; use of unfiltered water containing corrosive chemicals will damage the washer. Bursting hoses may cause injury. Examine hoses regularly and replace if damaged. Do not attempt to mend a damaged hose. 9. Connect the garden hose adapter (female coupler) to the water inlet of the pressure washer, then thread your garden hose (male end) into the garden hose adapter (Fig. 9).
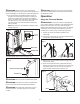
NOTE: The GFCI may need to be reset when first plugged into the electric outlet. Press the "Reset" button until the power light indicator on the GFCI illuminates when plugged in. Fig. 15 5. Turn the water supply tap on completely. 6. Release the safety lock, then press the trigger for a few seconds until the water flow is steady. Operating the pressure washer in this manner will allow air to escape and discharge residual pressure in the hose (Figs. 13 – 14). Fig. 13 ON/OFF switch 8.
To disconnect a nozzle from the spray wand once the cleaning job is complete: Fig. 18 1. Turn off the pressure washer and shut off the water supply. Pull the trigger to release water pressure. 2. Engage the safety lock on the trigger handle. 3. Remove the nozzle by disconnecting it while pulling back the brass Quick-Connect collar. mWARNING! Do not make changes to the nozzle while the trigger is engaged. Doing so could result in damage to the pressure washer or injury to the user.
Shutting down Fig. 21 Decrease soap volume 1. Turn the switch to the OFF (0) position and unplug the power cord from the outlet. Increase soap volume 2. Turn off the water source. 3. Hold the trigger to release water pressure. Adjustable cap Pencil jet 4. Disconnect the garden hose from the water inlet on the unit. Fan spray Adjustable nozzle 5. Disconnect the high-pressure hose connection on the trigger gun handle. 6. Release the trigger and engage the gun safety lock.
• Store the machine and accessories in a room that does not reach freezing temperatures. Fig. 24 • Do not store near a furnace or other sources of heat that may dry out the pump seals. 15º • Operate the pressure washer with non-corrosive/non-toxic anti-freeze, a pump saver, or a pump protector before storing for the winter. mWARNING! Before reusing, completely flush the Needle clean-out tool unit out with clear water.
Troubleshooting • Disconnect the unit from the electrical power supply before carrying out maintenance on the machine or when checking that its parts are in proper working order. • To avoid unnecessary hassles, consult the following table before contacting customer service with any mechanical issues. Problems Machine refuses to start Possible Cause Possible Solution • Power failure/machine not plugged into a working receptacle. • Check to make sure machine is plugged into a working outlet.
Optional Accessories mWARNING! ALWAYS use only authorized Snow Joe ® + Sun Joe® replacement parts and accessories. NEVER use replacement parts or accessories that are not intended for use with this electric pressure washer. Contact Snow Joe® + Sun Joe® if you are unsure whether it is safe to use a particular replacement part or accessory with your pressure washer. The use of any other attachment or accessory can be dangerous and could cause injury or mechanical damage.
16
17
18
sunjoe.