
Replacement Part List


8
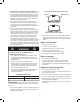
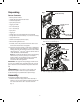
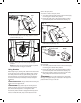
4. To assemble the spray wand protector, rst snap the tab
into the slot located at the bottom left side of the unit, and
then secure it in place with one 4.8 x 16 screw (Fig. 4).
5. Fit the spray wand into the trigger gun and rotate it until
the two parts are completely locked (Fig. 5).
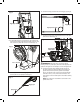
6. Connect the high-pressure hose to the trigger gun (Fig. 6).
7. Connect the other end of high-pressure hose to the water
outlet on the washer (Fig. 7).
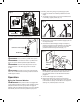
mWARNING! Keep hose away from sharp objects.
Bursting hoses may cause injury. Examine hoses regularly and
replace if damaged. Do not attempt to mend a damaged hose.
8. Connect the garden hose adapter (female coupler) to
the water inlet of the pressure washer, then thread your
garden hose (male end) into the garden hose adapter
(Fig. 8). The garden hose must have an internal diameter
of at least 13 mm (1/2 in.) and must be reinforced. The
water supply must be at least equal to the washer delivery
capacity.
NOTE: The machine is not suitable for connection to the
potable water main.
Fig. 3
Trigger gun holder
Fig. 4
Tab
Slot
4.8 x 16 screw
Fig. 5
Spray wand
Trigger gun
High-pressure hose
Trigger gun
Fig. 6
Fig. 7
High-pressure
water outlet
High-pressure
hose