
Replacement Part List


12
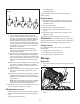
I) The 0º intense-jet nozzle (orange) is an extremely
powerful nozzle that delivers a high-pressure, pencil-
point jet stream. It is used to cut heavy dirt deposits
in a small, concentrated area. It is ideal for dissolving
stubborn substances, like tar and grease spots on
concrete, or for removing caked mud from equipment.
Use this nozzle to clean hard-to-reach areas including
the facades of 2-story buildings or the undersides of
lawn mowers and tractors.
NOTE: Care should be used when choosing the
right nozzle to avoid permanently gouging wood or
damaging fragile surfaces.
II) Use the 15º fan-tip nozzle (yellow) for intense cleaning
jobs on hard surfaces. Applications include stripping
paint, removing oil stains, grease, heavy mildew stains,
and rust from steel. This nozzle should only be used in
areas that can withstand the high-pressure from this
nozzle.
III) Use the 25º fan-tip nozzle (green) to clean home siding,
brick patios, wood decks, driveways, or sidewalks.
When using this nozzle, test a small area rst to avoid
surface damage.
IV) Use the 40º wide-spray tip nozzle (gray) to clean items
such as cars, trucks, boats, patio furniture, or lawn
equipment.
V) Use the Soap nozzle (black) for low-pressure detergent
application to clean equipment, remove mildew and
oxidation stains from houses, clean bricks or degrease
grimy surfaces.
NOTE: When using detergent, make sure to install the
correct Soap nozzle (black). All of the other colored
nozzles will not work for detergent application.
6. Start at the top of the area to be rinsed and work your way
down, making sure to overlap your strokes.
mIMPORTANT! NEVER USE:
• Bleach, chlorine products, and other corrosive chemicals
• Liquids containing solvents (e.g. paint thinners, gasoline,
oils)
• Tri-sodium phosphate products
• Ammonia products
• Acid-based products
These chemicals will harm the unit and will damage the
cleaning surface.
Shutting down
1. Make sure the pressure adjustable valve is closed. Turn
the switch to the OFF (0) position and unplug the power
cord from the outlet.
2. Turn o the water source.
3. Hold the trigger to release water pressure.
4. Disconnect the garden hose from the water inlet on
the unit.
5. Disconnect the high-pressure hose connection on the
trigger gun handle.
6. Release the trigger and engage the gun safety lock.
mWARNING! Turn o the water supply and squeeze the
trigger to depressurize the unit. Failure to do so could result in
personal injury due to discharge of high-pressure water.
Taking a break
If you are taking a break of two minutes or more between
cleaning tasks:
1. Engage the gun safety lock (Fig. 11).
2. Turn the switch to the OFF (0) position.
3. Unplug the power cord from the outlet.
Storage
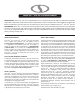
Hose Reel
1. Unlock the hose reel by pulling out on the hand crank out
(Fig. 20).
2. Turn the hand crank counterclockwise to wind the hose
(Fig. 21).
15º
SOAP
25º
40º
0º
Fig. 19
R
Fig. 20
Hand crank