
Use and Care Manual

9
• Double check to make sure the lters are not broken or
torn. Do not use lters that are broken or torn. Handle the
lters carefully when removing and installing.
• To reduce the risk of hearing loss associated with sound
level(s), hearing protection is required.
• Always direct the cord backwards, away from the unit.
• This unit is intended for indoor use only. Do not use this
unit outdoors.
• Be extremely careful when working on slopes and stairs.
• Always move forward by walking. Never run.
• Clean up after using the wet/dry vacuum. Dispose of
debris appropriately.
• Always use the handle for transporting the equipment.
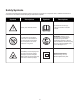
mWARNING! To avoid personal injury, wear ear
protectors when operating this unit. Wear a face mask or dust
mask in dusty locations.
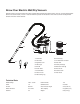
Air Inlet
Never cover the air inlets. Keep them free from obstructions
and debris. They must always remain clear for proper motor
cooling.
mWARNING! To avoid personal injury, do not wear loose
tting clothing or articles such as scarves, necklaces, chains,
ties, etc., that could get drawn into the air inlet. To make sure
long hair does not get drawn into the air inlet, tie back long
hair.
Basic Vacuum Procedures
mWARNING! Do not vacuum drywall dust, replace soot
or ash with the unit. This is very ne dust which will not be
captured by the lter and may cause damage to motor.
mWARNING! The cloth lter is only for dry vacuum. Make
sure the cloth lter is attached for dry cleaning, and DO NOT
use the cloth lter when vacuuming liquid.
mWARNING! The foam lter must be used for wet
vacuuming, and make sure to clean the foam lter after wet
vacuuming.
• Place the equipment on a level surface that is not heat
sensitive.
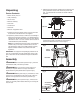
• Always use the vacuum hose for vacuuming. Hold the
vacuum hose at a distance of approximately 0.4 in. (1 cm)
above the material to be vacuumed.
mWARNING! When vacuuming large quantities of liquids,
do not immerse the brush attachment completely in the liquid;
leave a gap at the tip of the brush attachment opening to allow
air inow. The machine is tted with a oat valve that stops the
suction action when the collection tank reaches its maximum
capacity. You will notice a decrease in motor speed. When
this happens, turn o the machine, disconnect from power
supply, and drain the liquid into a suitable receptacle or drain.
To continue vacuuming, ret the collection tank with the power
head.
• To prevent overheating of the motor, stop the unit for one
minute after every 15 minutes of using.
• Turn o and unplug the unit after vacuuming, before
cleaning and maintenance. After wet vacuuming, empty
the collection tank, clean and dry the inside and outside
before storage.
• Empty the tank outside in order to avoid a mess.
• Clean or change the lters (see Maintenance section) if the
suction performance deteriorates.
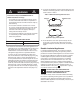
mWARNING! Never remove the power head without
rst turning the power switch to the OFF (O) position and
unplugging the unit from the main power source.
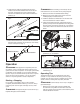
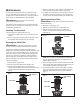
Releasing and Assembling the Power
Head
mWARNING! To prevent personal injury, make sure the
switch is in the OFF position and the unit is unplugged before
attaching or removing the power head.
1. To release the power head, grab the two lid locks and pull
outside to unlock. Then remove the power head
(Fig. 8).
2. To attach the power head, insert the tabs on each side of
the collection tank into the lid lock slots, and push rmly
to make sure the tabs are locked inside of the lid locks.
NOTE: The power head must be attached any time the
unit is being operated.
Fig. 8
Lid lock
Power head