
Use And Care Manual

10
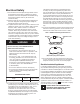
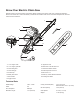
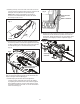
7. Remove all slack from the chain by turning the chain
tensioner screw clockwise until the chain seats snugly
against the bar with the drive links ush inside the bar
groove (Fig. 7).
NOTE: The chain is correctly tensioned when there is no sag
on the underside of the guide bar; the chain is snug, but can
be rotated by hand without binding. For more information on
chain tensioning, see the maintenance section beginning on
pg. 17.
8. Tighten the end cover nut completely using the hex key
wrench.
NOTE: If the chain is too tight, it will not rotate. Loosen the
end cover nut slightly and turn the chain tensioner 1/4 turn
counterclockwise. Lift the tip of the guide bar up and retighten
the end cover nut. Ensure that the chain can be rotated by
hand without binding.
NOTE: A new chain tends to stretch; check the chain tension
frequently, and adjust tension as required.
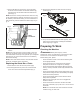
Replacing the Guide Bar + Chain
1. Disconnect the chain saw from the power supply.
2. Use the supplied hex key wrench to unscrew the end
cover nut to remove the chain/sprocket end (Fig. 1).
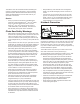
3. Remove the cutting bar and chain from the mounting
surface (Fig. 8).
4. Remove the old chain from the bar.
5. To lay out and install the new saw chain properly, follow
steps 2 to 6 from the section "Installing the Guide Bar +
Chain" beginning on page 8.
Preparing To Work
Checking the Machine
mWARNING! Before performing any checks,
adjustments, repairs, or maintenance on the machine, make
sure the unit is not connected to the power supply.
Before starting work, please:
• Check that all the screws on the machine and the guide
bar are tightly fastened;
• Check that the chain is correctly tensioned, properly
sharpened, and there are no signs of any damage;
• Check that hand grips and protection devices are clean
and dry, correctly mounted, and securely fastened to the
machine;
• Check that the trigger switch and the safety button move
freely without forcing and return automatically and rapidly
back to their neutral positions;
• Check that the trigger switch remains locked until the
safety button is pressed;
• Make sure the cooling air vents are not clogged with
sawdust or debris;
• Check that the chain’s oil level is not below the "MIN"
level mark; if necessary, top up the oil to 1 cm from the rim
of the ller.
NOTE: You must ll the chain oil tank with bar and chain
oil before using your chain saw.
Fig. 7
Chain tensioner
Blade
screwdriver
R
Fig. 8
Chain
Cutting bar