
Replacement Part List


8
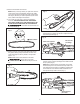
8. Tighten the chain tensioner screw only enough to hold the
bar and chain in place (Fig. 8), ensuring the chain is still in
place over the sprocket.
9. Install the sprocket cover by rst inserting the rear tab into
the rear tab slot, then positioning the cover onto the saw
head (Fig. 9).
10. Install the sprocket cover bolt and tighten by hand, leaving
the bar slightly free to move for further tension adjustment
(Fig. 10).
11. Remove all slack from the chain by turning the chain
tensioner screw (Fig. 8) clockwise until the chain seats
snugly against the bar with the drive links in the bar
groove.
NOTE: A cold chain is correctly tensioned when there
is no sag on the underside of the guide bar; the chain
is snug, but can be rotated by hand without binding.
For more information on chain tensioning, see the
maintenance section beginning on pg. 12.
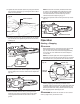
12. Tighten the sprocket cover bolt using the hex key wrench
(Fig. 11).
Operation
Starting + Stopping
mCAUTION!
• Before starting the saw, remove the oil tank cap and add
bar and chain oil to the top of the oil level window
(Fig. 12). One minute of use will consume approximately
0.15 oz (4 ml) of oil. Rell when the oil level drops to
1/4 of a tank.
NOTE: Your electric pole chain saw is equipped with an
automatic oil pump for bar and chain oiling. You must add
bar and chain oil or your pole chain saw will not function.
• Starting, stopping, and restarting an electric motor
repeatedly within a few seconds can generate a great deal
of heat and damage the motor. To protect the life of your
electric pole chain saw, always wait at least ve seconds
after stopping before restarting the saw.
mWARNING! Be certain that the chain is not in contact
with any object when you start the motor.
Fig. 8
Chain tensioner
Blade screwdriver
R
Rear tab
Fig. 9
Rear tab slot
R
Fig. 10
Sprocket cover
R
Fig. 11
Sprocket cover bolt
MIN
Fig. 12
Oil level
window
Minimum level mark
Oil tank cap