
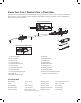
Replacement Part List

10
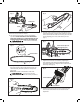
Chain Saw Assembly
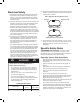
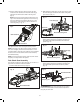
1. To remove the cutting head from the telescoping pole,
PULL the cutting head lock back to release, and grasping
the front hand grip, SLIDE UP to remove the cutting head
(Fig. 14).
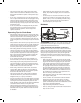
2. To remove the handle from the telescoping pole, pull the
handle lock back to release, and SLIDE DOWN to remove
the handle (Fig. 15).
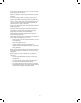
3. Connect the cutting head with the removable handle by
aligning their ends together and slide the cutting head
downward until it clicks into position (Fig. 16).
mWARNING! Always make sure that the handle lock is
locked securely before using the chain saw.
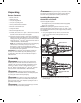
Operation
Starting and Stopping
mCAUTION!
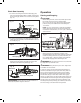
• Before starting the saw, remove the oil tank cap and add
bar & chain oil to the top of the oil level window
(Fig. 17). One minute of use will consume approximately
0.15 oz (4 ml) of oil. Rell when the oil level drops to
1/4 of a tank.
NOTE: Your 2-in-1 electric pole + chain saw is equipped
with an automatic oil pump for bar and chain oiling. You
must add bar and chain oil or your 2-in-1 pole + chain saw
will not function.
• Starting, stopping, and restarting an electric motor
repeatedly within a few seconds can generate a great deal
of heat and damage the motor. To protect the life of your
2-in-1 electric pole + chain saw, always wait at least ve
seconds after stopping before restarting the saw.
mWARNING! Be sure that the chain is not in contact with
any object when you start the motor.
mWARNING! Keep hands away from chain. Keep hands
on handles. Do not overreach.
A good, rm grip on the tool using both hands will help you
maintain control. When using as a pole chain saw, place one
hand on the soft grip and the other hand on the removable
handle with your thumbs and ngers encircling the pole and
handle. When using as a chain saw, maintain a rm grip by
placing your right hand on the rear handle and left hand on the
front handle with thumbs and ngers encircling the respective
handles. A rm grip combined with proper positioning of the
handle against your body will help you maintain control of the
saw. Do not let go of the saw while it is in operation.
R
Fig. 14
Removable cutting head
Cutting
head lock
Front hand grip
Fig. 15
Telescoping pole
Handle lock
Removable handle
R
Fig. 16
Removable
handle
Removable cutting head
R
Fig. 17
Oil level
window
Minimum level mark
Oil tank cap