
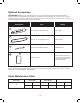
Replacement Part List


15
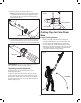
mWARNING! Pay special attention to where the branches
are lying on the ground and recognize the following risks:
1). the branches may be under tension; 2). the direction in
which the branch will fall may dier from that anticipated; 3).
the tree may be unstable after the branch has been cut.
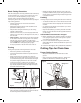
Bucking a Log
mWARNING! Do not buck logs that are larger than the
maximum cutting thickness.
Bucking is the process in which a log is cut into lengths. It is
important to make sure your footing is rm and your weight is
evenly distributed on both feet. When possible, the log should
be raised and supported by the use of limbs, logs, or chocks.
Follow these simple directions for easy cutting:
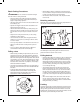
• When the log is supported along its entire length as
illustrated (Fig. 30A), cut from the top (overbuck).
• When the log is supported on one end (Fig. 30B), cut 1/3
the diameter from the underside (underbuck). Then make
the nishing cut by overbucking to meet the rst cut.
• When the log is supported on both ends (Fig. 30C), cut
1/3 the diameter from the top (overbuck). Then make the
nishing cut by underbucking the lower 2/3 to meet the
rst cut.
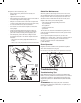
• It is easier to saw a log using the spiked bumper
(Fig. 30D).
– Dig the spiked bumper into the log and use it as a
pivot. Cut with an arched motion to make the bar
penetrate the wood.
– Repeat several times if necessary, changing the point
where you plant the spiked bumper.
1
2
1
Fig. 29
1
Fig. 30A
1
2
Fig. 30B
1
2
Fig. 30C
Fig. 30D
Spiked bumper
Spiked bumper