
Full Product Manual


9
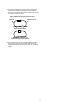
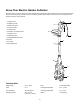
Changing the Tines
NOTE: The tines in the motor housing are provided by the
manufacturer. Only use tines that have been supplied by the
manufacturer. Ensure the tines are in good condition prior to
operation.
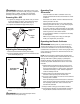
To replace the tines, using the following procedure:
1. Turn OFF the cultivator and unplug the power cord.
2. Place the unit on a at surface and stand in a safe
position.
3. Remove the locknut with a socket wrench and
disassemble the blades (Fig. 5).
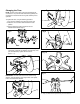
4. Remove the old blades while taking note of the sequence
of assembly. Install the new blades in the order they were
prior to disassembly. Tighten with the locknut.
(Figs. 6 – 11).
IMPORTANT:
The tines must be set in the correct turning
direction. Note the position of the original tines, and replace
them in the exact same direction.
5. Only use tines that are produced by the manufacturer.
Fig. 5
Blade
Fig. 6
Fig. 7
Fig. 8
Fig. 9
Fig. 10
Fig. 11