This unit has been reconditioned by Home and Power Company Do not return to the manufacturer Please contact us via email at info@homeandpower.com We will very happy to assist you Home and Power Customer care.
14-INCH 6.5-AMP ELECTRIC TILLER + CULTIVATOR Model TJ600E Form No. SJ-TJ600E-880E-MR1 OPERATOR’S MANUAL A Division of Snow Joe®, LLC IMPORTANT! 9. Do not abuse the cord – Never carry the garden tiller + cultivator by the cord or yank the cord to disconnect it from the receptacle. Keep the cord away from heat, oil, and sharp edges. Safety Instructions All Operators Must Read These Instructions Before Use 10. Moving parts – Keep hands and feet away from moving parts.
alignment of moving parts, binding of moving parts, breakage of parts, mounting, and any other condition that may affect its operation. A guard or other part that is damaged should be properly repaired or replaced. Contact the Snow Joe® + Sun Joe® customer service center at 1-866-SNOWJOE (1-866-766-9563) for assistance. • Ensure the controls (start/stop) function properly before cultivating. • Hold onto the tiller + cultivator with both hands during operation. Ensure the grips are dry.
Maintenance + Storage Before use, check that the extension cord is in good condition. When using an extension cord, make sure to use one heavy enough to carry the current your product will draw. For lengths more than 50 ft (15 m), a No.16 AWG (or greater) extension cord should be used. An undersized cord will cause a drop in line voltage resulting in loss of power and overheating. • Maintain or replace safety and instruction labels.
4. To prevent the appliance cord from disconnecting from the extension cord during operation, use the onboard extension cord restraint hook and/or make a knot with the two cords as shown in Table 1. Table 1. Method of Securing Extension Cord Cord set Appliance cord (A) Tie cord as shown (B) Connect plug and receptacle 5. Do not abuse the cord. Never pull the tiller + cultivator by the cord or yank the cord to disconnect it from the receptacle. Keep the cord away from heat, oil, and sharp edges.
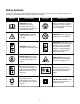
Safety Symbols The following table depicts and describes safety symbols that may appear on this product. Read, understand, and follow all instructions on the machine before attempting to assemble and operate. Symbols Descriptions Symbols Descriptions READ THE OPERATOR'S MANUAL(S) – Read, understand, and follow all instructions in the user manual(s) before attempting to assemble and operate. Wear eye protection, breathing protection, and ear protection (i.e.
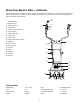
Know Your Electric Tiller + Cultivator Read the owner’s manual and safety instructions carefully before operating the electric tiller + cultivator. Compare the illustration below to the electric tiller + cultivator in order to familiarize yourself with the location of the various controls and adjustments. Save this manual for future reference. 2 1. Right handle grip 2. Appliance cord 3 4 1 3. Safety lock button 4. Trigger switch 6 5 5. Extension cord restraint hook 6. Left handle grip 7.
Unpacking Connecting the Handles NOTE: Reference to right or left side of the tiller is determined from behind the unit in the operating position. The “Operator’s position” is defined as standing directly behind the tiller. Carton Contents • Electric tiller + cultivator housing NOTE: Small parts can easily get lost during assembly or when making adjustments to the machine. To avoid this, secure all small parts that are removed from the box or machine and keep them accessible..
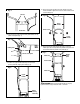
3. Secure the upper handle to the lower handle using the knobs and bolts. Tighten the knobs on each side to ensure a secure fit (Fig. 6). Fig. 3 Screws Fig. 6 Upper handle Knob + bolt Back View 3. Push the power cable into the cable guide located on the plastic cross plate (Fig. 4). Lower handle Fig. 4 4. Secure the power cable to the unit body by using the cable clips. Use one clip above the plastic cross plate and the second below the plastic cross plate (Fig. 7). Cable guide Fig.
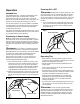
Operation Powering ON + OFF mWARNING! Rotating tines may cause serious injury. The Intended Use tines will continue to turn for a few seconds after the tool has been switched OFF. Do not touch the rotating tines. Contact with hot components (i.e. motor housing, gear box, etc.) on the machine may cause burns. Allow the machine to cool before handling.
Tilling Extensive vibration of the product during operation is an indication of damage. Immediately stop the motor and promptly inspect and repair the tool. • Make sure that the work area is clear of stones, sticks, wire, or other objects that could damage the product or its engine. After Use • Do not till very wet soil because wet soil tends to stick to the working tool, preventing proper tine rotation; it could also cause you to slip and fall.
• All nuts and bolts must be checked periodically for tightness before operation. After prolonged use, especially in sandy soil conditions, the working tool will become worn and lose some of its original shape. Tilling efficiency will be reduced and the working tool should be replaced. To replace the tines, follow the steps below: 1. Place the electric tiller on the ground. The rating label should be facing upward. 2. Remove the hex bolts and the self-locking nuts, then remove the steel blade tines (Fig.
Power Cord Fold + Storing 1. Loosen the handle knobs and fold the fork grips down (Fig. 13). If the power cord is damaged, it must be replaced in order to avoid a safety hazard. Contact your authorized Snow Joe® + Sun Joe® dealer or call the Snow Joe® + Sun Joe® customer service center at 1-866- SNOWJOE (1-866-766-9563). 2. Check to ensure the power cable is not pinched. Fig. 13 Repair This product does not contain any parts that can be repaired by the consumer.
Service + Support If your Sun Joe® Tiller Joe TJ600E electric tiller + cultivator requires service or maintenance, please call the Snow Joe® + Sun Joe® customer service center at 1-866-SNOWJOE (1-866-766-9563). Model + Serial Numbers When contacting the company, reordering parts, or arranging service from an authorized dealer, you will need to provide the model and serial numbers, which can be found on the decal located on the housing of the unit. Copy these numbers into the space provided below.
NOTES 14
HOME AND POWER RECONDITIONED PRODUCT LIMITED WARRANTY ABOVE ALL ELSE, Home and Power is dedicated to you, our customer. We strive to make your experience as pleasant as possible. Unfortunately, there are times when a product does not work or breaks under normal operating conditions. We think it's important that you know what you can expect from us. That's why we created the Home and Power promise. OUR PROMISE: Home and Power warrants re-conditioned product for 90-days from the date of purchase.