
User Manual


8
4. Slide the extension cord restraint holder onto the upper
handle (Fig. 3).
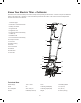
5. Connect the upper handle to the middle handle using the
second set of knobs and bolts (B). Tighten the knobs on
each side to ensure a secure t (Fig. 4).
6. Secure the cable inside the cable clip (Fig. 5).
mWARNING! Make sure all handle knobs are properly
tightened before using the electric tiller + cultivator.
Operation
Intended Use
The TJ602E electric tiller + cultivator is designated with a rated
input power consumption of 960 Watts.
Designed for small gardens and ower beds, this electric
tiller + cultivator eectively loosens and turns over new soil. It
may also be used to mix coarse soil with fertilizer, peat, and
compost. This product may not be used to till extremely dry or
wet soil.
The use of this product in rain or wet conditions is prohibited.
For safety reasons, it is essential to read the entire instruction
manual before rst use and to observe all the instructions
contained within this manual.
This product is intended for private domestic use only. It is not
intended for any commercial trade use. It must not be used for
any purposes other than those described.
Connecting to Power Supply
NOTE: For safety reasons, this product is equipped with a
short power cord. Do not connect the electric tiller + cultivator
directly to the power supply using this power cord. A proper
extension cord is required for operation. Observe the technical
requirements for this product when purchasing an extension
cord.
mWARNING! For your safety, it is required that the plug
attached to this electric tiller + cultivator be connected to an
approved extension cord. The extension cord must be suitable
for outdoor use, with all sockets protected against water
intrusion. Ensure the extension cord is of the proper
size and type for your product (≥ 1.5 mm²). Always use a
residual-current device (RCD), or residual-current circuit
breaker (RCCB) protected power supply.
Fig. 3
Extension
cord restraint
holder
Fig. 4
Knob + bolt
Middle handle
Lower handle
Upper handle
B
B
Fig. 5
Cable
Cable clip