
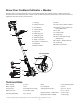
Replacement Part List


10
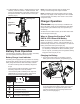
3. The battery will take approximately 80 minutes to charge.
The battery indicator LEDs will twinkle and illuminate one
by one during the charging process. Unplug the charger
immediately when the 3 LEDs are all illuminated.
mCAUTION! FIRE HAZARD. When disconnecting the
charger from the battery, be sure to unplug the charger from
the outlet rst, then disconnect the charger from the battery
Operation
Intended Use
The TJW24C cordless mini cultivator + weeder is designed
for small gardens and ower beds, this cordless cultivator +
weeder eectively loosens and turns over new soil. It may also
be used to mix coarse soil with fertilizer, peat, and compost.
This product may not be used to till extremely dry or wet soil.
The use of this product in rain or wet conditions is prohibited.
For safety reasons, it is essential to read the entire instruction
manual before rst use and to observe all the instructions
contained within this manual.
This product is intended for private domestic use only. It is not
intended for any commercial trade use. It must not be used for
any purposes other than those described.
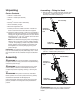
Telescoping Pole Adjustment
mWARNING! Always switch the product o and remove
the battery before making any adjustments.
This product is equipped with a telescoping pole that can be
adjusted. To adjust the pole, follow the instructions below.
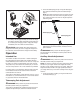
1. Unlock the telescoping pole by turning the telescoping
lock clockwise. Extend the pole to the desired length
(Fig. 6).
NOTE: Push poles toward each other to shorten the pole
or pull them away from each other to lengthen the pole.
Only extend the pole to the minimum length required to
reach the ground.
2. Lock the telescoping pole in position by turning the
telescoping lock counterclockwise, and ensure that the
pole is secured.
mWARNING! Always ensure the telescoping pole is
securely locked. Do not attempt to use the product with the
pole unlocked.
Auxiliary Handle Adjustment
mWARNING! Always switch the product o and remove
the battery before making any adjustments.
NOTE: For maximum comfort and control, adjust the auxiliary
handle to t your height. Shorter users adjust the auxiliary
handle to a lower position (away from your body). Taller users
adjust the auxiliary handle to an upper position (towards to
your body). Make sure your forearm is straight when using the
machine.
1. Loosen the auxiliary handle by turning the handle knob
counterclockwise (Fig. 7).
Fig. 5
Battery
indicators
Fig. 6
Telescoping lock
Telescoping pole