
Replacement Part List


13
Cleaning the Underbody + Working Tool
mWARNING! Wear safety gloves when working on or
near the working tool. Use appropriate tools (e.g a wooden
stick) when necessary; never use your bare hands!
• Keep the underbody and blade clean and free of debris.
Use a brush or another implement to remove soil from the
working tool.
• All nuts and bolts must be checked periodically for
tightness before operation. After prolonged use, especially
in sandy soil conditions, the working tool will become worn
and lose some of its original shape. Tilling eciency will be
reduced and the working tool should be replaced.
• Have worn or damaged working parts replaced with new
ones of the same type by a qualied technician.
• To prolong the life span of the working tool and the product,
lubricate the blade after each use.
mWARNING! Unexpected blade movement may cause
personal injury. Before servicing, repairing, or inspecting
the unit, turn the motor OFF and remove the battery. Wait
for the blade to completely stop rotating before conducting
inspection, cleaning, or maintenance.
Before and after each use, check the product and accessories
(or attachments) for wear and damage. When necessary, only
use identical replacement parts that are approved by the
manufacturer.
IMPORTANT!
• Wear protective gloves when cleaning or maintaining the
machine.
• Do not use cleaning uids or solvents or spray the
machine down with water (especially water under
pressure) when cleaning the machine.
NOTE: After each use, follow these steps to properly clean the
unit:
1. Remove soil, dirt, and foliage stuck in the blade, drive
shaft, tool surface, and vents with a brush or dry cloth.
2. Spray or rub biodegradable oil onto the blade.
3. Clean soiled grips with a damp cloth.
Always inspect the machine for damaged and worn parts after
each use. Check that safety features (i.e. labels, guards, etc.)
are in place. Check that nuts, bolts, and screws are tight.
Replace the Tilling Blade
The machine is tted with a 10 tine steel tilling blade that can
easily be changed. Only use the original replacement part
specied for this cultivator + weeder.
You can purchase a replacement blade (Model TJW24C-
BLADE) and other genuine replacement parts by visiting us
online at snowjoe.com or calling our toll-free customer service
helpline at 1-866-SNOWJOE (1-866-766-9563). The use of
parts that do not meet the original equipment specications
may lead to improper performance of the cultivator +
weeder, may compromise operator safety and will void the
manufacturer's warranty.
mWARNING! The tilling blade is sharp and can cause
severe personal injury if handled incorrectly. Wrap the blade or
wear protective gloves, and use extra caution when handling.
To replace the tines, follow the steps below:
1. Turn o the unit, remove the battery and wait until the
blade has come to a standstill.
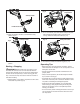
2. Using the provided wrench, remove the nut and the
washer used to x the tilling blade from the motor shaft,
then remove the old blade from the motor shaft (Fig. 12).
3. Insert the new steel blade on the motor shaft. Make sure
to align the notches on the blade hole with the notches on
the motor shaft, and press the blade rmly on the motor
shaft until it sits ush (Fig. 13).
Note: Failure to align the notches will cause the blade to be
unstable and wobble during use.
R
Fig. 12
Cultivator + weeder head
Steel blade
Nut
Motor shaft
Washer
Fig. 13
Steel blade
Motor shaftNotches on the shaft
Notches on
the blade
hole
Align
Align