
Computer Drive User Manual


62 Sun StorageTek 2500 Series Array Hardware Installation Guide • March 2007
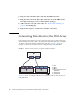
Powering On the Array
Use this procedure to turn power on for all trays installed in the cabinet (FIGURE 4-1).
Note – The order in which you power up the trays is important. Be sure to power
on the controller tray last in order to ensure that the disks in the expansion trays
have enough time to spin completely before being scanned by the redundant array
of independent disks (RAID) controllers in the controller tray.
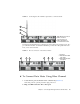
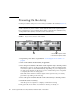
FIGURE 4-1 Tray Power Connectors and Switches
1. Prepare the power cables as specified in “Connecting the Power Cables” on
page 42.
2. Turn on the cabinet circuit breakers, if applicable.
3. Press the power switches at the back of each expansion tray to the On position.
While the tray powers on, the green and amber LEDs on the front and back of the
controller tray turn on and off intermittently. Depending on your configuration, it
can take several minutes for the tray to power on. When the power-on sequence
is complete, the LEDs are steady green.
Wait until all the disk drive indicator lights on the expansion trays are steady
green before proceding to the next step.
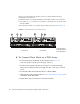
4. Press each power switch at the back of the controller tray to the On position.
5. Check the status of each tray.
After the power-on sequence is complete, confirm the following:
■ The green OK/Power LEDs on each drive in the tray are steady on.
Controller B
Controller A
1. Controller A power switch
2. Controller B power switch
1
2