
Server User Manual
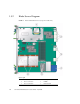
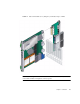
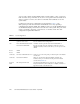

Table Of Contents
- Sun Netra™ CP3250 Blade Server User’s Guide
- Contents
- Figures
- Tables
- Preface
- Overview
- Hardware Installation and Service
- 2.1 Safety and Tool Requirements
- 2.2 Installing the Blade Server
- 2.3 Service Procedures
- 2.3.1 Hot-Swapping the Netra CP3250 Blade Server
- 2.3.2 Powering Off the Netra CP3250 Blade Server
- 2.3.3 Removing the Netra CP3250 Blade Server
- 2.3.4 Powering On the System
- 2.3.5 Automatic Power-Off Events
- 2.3.6 Servicing DIMMs
- 2.3.7 Installing the Optional Compact Flash Card
- 2.3.8 Installing Optional AMC
- 2.3.9 Adding or Replacing the Battery
- 2.3.10 Changing Jumper Settings
- 2.3.11 Checking DIP Switch Settings
- 2.3.12 Resetting the Netra CP3250 Blade Server
- Hardware Architecture
- Software Configuration
- Configuring and Using BIOS Firmware
- 5.1 About BIOS Settings
- 5.2 Changing the Configuration of a BIOS Menu Item
- 5.3 Setting the Boot Device Using BIOS Setup Screens
- 5.4 Setting Supervisor and User Passwords
- 5.5 Resetting the System Time and System Date
- 5.6 Updating the BIOS
- 5.7 Secondary BIOS Image
- 5.8 Perform a Live Firmware Upgrade
- 5.9 Power-On Self-Test
- 5.10 Changing POST Options
- BIOS Screens
- Physical Characteristics
- ShMM CLI and Commands
- Index

1-10 Sun Netra CP3250 Blade Server User’s Guide • April 2009
You can order a Netra CP32x0 ARTM, build a custom module, or buy one from an
IHV. You must set up a minimal set of I/O for a boot path for the host blade server
and for a path for console I/O to deliver commands and read blade server and
system status.
Possible boot and console configurations are described in
TABLE 1-1. Sun
Microsystems provides the Sun Netra CP3250 blade server and, optionally, a
compatible Netra CP32x0 ARTM. The ARTM provides one 10/100/1000BASE-T per
second Ethernet RJ-45 port from the host to the rear of the system. This port can be
used to accomplish, optionally, a network boot as a diskless client. The other
configurations require IHV hardware.
TABLE 1-1 I/O Configurations
I/O Hardware Required Description
Ethernet Netra CP32x0 ARTM, as an
option for rear access
The default boot path uses an Ethernet port; the blade server
runs in a diskless client configuration
SAS Netra 146-GB hard disk and the
Netra CP32x0 ARTM-HD
Available with the optional Netra CP32x0 ARTM-HD or
through an AMC with SAS capabilities. When the optional
ARTM is installed, connect to the drive(s) via SAS ports on the
ARTM.
Zone 3 ARTM
Zone 3 ARTM
Serial data
Serial data
Sun Netra CP3250 blade server
Netra CP32x0 ARTM
Serial port A on the front panel provides the path of the default
console I/O.
When an optional Netra CP32x0 ARTM is installed, the
module’s serial port A will become the path of the default
console I/O (
FIGURE 1-4).
Compact
Flash
IDE Compact Flash card Sun Netra CP3250 blade server supports one, optional IDE
Compact Flash drive, either 8-Gbyte or 16-Gbyte, installed in a
Type II CF socket on the blade server.