
Server User Manual
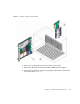
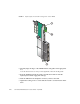


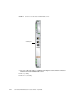
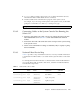

Table Of Contents
- Sun Netra™ CP3250 Blade Server User’s Guide
- Contents
- Figures
- Tables
- Preface
- Overview
- Hardware Installation and Service
- 2.1 Safety and Tool Requirements
- 2.2 Installing the Blade Server
- 2.3 Service Procedures
- 2.3.1 Hot-Swapping the Netra CP3250 Blade Server
- 2.3.2 Powering Off the Netra CP3250 Blade Server
- 2.3.3 Removing the Netra CP3250 Blade Server
- 2.3.4 Powering On the System
- 2.3.5 Automatic Power-Off Events
- 2.3.6 Servicing DIMMs
- 2.3.7 Installing the Optional Compact Flash Card
- 2.3.8 Installing Optional AMC
- 2.3.9 Adding or Replacing the Battery
- 2.3.10 Changing Jumper Settings
- 2.3.11 Checking DIP Switch Settings
- 2.3.12 Resetting the Netra CP3250 Blade Server
- Hardware Architecture
- Software Configuration
- Configuring and Using BIOS Firmware
- 5.1 About BIOS Settings
- 5.2 Changing the Configuration of a BIOS Menu Item
- 5.3 Setting the Boot Device Using BIOS Setup Screens
- 5.4 Setting Supervisor and User Passwords
- 5.5 Resetting the System Time and System Date
- 5.6 Updating the BIOS
- 5.7 Secondary BIOS Image
- 5.8 Perform a Live Firmware Upgrade
- 5.9 Power-On Self-Test
- 5.10 Changing POST Options
- BIOS Screens
- Physical Characteristics
- ShMM CLI and Commands
- Index

Chapter 2 Hardware Installation and Service 2-11
10. Install the Sun Netra CP3250 blade server into the front of the ATCA shelf in
the corresponding slot.
See Section 2.2.3.2, “Installing the Blade Server Into the Shelf” on page 2-11 for
instructions.
2.2.3.2 Installing the Blade Server Into the Shelf
Note – You can install the Sun Netra CP3250 blade server in any available slot in the
ATCA shelf except for slots 7 and 8.
1. If you have installed an advanced rear transition module (ARTM), go to the
front of the system and locate the corresponding slot number of the ARTM.
2. Remove the filler panel from the blade server slot, if necessary.
The filler panel is secured to the card cage using two screws, one at the top of the
filler panel, the other at the bottom. Store the filler panel in a safe place; you
might need to use it again if you remove a blade server for an extended time.
3. Prepare the Sun Netra CP3250 blade server by opening the injector/ejector
latches.
4. Carefully align the edges of the blade server with the guides in the appropriate
slot.
Look into the enclosure to verify correct alignment of the rails in the guides.
5. Keep the blade server aligned in the guides and slide the blade server in until
the injector/ejector latches engage the card cage.
6. Push the blade server slightly into the backplane connectors and close the
latches to seat the blade server in the connectors (
FIGURE 2-3).
Push the upper latch lever to engage the blade server. When the upper and lower
levers are engaged properly, the blue Hot-Swap LED blinks while the blade server
is initializing. The blue LED turns off and the green OK LED lights when the
blade server is ready for use.
Note – If the hot-swap LED does not light, then wiggle and push the latch so it
engages the hot-swap switch.