
Server User Manual

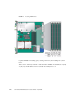
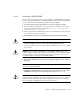
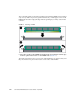
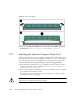
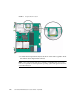
Table Of Contents
- Sun Netra™ CP3250 Blade Server User’s Guide
- Contents
- Figures
- Tables
- Preface
- Overview
- Hardware Installation and Service
- 2.1 Safety and Tool Requirements
- 2.2 Installing the Blade Server
- 2.3 Service Procedures
- 2.3.1 Hot-Swapping the Netra CP3250 Blade Server
- 2.3.2 Powering Off the Netra CP3250 Blade Server
- 2.3.3 Removing the Netra CP3250 Blade Server
- 2.3.4 Powering On the System
- 2.3.5 Automatic Power-Off Events
- 2.3.6 Servicing DIMMs
- 2.3.7 Installing the Optional Compact Flash Card
- 2.3.8 Installing Optional AMC
- 2.3.9 Adding or Replacing the Battery
- 2.3.10 Changing Jumper Settings
- 2.3.11 Checking DIP Switch Settings
- 2.3.12 Resetting the Netra CP3250 Blade Server
- Hardware Architecture
- Software Configuration
- Configuring and Using BIOS Firmware
- 5.1 About BIOS Settings
- 5.2 Changing the Configuration of a BIOS Menu Item
- 5.3 Setting the Boot Device Using BIOS Setup Screens
- 5.4 Setting Supervisor and User Passwords
- 5.5 Resetting the System Time and System Date
- 5.6 Updating the BIOS
- 5.7 Secondary BIOS Image
- 5.8 Perform a Live Firmware Upgrade
- 5.9 Power-On Self-Test
- 5.10 Changing POST Options
- BIOS Screens
- Physical Characteristics
- ShMM CLI and Commands
- Index

Chapter 2 Hardware Installation and Service 2-21
2.3.6.2 Installing a DDR2 DIMM
The following procedure provides a general guide for installing additional memory.
However, for specific directions on installing DIMMs on the Sun Netra CP3250 blade
server, refer to the documentation that shipped with the DIMMs.
1. Access the blade server by performing one of the following procedures:
■ If the Sun Netra CP3250 blade server is installed in an ATCA shelf, remove the
blade server from the shelf as explained in Section 2.3.3, “Removing the Netra
CP3250 Blade Server” on page 2-18.
■ Remove the Sun Netra CP3250 blade server from its antistatic envelope and place
it on an ESD mat near the ATCA shelf.
2. Take antistatic precautions: Attach and electrically ground the wrist strap.
Caution – Always wear a grounded antistatic wrist strap when handling DIMMs.
3. Locate the DIMM connectors on the Sun Netra CP3250 blade server.
Select the connectors where you will install the DIMM. See
FIGURE 2-5 for DIMM
slot locations.
Caution – Do not remove the DIMM from its antistatic container until you are
ready to install the DIMM on the Sun Netra CP3250 blade server. Handle the DIMM
only by its edges. Do not touch DIMM components or metal parts. Always wear a
grounded antistatic wrist strap when handling DIMM.
4. Remove the DIMM from its protective packaging, holding the module only by
the edges.
Note – Before installing a replacement DIMM, verify that the new DIMM is the
same size as its paired DIMM.
5. Holding the DIMM upright to the blade server, insert the bottom edge of the
DIMM into the bottom of the slot’s hinge-style connector (
FIGURE 2-6).
Caution – Evenly engage the DIMM in its hinge-style slot; uneven contact can
cause shorts that will damage the Sun Netra CP3250 blade server. Do not rock the
DIMM into place. Ensure that all contacts engage at the same time. You will feel or
hear a click when the DIMM properly seats in the connector.