
Server User Manual
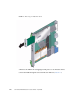
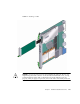


Table Of Contents
- Sun Netra™ CP3250 Blade Server User’s Guide
- Contents
- Figures
- Tables
- Preface
- Overview
- Hardware Installation and Service
- 2.1 Safety and Tool Requirements
- 2.2 Installing the Blade Server
- 2.3 Service Procedures
- 2.3.1 Hot-Swapping the Netra CP3250 Blade Server
- 2.3.2 Powering Off the Netra CP3250 Blade Server
- 2.3.3 Removing the Netra CP3250 Blade Server
- 2.3.4 Powering On the System
- 2.3.5 Automatic Power-Off Events
- 2.3.6 Servicing DIMMs
- 2.3.7 Installing the Optional Compact Flash Card
- 2.3.8 Installing Optional AMC
- 2.3.9 Adding or Replacing the Battery
- 2.3.10 Changing Jumper Settings
- 2.3.11 Checking DIP Switch Settings
- 2.3.12 Resetting the Netra CP3250 Blade Server
- Hardware Architecture
- Software Configuration
- Configuring and Using BIOS Firmware
- 5.1 About BIOS Settings
- 5.2 Changing the Configuration of a BIOS Menu Item
- 5.3 Setting the Boot Device Using BIOS Setup Screens
- 5.4 Setting Supervisor and User Passwords
- 5.5 Resetting the System Time and System Date
- 5.6 Updating the BIOS
- 5.7 Secondary BIOS Image
- 5.8 Perform a Live Firmware Upgrade
- 5.9 Power-On Self-Test
- 5.10 Changing POST Options
- BIOS Screens
- Physical Characteristics
- ShMM CLI and Commands
- Index
2-30 Sun Netra CP3250 Blade Server User’s Guide • April 2009
6. Carefully push the AMC into the AMC connector.
7. Refer to the AMC documentation for software and cabling installation
instructions.
2.3.9 Adding or Replacing the Battery
The Sun Netra CP3250 blade server does not ship with the battery. If you want
CMOS settings to be preserved in the event of power loss, obtain and install the
battery.
The battery must be type CR1632, with a minimum of 4ma abnormal charging
current rating (for example; a Renata CR1632).
Caution – Risk of explosion if the battery is replaced by an incorrect type. Dispose
of used batteries properly in accordance with manufacturer’s instructions and local
regulations.
To install the battery:
1. Remove the old battery, if necessary.
2. Slide the new battery into the holder with the side labeled “+” facing up.