Sun Blade™ X6275 Server Module Windows Operating System Installation Guide Sun Microsystems, Inc. www.sun.com Part No. 821-0081-10 September 2009, Revision A Submit comments about this document by clicking the Feedback[+] link at: http://docs.sun.
Copyright © 2009 Sun Microsystems, Inc., 4150 Network Circle, Santa Clara, California 95054, U.S.A. All rights reserved. This distribution may include materials developed by third parties. Sun, Sun Microsystems, the Sun logo, Sun Blade, Sun Blade X6275 Server Module and Sun company logo are trademarks or registered trademarks of Sun Microsystems, Inc. or its subsidiaries, in the U.S. and other countries.
Contents Preface 1. v Overview 1 Installing the Windows OS onto a Sun Blade X6275 Server Module Prerequisites 2 Things You Must Decide What to Do Next 2 2 Using a Remote Control Application (RKVM) ▼ 2.
3. Post Installation 17 Downloading Server-Specific Drivers ▼ 18 To Download the Server-Specific Drivers Installing Server-Specific Device Drivers ▼ A.
Preface This guide contains instructions for installing the Windows Server 2008 64-bit Service Pack 2 (SP2) onto the Sun Blade X6275 Server Module. Product Updates For product updates that you can download for the Sun Blade™ X6275 Server Module, visit the following web site: http://www.sun.com/download/ Find the Hardware Drivers section and click x64 Servers & Workstations. The Sun Blade X6275 Server Module site contains updates for firmware and drivers, as well as DVD-ROM ISO images.
vi Title Content Part Number Format Sun Blade X6275 Server Module Product Notes Late-breaking information about the server module 820-6853 PDF HTML Sun Blade X6275 Server Module Getting Started Guide Basic installation information for setting up the server module 820-6847 PDF Print Sun Blade X6275 Server Module Installation Guide Detailed installation information for setting up the server module 820-6977 PDF HTML Print Sun Blade X6275 Server OS Installation Guide Installation instructions
Translated versions of some of these documents are available at the web site described above in French, Simplified Chinese, and Japanese. English documentation is revised more frequently and might be more up-to-date than the translated documentation. Documentation, Support, and Training Sun Function URL Sun Documentation http://docs.sun.com Support http://www.sun.com/support/ Training http://www.sun.
viii Sun Blade X6270 Server Module Windows Operating System Installation Guide • September 2009
CHAPTER 1 Overview This chapter provides instructions for tasks you must complete before you begin installing the Windows Server 2008 64-bit operating system onto a Sun Blade X6275 server module.
Prerequisites Complete the following tasks before you begin the installation. ■ Install the server hardware. ■ (Optional) Configure the service processor. ■ Gather needed information, such as IP address and netmask. Things You Must Decide ■ Where will you install the OS? You can install an OS using the flash module, which is similar to a hard drive. See the Sun Blade X6275 Server Module Service Manual for instructions to access the flash module.
Using a Remote Control Application (RKVM) The Sun Blade X6275 server module supports industry-standard RKVM with devices connected to it through the service processor. This ability allows you to mount and boot from a remote DVD, or an ISO file image. ▼ To Mount a DVD or Equivalent ISO Image 1. Locate your installation DVD or the equivalent ISO images. 2. To connect to the ILOM: a. Open a web browser and use the ILOM IP address as a URL. b. Enter an ILOM user name and password. The Versions screen appears.
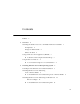
Dongle Cable Connections If you choose to do a local installation, you must connect a dongle cable directly to the server module. ▼ To Connect the Dongle for a Local Installation 1. Connect a USB hub to one of the USB connectors on the dongle. See FIGURE 1-1. 2. Connect a keyboard, mouse, and DVD drive to the USB hub or to the other USB connector. 3. Connect a monitor to the VGA port.
Figure Legend 1 Dual USB connectors. 2 RJ-45 connector. This connector provides serial access to the ILOM. 3 VGA video connector.
6 Sun Blade X6270 Server Module Windows Operating System Installation Guide • September 2009
CHAPTER 2 Installing Windows Server 2008 Operating System This chapter provides information about installing the Windows Server 2008 Operating System (OS).
Task Map for the Windows Server 2008 Installation Use TABLE 2-1 to preview the installation process defined as a series of tasks. The table defines the required tasks, describes them, and provides pointers to the instructions for performing that task. TABLE 2-1 Step Task Map for the Windows 2008 Installation Task Description Relevant Topic(s) 1 Review installation prerequisites Verify that all applicable requirements are • “Prerequisites” on page 2 met for installing an operating system to a server.
Installing Windows Server 2008 Using Local or Remote Media The following procedure describes how to boot the Windows Server 2008 operating system from local or remote media.
■ From the ILOM web interface, select Reset on the Remote Power Control tab. ■ From the local server, press the Power button on the front panel of the server to power off the server, then press the Power button again to power-on server. ■ From the ILOM CLI on the server SP, type: reset /SYS ■ From the ILOM CLI on a CMM, type: reset /CH/BLn/SYS Where n is the number of server module in chassis. The BIOS screen appears. 3.
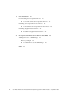
6. In the Installation Type dialog, click Custom (advanced). The Where Do You Want to Install Windows dialog appears: 7. In the Where do you want to Install Windows dialog, do one of the following: ■ If you do not want to override the Windows Default partition information, click Next then skip to Step 9.
■ If you do want to override the Windows default partition information, click the Driver Options (advanced) option and proceed to Step 8. Caution – Formatting or re-partitioning a pre-existing partition will destroy all data on the partition.
8. In the Where to Install Windows dialog, do the following: a. Click Delete to delete the existing partition. A confirmation window appears. b. Click OK to confirm the partition deletion. c. Click New to create the new partition. d. Change partition size settings as needed, and then click Apply. The partition is created. e. Click Next and proceed to the next step. The Windows installation begins. The server will reboot multiple times during the installation process. This process could take several minutes.
Installing Windows Server 2008 Using a PXE Network This section explains the initial information you will need to install the Windows Server 2008 operating system over an established PXE-based network via a customer-provided Windows Deployment Services (WDS) image.
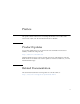
▼ To Install Windows Server 2008 Using PXE 1. Reset or power on the server, for example: ■ From the ILOM web interface, select Reset on the Remote Power Control tab. or ■ Press the Power button (approximately 1 second) on the front panel of the blade to turn off the blade, then press the Power button again to turn on the blade. The BIOS screen appears. Note – The next events occur very quickly; therefore, focused attention is needed for the following steps.
The Boot Agent dialog appears: 4. Continue the normal Windows Server 2008 WDS network installation. For additional information, consult Microsoft’s Windows Deployment Services product documentation. 5. Proceed to “Post Installation” on page 17.
CHAPTER 3 Post Installation After completing the Windows Server installation and rebooting the operating system, you should review the following post installation tasks and, if necessary, perform the tasks that are applicable to your system.
Downloading Server-Specific Drivers This section describes how to download the server-specific driver packages needed for Windows Server installations. Note – The Sun Blade X6275 Tools and Drivers DVD contains all of the serverspecific drivers required for Windows Server installations. If you are using the Tools and Drivers DVD, you can you can skip this section and proceed to “Installing Server-Specific Device Drivers” on page 19.
Note – The _x_x_x number identifies the version of the package (for example, FloppyPack_1_1_4.zip). 3. Proceed to “Installing Server-Specific Device Drivers” on page 19. Installing Server-Specific Device Drivers Sun provides a wizard to install Sun server-specific device drivers and supplemental software. The Sun Server Installation Package wizard may be started from one of the following locations: ■ The main menu of your server’s Tools and Drivers DVD. ■ The InstallPack_x_x_x.exe executable file.
▼ To Install the Server-Specific Device Drivers 1. Start the Sun Installation Package software using one of the following methods: ■ Access the Tools and Drivers DVD or ISO using RKVM, remote DVD drive, or a USB DVD drive. The DVD will automatically start. At the main menu, select Install Drivers and Supplemental Software. Or ■ If you downloaded the InstallPack_x_x_x.exe file from the Sun download site, ensure that it has been copied to a local drive on the server, and then run the InstallPack_x_x_x.
3. In the Install Pack notice dialog box, read the message then click Next. 4. In the End User License Agreement page, select “I accept this agreement”, and then click Next. The platform-specific drivers are installed. A green check mark verifies that each driver has been successfully installed. 5. In the Driver Installation Pack dialog box, click Finish. The System Settings Change dialog box appears.
Note – If you plan on installing Supplemental Software (highly recommended), do not restart your system at this time. Once the Supplemental Software has been installed, you will be prompted to restart the system. 6. Perform one of the following: ■ If you accepted the default installable settings in Step 2, click No to proceed to “Installing Supplemental Software” on page 22. ■ If you are not installing the Supplemental Software, click Yes to restart your computer.
■ If you did select Supplemental Software at the Sun Server Installation Package dialog box in Step 2 of “Installing Server-Specific Device Drivers” on page 19, and selected No in Step 6, the supplemental software dialog box appears. Proceed to the next step. 2. In the Install Pack Supplement Software dialog box, click Next to accept the Typical settings, or select Custom to choose the options to install.
24 Sun Blade X6270 Server Module Windows Operating System Installation Guide • September 2009
APPENDIX A Incorporate Sun Blade Server Drivers Into WIM This appendix is intended for advanced system administrators who need to incorporate the server-specific drivers into a Windows Imaging Format (WIM) image. ■ WIM files are installed using Windows Deployment Services (WDS). For more information on WDS, refer to Microsoft documentation. Adding Drivers to a WIM Image The procedures in the section assume the Windows Deployment Services are running on Windows Server 2008.
▼ To Add Drivers to the WIM Image 1. Extract the contents of Windows Server 2008 DriverPack_x_x_x.zip to a network share (for example: \\yourshare\share\DriverPack), making sure to maintain the directory structure. 2. Select the service image to update and export the image. a. Click Start, click Administrative Tools, and then click Windows Deployment Services. b. Find the image to service. Right-click the image and then click Disable. c. Right-click the image and select Export Image.
8. Save the answer file and exit Windows SIM. The answer file must be similar to the following sample. The sample assumes the architecture is 64-bit. PAGE 36a. If the Windows Deployment Services snap-in is not running, click Start, click Administrative Tools, and then click Windows Deployment Services. b. Locate the image to service. Right-click the image and select Replace Image. Follow the Wizard directions to replace the service image with the Windows image that was updated. c. Right-click the service image and select Enable. The service image is now available and all the server-specific drivers are added to the image.
Index D V dongle cable, 4 driver updates, v DVD ISO image, 3 VGA port, 4 F firmware updates, v W Windows Server 2008 installation using local or virtual media, 9 Windows Server 2008 Operating System using a PXE Network, 14 I installation task map Windows 2008, 8 installing an operating system overview, 1 ISO image, 3 L Local Media, Install Using, 9 P prerequisites for OS installation, 2 product updates, v R remote access via RKVM, 2, 3 Remote Media, Install Using, 9 RKVM, 2, 3 U USB device connec
30 Sun Blade X6270 Server Module Windows Operating System Installation Guide • September 2009