
Installation Guide
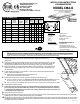

CURB O.D.
Roof
Opening
Finished
Opening
SIZE INFORMATION Fastener Schedule
Size
Code Roof Opening
Finished
Opening
(Drywall
Dimension)
Curb Outside
Dimension
Fits on
Center
Spacing
SKYLIGHT
TO CURB
#12 x 2
Phillips Pan
Head Screws
CURB TO
DECK
#10 x 2½”
Deck Screws
DECO TO
POLY
3/16"
x ¾"
Rivets
Long
Side
Short
Side
Long
Side
Short
Side
Long
Side
Short
Side
2269 22½” x 69½” 21½” x 68½” 25½” x 72½” 24” 5 3 7 3 12 4
3030 30½” x 30½” 29½” x 29½” 33½” x 33½” 16” or 32” 3 3 3 3 6 6
3046 30½” x 46½” 29½” x 45½” 33½” x 49½” 16” or 32” 4 3 5 3 9 6
3069 30½” x 69½” 29½” x 68½” 33½” x 72½” 16” or 32” 5 3 9 4 12 6
3636 36½” x 36½” 35½” x 35½” 39½” x 39½” 16” or 32” 4 4 4 4 7 7
4646 46½” x 46½” 45½” x 45½” 49½” x 49½” 16”, 24”, 48” 4 4 5 5 9 9
4669 46½” x 69½” 45½” x 68½” 49½” x 72½” 16”, 24”, 48” 5 4 10 6 15 9
4689 46½” x 89½” 45½” x 88½” 49½” x 92½” 16”, 24”, 48” 5 4 13 6 15 9
MODEL CMA-D
Use on any type roof (curb required)
2224 - 3/14
Sun-Tek Manufacturing, Inc.
10303 General Drive
Orlando, FL 32824
407 / 859-2117
www.Sun-Tek.com
CustomerService@Sun-Tek.com
INSTALLATION INSTRUCTIONS
POLYDOME SERIES
You will need:
• hammer • sealant/mastic
• keyhole saw • tape measure
• skill saw • chalkline or straight edge
• nails • trowel or caulk gun
• drill • utility knife
• 2 x 4’s
For Light Tunnel:
• 8 or 10 penny nails
• plywood or drywall
RECOMMENDED SEALANTS:
• 100% Silicone
• Sealants approved for use on
polycarbonate (contact Sun-Tek
• STS 1000 (Sun-Tek exclusive) Butyl
rubber sealant/caulk
1.
Inspect skylight for damage before installing. Peel back protective plastic to inspect dome.
If skylight is damaged, do not install. Please contact your supplier for information on a
replacement.
2.
To properly position skylight between trusses/rafters, locate the roof opening from the underside
of the decking. Drill holes or drive nails to mark corners. (If this area is not accessible, locate the
ceiling joists from inside the house, mark and cut opening in ceiling, then mark roof opening.)
3.
Remove shingles 6 - 8" out from roof opening. Before cutting roof opening, check measurements
against size chart. Snap a chalkline from corner to corner, or draw line with a straightedge, then
cut roof opening.
4.
Frame roof opening using 2 x 4’s as headers - cut two 2 x 4’s to fit the actual distance between
trusses / rafters and nail into place.
a. If applicable, cut ceiling opening and build tunnel framing.
See “Light Tunnel Installation Instructions.”
5.
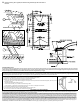
Build curb (or use Sun-Tek’s pre-built, pre-flashed insulated “Labor Saver” Curb)
a. Construct curb with 2x4’s, 2x6’s, etc. (depending on height desired or building code requirements). Curb should
be minimum 4"3½" high. Be sure inside measurement of curb is the same as roof opening measurement.
b. Secure curb to roof per local building codes. Build curb as shown in drawing. This is the tested/approved method.
6.
Shingle roof up to bottom of curb.
7.
Flash curb (or use Sun-Tek’s pre-formed, pre-cut Step Flash Kit with one-piece head and sill. Step flash
for 2x4 curb only!). Use galvanized sheet metal, aluminum, or copper. Metal should extend a minimum of
4" over shingles (on bottom side), then up sides of curb. Flashing should be flush with curb top. Flash curb
to comply with Florida building code.
8.
Shingle up sides and across the top.
9.
Apply a ½" wide bead of caulking on top of the curb around the entire perimeter. Sealant applied too close to the opening may “ooze” into
the opening. Can also use 1" wide by 1/8" thick butyl tape, if compatible.
10.
Set skylight over opening with the "THIS EDGE DOWN" label at the bottom of the opening. Screw into place through the pre-drilled holes in
the flange with the #12 x 2" phillips pan head screws provided (See Fastener Schedule). Fasteners must be perpindicular to the curb. Every
installation hole must have a fastener.
FAILURE TO FOLLOW RECOMMENDED INSTALLATION PROCEDURES MAY VOID WARRANTY
Please read instructions completely before beginning. Deck and roong felt should already be installed.
All installation information is supplied in good faith, but without recommendation to its use. No guarantee of the results of any use of this information is to be
implied, since conditions of use are beyond our control. Please consult local building codes for compliance before installing.
4