advanced bark control collar STATIC INSTRUCTION Manual
IMPORTANT SAFEGUARDS • This device should only be used for bark deterrent training of dogs. • This device is not a toy; keep out of reach of children. • This device is not intended to provide protection against aggressive dogs. • Your dog should be in good health when using this product. • This product is not to be used on dogs less than 9 lbs. • This product is not to be used on dogs less than 6 months old. • Your dog should not be left unattended with this collar on.
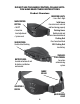
DO NOT USE THIS BARK CONTROL COLLAR UNTIL YOU HAVE READ THESE INSTRUCTIONS Product Overview: INDICATOR LIGHTS: • Low • Med • High MAIN CONTROL BUTTON: Solid Green: Correction level selected and functioning properly • On/Off • Correction level adjustment • System reset Flashing Green: Bark detected and correction administered Flashing Red: Over Correction Mode SENSOR PROBE: Used to detect barking All 3 Flashing Red: Low battery STAINLESS STEEL PROBES: Correction administering system BATTERY DOOR: Loca
How it Works: The Sunbeam® Advanced Bark Control Collar has a proprietary bark detection system that uses sensors and a voice mapping system to determine barking behavior. This specially designed system ensures that a correction is administered only when unwanted barking behavior is occurring. The system also has been designed to prevent continuous corrections if excessive barking is detected. An Over Correction Mode causes the system to turn off and automatically resets.
• When replacing batteries after usage you must completely discharge the collar by holding a plastic handle screwdriver across both stainless steel probes for 5 seconds. Make sure the metal portion of the screwdriver is touching both stainless steel probes and the unit is in the OFF position. figure 4 COLLAR FITTING Proper fit of the Sunbeam® Advanced Bark Control Collar is essential to establish a good training foundation and optimal performance.
Use a wrench when assembling or disassembling the stainless steel probes, do not over tighten. (fig. 6) STEP 3: Close and lock clasp. (fig. 7) STEP 4: Adjust for proper fit by pulling on strap until you can fit two fingers in between your dog’s neck and the collar. (fig. 8) Note: Verify that the sensor probe is directly over the dog’s voicebox. The collar should be firm but not excessively tight. STEP 5: Let your dog wear the product for sufficient time confirming that they are moving around normally.
The Sunbeam® Advanced Bark Control Collar has been designed to maximize battery life and has a SLEEP MODE that it enters if no user input or barking is detected. STEP 2: Set correction level by pressing and holding (approximately 2 seconds) the Main Control Button until a green LED illuminates at the desired setting. When a green LED is illuminated press once the Main Control Button to toggle to the next correction level.
Each dog can have a different reaction from the bark control collar’s correction. These reactions can vary from a dip of the head, to shaking the head, whining, excessive barking, confusion, or running away. In the event of an extreme reaction, wait until your dog is calm before approaching your dog. The reaction your dog will have is dependent on your dog’s personality. The first several times you use the bark control collar, you must be present.
• Check the fit of the collar several times per day • Wipe the Stainless Steel Probes weekly with a damp cloth while collar is in off position Note: The Lithium coin batteries used in this product contain perchlorate material. Special handling may apply in California. Go to: www.dtsc.ca.gov/ hazardouswaste/perchlorate for more information.
defects in material and workmanship. JCS, at its option, will repair or replace this product or any component of the product found to be defective during the warranty period. Replacement will be made with a new or remanufactured product or component. If the product is no longer available, replacement may be made with a similar product of equal or greater value. This is your exclusive warranty. DO NOT attempt to repair or adjust any electrical or mechanical functions on this product.