Instruction Manual MIXMASTER” STAND MIXER M a n u e l d’instructions BATTEUR DE PIiDESTAL MIXMASTER” Manual de Instrucciones MIXMASTER” BATIDORA DE PEDESTAL Manual de Instrucoes MIXMASTER” BATEDEIRA DE PEDESTAL
IMPORTANT SAFEGUARDS When using electrical appliances, basic safety precautions should always be followed including the following: 1. READ ALL INSTRUCTIONS BEFORE USING THE MIXER. 2. To protect against risk of electrical shock, do not put Mixer in water or other liquid. This may cause personal injury or damage to the product. 3. Close supervision is necessary when Mixer is used by or near children or incapacitated persons. 4.
11. Do not place Mixer or bowls on or near a hot gas or electric burner, or in a heated oven. 12. Do not use Mixer for other than intended use. 13. Do not leave Mixer unattended while it is operating. SAVE THESE INSTRUCTIONS THIS UNIT IS FOR HOUSEHOLD USE ONLY When your Mixmaster® Mixer is first used, you may experience an odor and possibly a slight wisp of smoke from your mixer motor. This is caused by the heat curing of the insulation which protects the motor and is normal.
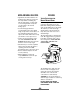
FEATURES Thank you for choosing the SUNBEAM’ MIXMASTER” Mixer. For generations we have been helping cooks prepare moist cakes, light and fluffy meringue and chewy cookies. You can even make bread dough with your SUNBEAM’ MIXMASTER” Mixer. The SUNBEAM” MIXMASTER” Mixer offers a choice of 12 different mixing speeds. The bowl-fit beaters and bowls have been designed to mix ingredients thoroughly and evenly. 1.
As you release pressure from the mixer-release trigger, the top of the latch should clamp around the metal pivot. Once the mixing head is lowered into position, it will lock into place. To raise the mixing head, press the head lock button downward while pulling up on the handle of the mixing head. Once unlocked, the mixing head can be removed by pressing the mixer release trigger.
ATTACHING THE BEATERS Be sure the speed control dial is in the OFF position and unplug electric cord from the electrical outlet. Lift mixer head up and back to pull it out of the way of the bowl. Side of Bowl Conical Beater Square Beater Insert the beaters, one at a time, using a combination pressing and twisting motion, until the beaters snap into position. If a beater should not properly snap into place, pull it out of the socket and rotate it one quarter turn.
The dough hook with the small washer and foot goes into the socket on the side of the mixer nearest the side of the bowl. The other dough hook with the large washer goes into the socket nearest the center of the bowl. See the dough hook symbols located on the bottom of the mixer head. OPERATING INSTRUCTIONS ABOUT THE SPEED CONTROL DIAL The speed control dial is used for turning the mixer ON and OFF and for selecting its 12 mixing speeds.
MIXING GUIDE The speed control guide on your mixer has been designed to help you take the guess work out of preparing foods. Use the chart below to determine the best setting to use when preparing your favorite recipes. SPEED SETTING MIXING GUIDE 1 Fold-Kneaded 2 Stir 3 Blend 4 Mix 5 Combine 6 Cake Mixes 7 Cream Use when creaming sugar and butter together. 8 Whip Use to whip potatoes or to develop a smooth batter. 9 Whip/Cream 10 Desserts Use to beat air into whipped desserts.
STORING YOUR MIXER CARING FOR YOUR MIXER After you’ve finished mixing, turn the speed control dial to OFF and unplug the electric cord from the electrical outlet. Push the ejector button located near the handle to remove beaters or dough hooks. Scrape excess batter off the beaters using a rubber or plastic spatula. Do not strike beaters on the rim of the bowl. Store the mixer in a dry location, such as on a counter top or table top, or in a closet or cupboard.
MIXING AND BAKING SUGGESTIONS BREADS • Ingredients should be added to the mixing bowl as they are specified in the recipe. When combining dry and wet ingredients, you may wish to moisten ingredients on Speed 1 or 2, then turn to the desired mixing speed. • Use the mixing speed that is recommended in the recipe. When using a recipe that is not in this book, use the handy mixing guide on the speed control dial of the mixer to help you find the correct speed to use.
Do not attempt to scrape the bowl while the mixer is operating. Stop the mixer and scrape the sides of the bowl as necessary. Use a rubber or plastic spatula only. BREAD MAKING INSTRUCTIONS FOR UNITS WITH DOUGH HOOKS Ingredients should be added to the mixing bowl as they are specified in the recipe. Combine a small portion of the dry ingredients with the wet ingredients. Mix on Speed 6. Continue adding dry ingredients until the mixture becomes sticky, then turn to Speed 1.
DOUGH RISING TIPS HOW TO SHAPE DOUGH FOR A LOAF PAN A large, well-greased, glass mixing bowl is an excellent container in which to raise or proof yeast dough. The ideal temperature is 85°F in a draft-free area. Cover with a light cloth. 1. Using a rolling pin, roll dough into a rectangle. 2. Roll dough into a loaf, starting from narrow end. The final rising should be after the dough has been shaped and placed on the greased baking sheet or pan recommended in the recipe.
2 Year Limited Warranty Sunbeam Products Inc. warrants to the original purchaser, subject to the limitations and exclusions set forth below, that this product shall be free, in all material respects, of mechanical and electrical defects in material and workmanship from the date of purchase for two years.
PRÉCAUTIONS IMPORTANTES Lors de l'utilisation d'appareils électriques, toujours prendre les précautions nécessaires, et en particulier: 1. LIRE TOUTES LES INSTRUCTIONS AVANT D'UTILISER LE BATTEUR. 2. Pour éviter le risque d'électrocution, ne pas immerger le Batteur dans l'eau ou d'autres liquides. Peut causser des blessures et/ou de dégâts à l'appareil. 3. Faites particulièrement attention lorsque le Batteur à Main est utilisé par, ou en présence d'enfants ou d'invalides. 4.
10. Détacher les fouets du Batteur avant de les laver. 11. Ne pas placer le Batteur sur ou à proximité d’un brûleur chaud ou d’un four allumé. 12. Ne pas utiliser le Batteur à des fins autres que celles pour lesquelles il est destiné. 13. Ne jamais laisser le Batteur en marche sans surveillance.
CARACTÉRISTIQUES Nous vous remercions d’avoir choisi le MIXMASTER” de SUNBEAM? Depuis plusieurs générations, nous aidons les cuisiniers à préparer des gâteaux moelleux, des meringues légères et gonflées et de délicieux petits fours. Le MIXMASTER@ de SUNEEAM@ permet même de faire du pain. de SUNBEAM” comporte Le MIXMASTER@ un choix de 12 vitesses de marche. Les fouets et les bols sont conçus pour mélanger les ingrkdients totalement et de manière homogène. La Commande de Vitesse permet 1.
Lorsque le bouton de déverrouillage est relâché, la partie supérieure du loquet enveloppe la tige métallique. Lorsque la tête est abaissée, elle se bloque en position basse. Pour relever la tête de batteur, pousser le bouton de déblocage de la tête vers le bas en tirant la poignée de la tête vers le haut. Une fois débloquée, la tête s'enlève en enfonçant le levier de déverrouillage du batteur.
MONTAGE DES FOUETS Vérifier que la Commande de Vitesse est en position OFF (ARRÊT) et que le batteur est débranché. Relever la tête du batteur vers l’arrière et la tenir en position verticale à l’écart du bol. Paroi du bol Fouet Conique Fouet Carré Introduire les fouets l’un après l’autre, en tournant et en poussant jusqu’à ce qu’ils s’encliquètent dans la bonne position. Si un fouet ne semble pas s’encliqueter correctement, le sortir et le faire tourner d’un quart de tour.
Le crochet pétrisseur muni de la petite rondelle et du pied se monte dans l’emboîtement du batteur le plus proche de la paroi du bol. L’autre crochet, avec la grande rondelle, se monte dans l’emboîtement le plus proche du centre du bol. Se reporter aux symboles des crochets pétrisseurs figurant sur le dessous de la tête du batteur.
Guide de Mélange Le guide de mélange sur le batteur permet d’éliminer toute incertitude lors de la préparation d’aliments. Ces indications servent de guide lors de la préparation des recettes. VITESSE GUIDE DE MÉLANGE 1 Pétrir 2 Remuer 3 Mélanger 4 Mêler 5 Combiner 6 EXEMPLE À utiliser pour le mélange d’ingrédients secs, pour incorporer une portion de recette dans l’autre, tels des œufs en neige dans une pâte, ou lorsque la recette requiert un battage à vitesse LENTE.
SOINS DU BATTEUR RANGEMENT DU BATTEUR Ranger le batteur à main sur son talon d’appui dans une endroit propre et sec, du type placard ou étagère, par exemple. Placer le petit bol à l’intérieur du grand avec les fouets montés dans les emboîtements corrects. Placer les crochets pétrisseurs dans le petit bol. Entreposer les bols sur le plateau tournant. Les fouets permettent de tenir les bols en place. Attacher le cordon à l'aide d'un line souple.
CONSEILS DE PRÉPARATION ET DE CUISSON PAINS • Verser les ingrédients dans le bol comme indiqué dans la recette. Lors du mélange d’ingrédients secs et humides, il peut être utile de mouiller les ingrédients en vitesse 1 ou 2 puis de passer à la vitesse désirée. INSTRUCTIONS PARTICULIÈRES DE PÉTRISSAGE DU PAIN Le batteur nécessite plus d’attention pour le pétrissage du pain qu’avec des mélanges ordinaires du type pâte à gâteau ou à petits fours.
NE PAS tenter de pousser la pâte à l’intérieur des crochets pétrisseurs à la main ou à l’aide d’une spatule ou de tout autre ustensile lorsque le batteur est branché sur une prise ou en marche. PRÉPARATION DU PAIN AVEC LES CROCHETS PÉTRISSEURS Verser les ingrédients dans le bol comme indiqué dans la recette. Mélanger une petite portion des ingrédients secs avec les ingrédients humides. Battre à la vitesse 6.
CONSEILS POUR LE LEVAGE DE LA PÂTE COMMENT FAÇONNER LA PÂTE POUR LE MOULE À PAIN Un grand bol à mélanger en verre bien graissé est une excellent récipient pour la fermentation ou l’apprêt d’une pâte levée. La température idéale est 30°C dans une atmosphère sans courant d’air. Couvrir d’un linge léger. 1. Au rouleau à pâtisserie, abaisser la pâte en formant un rectangle. 2. Rouler la pâte sur elle-même en commençant par le petit côté.
GARANTIE LIMITÉE 2 ANS Sunbeam Products Inc. garantit à l'acheteur initial, sous couvert des limitations et exclusions stipulées ci-après, que ce produit est exempt, sous tous les aspects matériels, de tout défaut mécanique et électrique de matériel ou de fabrication pendant deux ans à compter de la date d'achat.
PARA MÉXICO SOLAMENTE UN AÑO DE GARANTÍA UN AÑO DE GARANTÍA Póliza de Garantía, SUNBEAM MEXICANA S.A. de C.V. Sunbeam Mexicana S.A. de C.V. garantiza por el término de un año este aparato en todas sus partes y mano de obra contra cualquier defecto de fabricación y funcionamiento, en uso doméstico normal a partir de la fecha de entrega.
“UNA RESPUESTA PARA CADA PREGUNTA” ¿Tiene Ud. alguna pregunta o comentario? Llámenos sin costo al: 91-800-506-17 del D.F. al: 729-21-00 De lunes a viernes de las 8:30 hrs. a las 17:00 hrs. SUNBEAM MEXICANA S.A. DE C.V. Vía Dr. Gustavo Baz No. 180, Tlalnepantla, Edo. de México C.P. 54090 Tel 729-21-00 Fax 397-03-99 OFICINAS DE VENTA EN LA REPÚBLICA MEXICANA: SUCURSAL TLALNEPANTLA EDO. DE MÉXICO Vía Dr. Gustavo Baz No. 180 . . . . . . . . . . . . . . . . . . . . . . . . . . .
PARA SERVICIO DE GARANTÍA Y VENTA DE PARTES Y REFACCIONES SUNBEAM MEXICANA, S.A. de C.V. Via Dr. Gustavo Baz No. 180, Tlalnepantla, Edo. de México TALLERES DE SERVICIO AUTORIZADOS ESTADO Y CIUDAD NOMBRE Y DIRECCIÓN . . . . . . . . . . . . . . . . . . . . . . . . . . . . . . . . . . . . . . . . TELÉFONO AGUASCALIENTES AGUASCALIENTES - DISTRIB. AGUASCALIENTES - Madero No. 203 . . . . . . . . . . . . . . . . . . . . . . . . . . . . . . . . . . . . . . 15-1346 AGUASCALIENTES - RYSE DE AGUASCALIENTES, S.A.
ESTADO Y CIUDAD NOMBRE Y DIRECCIÓN . . . . . . . . . . . . . . . . . . . . . . . . . . . . . . . . . . . . . . . . . . TELÉFONO MICHOACAN APATZINGAN - REFRIG. Y CLIMAS ARTIF. DE MÉXICO - Cart. Apatzingán Cuatro Caminos No. 202. Col. La Nueva . 4-5030 y 4-5082 LA PIEDAD - REFRIGERACIÓN CALDERON - Vicente Guerrero No. 109. Zona Centro . . . . . . . . . . . . . . . . . . . . . . . . . . . . . . . 2-1504 MORELIA - CASA MARY - Alvaro Obregón No. 22. Zona Centro . . . . . . . . . . . . . . . . . . . . . . . .
PRECAUCIONES IMPORTANTES Cuando use aparatos eléctricos, precauciones de seguridad básicas siempre deben de seguirse. Incluyendo las siguientes: 1. LEA TODAS LAS INSTRUCCIONES ANTES DE USAR LA BATIDORA. 2. Para protegerse contra riesgo de descargas eléctricas, no sumerja la Batidora en agua o en otros líquidos. Esto puede lesionar personas o dañar el aparato. 3. Supervisión cercana es necesaria cuando la Batidora sea usada por o cerca de niños o de personas incapacitadas. 4.
10. Retire los batidores de la Batidora antes de lavarlos. 11. No ponga la Batidora o los tazones en o cerca de quemadores eléctricos o de gas, o dentro de un horno caliente. 12. No use la Batidora más que para lo que está diseñada. 13. No deje de supervisar la Batidora mientras está en operación. CONSERVE ESTAS INTRUCCIONES Esta Unidad Es para Uso Doméstico Solamente Cuando use su Batidora Mixmaster® por primera vez, puede detectar un olor y posiblemente una ligera salida de humo del motor de la Batidora.
CARACTERíSTICAS Gracias por seleccionar la Batidora SUNBEAM” MIXMASTER? Por generaciones hemos ayudado en la cocina a preparar pasteles, merengues esponjosos y galletas deliciosas. Usted incluso puede hacer pan con su Batidora SUNBEAM” MIXMASTER? La Batidora SUNBEAM” MIXMASTER@ le ofrece a usted la opción de 12 diferentes velocidades de mezclado. Los batidores están ajustados al tamaño del tazón y los tazones han sido diseñados para mezclar ingredientes 1. Botón Expulsor 2b. Tazón Grande para Mezclar 2a.
A medida que usted deje de presionar la palanca para liberar la batidora, la parte superior del pestillo debe estar sujeta alrededor del pivote metálico. Una vez que la cabeza de la batidora esté colocada hacia abajo, se fijará en su lugar. Para levantar la cabeza de la batidora, presione el botón del seguro de la cabeza hacia abajo mientras jala hacia arriba el mango de la cabeza de la batidora. Una vez que el seguro se ha removido, la cabeza puede quitarse al presionar la palanca para liberar la batidora.
AÑADIENDO LOS BATIDORES Asegurese de que el Disco para Señalar el Mezclado se encuentre en la posición APAGADO/OFF y desconecte el cordón eléctrico de la toma de corriente. Levante la cabeza de la batidora y reclinela atrás fuera de los tazones. Pared del Tazón Batidor Cónico Batidor Cuadrado Inserte los batidores, uno a la vez, usando una combinación de movimientos de presión y giro, hasta que los batidores estén en posición.
El gancho para masa con el tope más pequeño se coloca en el orificio que está mas cercano a la pared del tazón. El otro gancho con el tope más grande se coloca en el orificio que está mas cerca del centro del tazón. Observe los símbolos de los ganchos para masa que están en la parte inferior de la cabeza de la batidora. INSTRUCCIONES DE OPERACIÓN SOBRE EL DISCO PARA SEÑALAR EL MEZCLADO El Disco para Señalar el Mezclado se usa para ENCENDER Y APAGAR la batidora y para usar sus 12 velocidades de mezclado.
Guía de Mezclado La guía de mezclado en su batidora ha sido diseñada para ayudar a decidir qué tipo de trabajo necesitan los alimentos que desea preparar. Use aquellas descripciones como una guía de mezclado cuando prepare sus recetas favoritas. GUÍA DE VELOCIDAD MEZCLADO EJEMPLO 1 Amasar Cuando se mezclan alimentos secos o cuando se incorporan dos porciones de una receta, como huevo batido o cuando las indicaciones señalan que se use una velocidad BAJA. Usela para amasar pan.
ALMACENAMIENTO DE SU BATIDORA CUIDADOS DE SU BATIDORA Almacene su batidora en un lugar seco, como sobre un mostrador o una mesa, o dentro de un armario. Coloque el tazón pequeño dentro del tazón grande con los batidores insertados dentro de los orificios adecuados. Coloque los ganchos para masa dentro del tazón pequeño. Coloque los tazones sobre la plataforma giratoria. Los batidores ayudarán a mantener los tazones en su posición. Enrosque el cordón eléctrico y asegurelo con un alambre pequeño.
PANES SUGERENCIAS PARA EL MEZCLADO Y EL HORNEADO • Los ingredientes deben ser agregados al tazón de mezclado de la forma que lo indica la receta. Cuando se combinen ingredientes secos y líquidos, deberá humedecerlos lentamente mezclando en la velocidad 1 ó 2, y después puede usar la velocidad deseada de mezclado. • Use la velocidad de mezclado que se recomienda en la receta.
No intente usar la espátula para limpiar el tazón mientras la batidora está en operación. Detenga la batidora y limpie con la espátula si es necesario. Use una espátula de plástico solamente. INSTRUCCIONES PARA HACER PAN CON LOS GANCHOS PARA MASAS Los ingredientes deben ser agregados al tazón de la forma que lo indique la receta. Combine una porción pequeña de ingredientes secos con ingredientes líquidos. Mezcle en la velocidad 6.
CONSEJOS PARA ELEVAR LA MASA COMO DAR LA FORMA DE UNA HOGAZA DE PAN Un tazón grande de vidrio, bien engrasado es un excelente recipiente para elevar la masa hecha con levadura. La temperatura ideal es 30˚C / 85˚F en un área sin corrientes de aire. Cubra con un ligero paño. 1. Usando un rodillo, haga un rectángulo con la masa. 2. Enrolle la masa en forma de una hogaza empezando por el borde más pequeño.
GARANTÍA DE 2 AÑOS Sunbeam Products Inc. garantiza al comprador original, sujeto a limitaciones y exclusiones que se estipulan en seguida, que este producto estará libre de defectos mecánicos y eléctricos en el material y en la mano de obra durante dos años a partir de la fecha de compra.
PRECAUÇÕES IMPORTANTES Sempre que utilizar eletrodomésticos, você deve tomar algumas medidas básicas de segurança, como as que seguem: 1. LEIA TODAS AS INSTRUÇÕES ANTES DE USAR A SUA BATEDEIRA. 2. Para evitar risco de choque elétrico, não submerja o fio, o plug ou o aparelho em água ou qualquer outro líquido. Isto pode causar danos pessoais e/ou danificar o produto 3. É necessário manter uma supervisão muito próxima quando este aparelho for usado por, em ou perto de crianças ou pessoas incapacitadas. 4.
11. Não coloque a sua Batedeira e as tigelas perto do fogão quente ou do forno aquecido. 12. A Batedeira só deve ser usada para o seu fim específico 13. Nunca deixe seu eletro-doméstico sozinho quando em uso. GUARDE ESTAS INSTRUÇÕES Este Aparehlo É Somente para Uso Doméstico ® Quando o sua Batedeira Mixmaster for usada pela primeira vez você pode detectar um odor e possivelmente uma ligeira saída de fumaça do motor da sua batedeira.
CARACTERíSTICAS Obrigado por escolher a Batedeira SUNBEAM” MIXMASTER? Por várias geracões ternos ajudado cozinheiros a preparar bolo, suspiros e biscoitos. Você pode ainda fazer pâo com a sua MIXMASTER? Batedeira SUNBEAM@ MIXMASTER” A Batedeira SUNBEAM@ oferece a você 12 tipos diferentes de velocidades. Os batedores e as tigelas foram feitas para misturar os ingredientes minuciosamente e uniformemente. 1. Botáo Ejetor 0 disco indica facilmente a velocidade você deve usar.
No momento em que você soltar o botão que libera os batedores, a parte superior da fechadura deverá estar segura ao eixo metálico. Uma vez que a cabeça da batedeira for colocada em posição, ela trancará em seu lugar. Para elevar a cabeça da batedeira, pressione o botão para travar a cabeça da batedeira para baixo enquanto você estiver puxando para cima a cabeça da batedeira pela alça. Uma vez destravada, a cabeça da batedeira pode ser retirada pressionando o botão para liberar os batedores.
ENCAIXANDO OS BATEDORES Certifique-se que o disco se encontra na posição desligado e desconecte o fio elétrico da tomada. Levante a cabeça da batedeira e recline-a para traz fora do alcance da tigela. Parte Lateral da Tigela Batedor Cônico Batedor Quadrado Insira os batedores, um de cada vez, usando uma combinação de movimentos de pressão e giro, até que os batedores estejam na posição. Se um batedor não está corretamente na posição, tire-o do orifício e gire-o um quarto de volta.
O batedor para massas com a arruela pequena é colocada no orifício perto da parte lateral mais próxima da tigela. O outro batedor de massas com a arruela maior deve ser colocado no orifício mais perto do centro da tigela. Atenção para os símbolos dos batedores de massas localizados embaixo da cabeça da batedeira. I NSTRUÇÕES DE U SO SOBRE O DISCO O disco é usado para ligar e desligar a batedeira e para selecionar suas 12 velocidades de mistura.
Guia de Mistura O guia de mistura da sua batedeira foi desenhado para ajudá-lo a preparar comida sem qualquer dúvida. Use essas opções como um guia de mistura quando for praparar suas receitas favoritas. VELOCIDADE ESTABELECIDA GUIA DE MISTURA 1 Dobrar-Amassar 2 Mexer Use quando for mexer ingredientes líquidos ou quando uma ação mais delicada for preciso para umedecer os ingredientes.
ARMAZENANDO A SUA BATEDEIRA CUIDADOS COM A SUA BATEDEIRA Guarde a sua batedeira em um lugar seco, em cima de uma mesa, em cima do balcão ou dentro do armário. Coloque a tigela menor dentro da maior com os batedores inseridos nos orifçios adequados. Coloque os batedores de massa dentro da tigela pequena. Coloque as tigelas sobre a plataforma giratória. Os batedores ajudarão a manter as tigelas em sua posição. Enrole o fio elétrico e prenda-o com um pequeno arame.
SUGESTÕES PARA MISTURA E COZIMENTOS PÃES • Os ingredientes devem ser agragados na tigela de mistura conforme indicada na receita. Quando se combina ingredientes seco e líquidos, deverá umidecê-los lentamente misturando na velocidade 1 ou 2 e depois poderá usar a velocidade desejada para misturar. • Use a velocidade recomendada na receita. Quando se usa uma receita que não se encontra nesse livro, use o guia de mistura no disco da batedeira para ajudá-lo a escolher a velocidade adequada.
Não tente usar uma espátula para limpar a tigela enquanto a batedeira estiver em operação. Desligue a batedeira e limpe os lados da batedeira caso seja necessário. Use somete uma espátula de plático. INSTRUÇÕES PARA FAZER PÃO COM OS BATEDORES PARA MASSAS Os ingredientes devem ser agregados na tigela de mistura como especificado na receita Combine uma porção pequena de ingredientes seco com ingredietes líquidos. Mistura na Velocidade 6.
CONSELHOS PAR AUMENTAR A MASSA COMO DAR A FORMA PAR UMA FORMA Uma tigela grande de vidro bem untada é um excelente recipiente para aumentar a massa com fermento. A temperatura ideal é 30 °C ou 85 °F em uma área sem correntes de ar. Cubra com um pano leve. 1. Usando um rolo faça um retângulo com a massa. 2. Enrole a massa em forma de uma bisnaga. Começando pela borda menor.
GARANTIA LIMITADA DE 2 ANOS A Sunbeam Products Inc. concede garantia ao comprador original, sujeita às limitações e exclusões estipuladas abaixo, de que este produto não apresentará fisicamente defeitos mecânicos e elétricos devido ao material ou mão de obra, durante dois anos a partir da data de compra.
NOTES/NOTAS 54
NOTES/NOTAS 55
01999 Sunbeam Corporation or its affiliated companies. All rights reserved. SUNBEAM? MIXMASTER” and BURST OF POWER8 are registered trademarks of Sunbeam Corporation or its affiliated companies. The configuration and/or coloicombination of the MIXMASTER” Mixer are trademarks of Sunbeam Corporation or its affiliated companies. Distributed by Sunbeam Products, Inc., Boca Raton, Florida 33431, or an affiliated company. A v 01999 Sunbeam Corporation ou ses societés affiliées.