When using your iron, basic safety precautions should always be followed, including the following: READ ALL INSTRUCTIONS BEFORE USE. Use iron only for its intended use. To protect against risk of electric shock, do not immerse the iron in water or other liquids. The iron should always be turned to “OFF” before plugging or unplugging from outlet. Never yank cord to disconnect from outlet; instead, grasp plug and pull to disconnect. Do not allow cord to touch hot surfaces.
. l If the iron is not operating normally, disconnect from the power supply and have the iron serviced by an authorized serwce center. Your SUNBEAMa iron is deslgned to rest on the heel rest. Do not leave the iron unattended. Do not set the iron on an unprotected surface, even if it is on its heel rest. SPECIAL INSTRUCTIONS l . This is a 1200.Watt appliance.” To avoid a circuit overload, do not operate another high wattage appliance on the same circuit.
Welcome......................................3 Learning About Your Iron.. . . . . . . . . . . . . . . . . . . . . . . .4 Filling the Water Reservoir . . . . . . . . . . . . . . .5 Extending the Power Cord . . . . . . . . . . . . . .6 Ironing . . . . . . . . . . . . . . . . . . . . . . . . . . . . . . . . . .: . . . . .7 Dry Ironing . . . . . . . . . . . . . . . . . . . . . .7 Steam Ironing . . . . . . . . . . . . . . . . . . . . . . .7 Using the Iron’s Special Features.. . . . . . . . . . . . . . . . .
Welcome Congratulations on your purchase of a SUNBEAM” Iron! Sunbeam has designed your iron to provide the utmost in quality, ease of use and convenience. SUNBEAM” Simple Pres9 irons offer the following features: . SPRAY MIST - Provides a fine mist of water to dampen fabrics for creases or to remove wrinkles from heavy fabrics. . Non-Stick Surface - Prevents starch residue and fabrics from sticking to the bottom, making the iron easier to clean. .
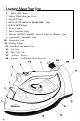
1. SPRAY MIST Release 2. Sliding Water Reservoir Cover 3. Water Fill Hole 4. SHOT OF STEAM Button (Model 3040 only) 5. SPRAY MIST Button 6. Steam Control 7. Power Indicator Light 8. Patented MOTION SMART Auto-Off Indicator Blinking Light 9. Comfortable, Ergonomic Grip 1OA. Retractable Cord 10B. Winding Button 11. 12. 13. 14. 15.
Filling the Water Reservoir You must fill the water reservoir with water to use the SPRAY MIST8 and SHOT OF STEAM features and to get steam out of your iron Tip: Sunbeam tests each iron at the factory to ensure that they function correctly. The test may leave a small, harmless amount of water within the water reservoir. Before you fill the water reservoir, please consider the following: l . While this iron was designed for use with tap water, very hard water will reduce the performance of the iron.
Slide the water reservoir cover open and hold the iron at an angle. Fill the water reservoir with tap water until it reaches the maximum fill level (10 ounces). WARNING: To prevent the risk of burns, be careful when filling a hot iron with water. Hot metal parts, hot water and steam can cause injuries. Close the water reservoir cover. Extending the Power Cord: 1: Hold iron with one hand and grasp plug of power cord with other hand. 2. Firmly pull power cord straight up to extend. 3.
Dry Ironing 1. Make sure that the Steam Control is set to OFF. 2. Plug the cord into a 102-Volt AC outlet. The Power Indicator will light. 3. Turn the Fabric Select dial to the Dry ironing fabric setting you desire (Silk or Synthetics) and allow the iron to heat for 2 minutes. While the Iron is heating, make sure it is sitting on its heel rest on a stable, protected surface. Tip: Refer to the Ironing Guide on Page 16 for the recommended setting for your fabric. Steam Ironing 1.
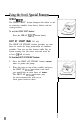
9 I Jsivthees SPRAY MIST@ The SPRAY MIST” feature dampens the fabric to aid in removing wrinkles from heavy fabrics and for setting creases. To use the SPRAY MIST feature: Press the SPRAY MIST’ button firmly, SHOT OF STEAM” (Model 3040 only) The SHOT OF STEAM” feature provides an extra burst of steam for deep penetration of stubborn wrinkles. You can use this feature while Dry or Steam ironing, but the water reservoir must be at least l/4 full of water. To Use the SHOT OF STEAM” Feature: 8 1.
Vertical Steam (Model 3040 only) The vertical steam feature allows your iron to function as a garment steamer. Tip: When using the vertical steam on clothing, hang the clothing on a clothes hanger for best results. Hanging curtains and drapes may also be steamed. To use the vertical steam: 1. Make sure that the iron has heated up (2 minutes). 2. Hold the iron in a vertical position, with the iron close to but not touching the fabric you want to steam. 3. With your other hand, pull the fabric tight. 4.
Patented MOTION SMART’” Auto-Off When the iron is plugged in, the Power Indicator will light steadily, indicating that there is power to the iron. If you leave the iron: . in a vertical position (on its heel rest) without moving it, the iron will automatically turn off after 15 minutes. The Power Indicator will blink to let you know that the iron has stopped heating. . in a horizontal position without moving it (or it accidentally tips over), the iron will automatically stop heating after 30 seconds.
Turning Off Your Iron 1. Turn the Steam Control and Fabric Select dial to OFF. 2. Unplug the iron from the power source. WARNING: NEVER yank the power cord when unplugging the iron, this can damage the cord. ’ Storing Your Iron 1. Allow the iron to cool. 2. Hold the plug with one hand and press the winding button with the other hand to retract the power cord. (Failure to bold plug may cause plug to BY.) \ The cord reel is compact for multi-layer winding of the cord.
. . . lq Your Trnn Cleaning the Soleplate Clean the soleplate if starch or other residue accum11latc. To clean the Soleplate: 1. Allow the iron to cool and then wipe it with a soft, damp cloth. WARNING: DO Not use abrasive cleansers, scouring pads or vinegar to clean the soleplate, this will damage the finish. 2. Run the iron over an all-cotton cloth to remove any residue. Using the Self-Cleaning Feature You should use the self-cleaning feature to maintain the optimal performance of your iron.
2. Fill the water reservoir with tap water (10 oz.) and close the water reservoir cover. 3. Plug the iron into a power outlet. The power indicator will light. 4. Set the Fabric Select dial to Linen and allow the iron to heat for 2 minutes. 5. Turn the Steam Control and the Fabric Select dial to OFF and unplug the iron. 6. Hold the iron over a sink in a horizontal position. WARNING: Be careful not to touch the iron’s hot surfaces. 7. Turn the Steam Control to CLEAN.
8. Turn the Steam Control to OFF. 9. Open the water reservoir cover, turn the iron upside down and allow the remaining water to flow out of the fill hole. 10. Dry the soleplate with a towel. 11. Plug in the iron and set the Fabric Select dial to Linen. Let the iron heat for 2 minutes to dry out the iron completely. 12. Set the Fabric Select dial to OFF, unplug the iron and allow it to cool.
Ironing Tips l l . l l l l l l Always read garment labels and follow the manufacturer’s ironing instructions. Sort the articles to be ironed according to the type of fabric. You should first iron garments requiring low temperature (e.g., silks and synthetics) to avoid damaging them with an iron that is too hot. If you are unsure of the fabric content of the garment, test a small area, such as a seam or facing, before ironing a visible area.
Ironing Guide Fabric Steam Setting Fabric Setting Ironing Recommendations Acrylic DRY Synthetic Iron garment inside out Acetate Dry Synthetic Iron garment Inside out while still damp Silk Dry Silk Iron garment Inside out. Use an ironing cloth* to prevent shine marks. Viscose D r y o r S t e a m Silk Mainly dry Iron. steam may be used under garment manufacturer’s instructions. Dry or Steam Silk Iron garment Inside out while still damp.
. . Year Imuted Warranty Sunbeam Products, Inc. (“Sunbeam”) warrants that for a period of one year from the date of purchase, this product will be free from defects in material and workmanship. Sunbeam, at its option, will repair or replace this product or any component of the product found to be defective during the warranty period. Replacement will he made with a new or remanufactured product or component.
How to Obtain Warranty Service Take the product to an authorized Sunbeam service center. You may obtain a list of service centers and other repair/replacement instructions by calling: (800) 458-8407 or send an e-mail to: Consumeraffairs@consumer.sunbeam.com Please include name, address, telephone number, product model number and description of the problem. DD NDT RETURN THIS PRDDUCT TD THE PLACE DF PURCHASE.
MEDIDAS DE SEGURIDAD Al usar la plancha, siempre se deben tomar precauciones de seguridad, incluidas las siguientes: l l l l l l l l l LEA TODAS LAS INSTRUCCIONES ANTES DE USARLA. Utilice la plancha sólo para su uso indicado. Para protegerse contra el riesgo de descarga eléctrica, no sumerja la plancha en agua u otros líquidos. La plancha siempre debe estar en la posición de apagado (OFF) antes de conectarla o desconectarla del tomacorriente.
. Si la plancha no funciona normalmente, desconéctela de la fuente de alimentackín eléctrica y llévela a un centro de servicio autorizado para que sea examinada. . La plancha Sunbeam@ ha sido diseñada para que descanse sobre su talón de apoyo. No deje la plancha desatendida. AJO coloque la plancha sobre una superficie desprotegida, aunque lo haga sobre su talón de apoyo. INSTRUCCIONES ESPECIALES .
PalabrasdeBienvenida...............................3 Información Sobre la Plancha.. . . . . . . . . . . . . . . . . . . . . . . . .4 Cómo Llenar el Depósito de Agua . . . . . . . .5 Extendiendo el Cordón Eléctrico . . .6 Cómo Planchar.. . . . . . . . . . . . . . . . . . ._ . . . . . . . . . . . . . . . . . .7 Planchado en Seco . . . . . . . . . . . . . . . . . . . . . . . . . . . . ...7 Planchado al Vapor . . . . . . . . . . . . . . . . . . . . . . . . . . . . ...
a ifelicitaciones por la Compra de su Plancha SUNBEAW! Sunbeam ha diseñado su plancha para brindar la máxima calidad, facilidad de USO y conveniencia. Sunbeam le ofrece una plancha ideal para su estilo de vida: Estas Planchas SUNBEAW Simple Pres9 Ofrecen las Siguientes Funciones: l l l l . l l l l l l l SPRAY MISP - Proporciona un fino vapor de agua a fin de humedecer la tela para planchar pliegues o para retirar arrugas de telas gruesas.
la Plancha l.Disparo SPRAY MISTO 2.Depósito de Agua con Tapa Deslizante 3.Agujero para Llenado de Agua 4.Botón SHOT OF STEAM@ (Modelo 3040 solamente) 5.Botón SPRAY MIST@ 6.Control de Vapor 7.Luz Indicadora de Encendido 8.Luz Parpadeante Indicadora de la Función de Apagado Automático MOTION SMART” Patentado 9.Cómodo Mango Ergonómico 10A. Cordón Retráctil l0B.Botón para Enrollar ll.Talón de Apoyo con Base de Coma 12.Base para Enrollar el Cable 13.Disco Selector de Tela 14.Placa de Base que No Se Adhiere 15.
Cómo llenar el Depósito de Agua Debe llenar el depósito de agua para usar las funciones SPRAY MIST@ y SHOT OF STEAM” y para que salga vapor de la plancha. Recomendación: Sunbeam prueba cada plancha en la fábrica para asegurar su correcto funcionamiento. Esta prueba puede dejar una pequeña cantidad de agua en el depósito, lo cual no danara la plancha.
I 2 Abra el depósito de agua deslizando la tapa y sujete la plancha en forma inclinada. 3. Llene el depósito de agua con agua de caño hasta que llegue al nivel de llenado máximo (10 onzas). ADVERTENCIA: Para evitar el riesgo de quemaduras, tenga cuidado al llenar una plancha caliente con agua. las partes metálicas calientes, el agua caliente y el vapor pueden causar lesiones corporales. 4. Cierre la tapa del depósito de agua. Extendiendo el Cordón Eléctrico: 1.
Planchando en Seco 1. Asegúrese de que el control del vapor (Steam) esté en la posición OFF (apagado). 2. Enchufe el cable en un tomacorriente de CA de 120 voltios (in México, 127 voltios). Se encenderá el indicador de encendido. 3. Gire el disco selector de tela (Fabric) a la posición deseada para planchando en seco (Silk [seda] o Synthetics Itela sintética]) y deje que la plancha se caliente durante 2 minutos.
I 00 l a s es SPRAY MIST” La función SPRAY MISTO humedece la tela para ayudar a eliminar las arrugas de las telas gruesas y asentar pliegues. Para usar la función SPRAY MIST? Presione firmemente el botón SPRAY MISTO. SHOT OF STEAM La función SHOT OF STEAM@ proporciona una descarga adicional de vapor para una penetración profunda de arrugas difíciles de planchar.
vapor vt?hXd (Modelo 3040 solamente) La función de vapor vertical permite que la plancha funcione como vaporizador de prendas. Recomendación: Cuando use la función de vapor vertical en ropas, cuelgue la ropa en un colgador de ropa para obtener mejores resultados. También se puede vaporizar las cortinas colgadas. Para usar el Vapor Vertical: 1. Asegúrese de que la plancha se haya calentado (2 minutos). 2.
Función de Apagado Automático MOTION SMARP” Cuando la plancha está encendida, el indicador de encendido se ilumina de manera fija, indicando que la plancha tiene alimentación eléctrica. Si deja la plancha: l l En posición vertical (sobre su talón de apoyo) sin moverla, la plancha se apagará automáticamente después de 15 minutos. El indicador de encendido parpadeará para indicar que la plancha ha dejado de calentar.
la Plancha , del TJso Cómo Apagar la Plancha 1. Gire el control del vapor (Steam) y el disco selector de tela (Fabric) a la posición OFF (apagado). 2. Desenchufe la plancha de la fuente de alimentación. ADVERTENCIA: NUNCA tire del cable de alimentación cuando desconecte la plancha, ya que esto puede dañar el cable. Cómo Guardar la Plancha 1. Deje que la plancha se enfríe. 2.
. . Mantenlmlentr>a I Limpieza de la Placa de Base 1 Limpie la placa de base si se acumula almidón LI otros residuos. Para limpiar la Placa de Base: 1. Deje que la plancha se enfríe y luego límpiela con un pafio suave y húmedo. ADVERTENCIA: NO use limpiadores abrasivos, almohadillas raspadoras abrasivas ni vinagre para limpiar la placa de base, ya que esto dañará el acabado. 2. Pase la plancha sobre un paño de algodon exclusivamente para retirar los residuos.
2. Llene el depósito de agua con agua de caño (10 onzas) y cierre la tapa del deposito de agua. 3. Enchufe la plancha en un tomacorriente. El indicador de corriente se iluminará. 4. Coloque el disco selector de tela (Fabric) en el nivel de temperatura para planchar lino (Linen) y permita que la plancha se caliente durante 2 minutos. 5. Gire el control del vapor (Steam) y el disco selector de tela (Fabric) a la posición OFF (apagado) y desenchufe la plancha. 6.
8. Gire el control del vapor (Steam) a la posición OFF (apagado). 9. Abra la tapa del depósito de agua, invierta la posición de la plancha y deje que el agua restante salga por el orificio de llenado. 10. Seque la placa de base con una toalla. ll. Enchufe la plancha y establezca el disco selector de tela (Fabric) en Linen (lino). Deje que la plancha se caliente durante 2 minutos para que se seque la plancha completamente. 12.
I Recbs y Giua de P Recomendaciones para el Planchado l l l l l l Siempre lea las etiquetas de la prenda y siga las instrucciones de planchando del fabricante. Clasifique las prendas que va a planchar según el tipo de tela. Primero debe planchar las prendas que requieren baja temperatura (por ejemplo, las prendas de seda y teIa sintética) a fin de evitar dañarlas con una plancha que esté demasiado caliente.
Guía de Planchado Tela salacchdevapm Acrílico Dry/ (Seco) Synthetic Planche la prenda por el revés. (Sintética) Acetato Dry/ (Seco) Synthetic Planche la prenda por el revés (Sintética) mientras Planche la prenda por el revés. Use un paño Seda Dry (Seco) Silk (Seda) Viscosa Dry (Seca) o bien Silk (Seda) está húmeda. de planchar* para evitar marcas brillosas.
de IJn Año Sunbeam Products, Inc. (“Sunbeam”) garantiza, por un período de un año a partir de La fecha de compra, que este producto csta libre de defectos de material y fabricación. Sunbeam, a su discreción, reparara o reemplazará este producto o cualquier componente del producto que se encontrara defectuoso durante el período de la garantia. El reemplazo se hará con un producto o componente nuevo o refabricado.
Cómo Obtener el Servicio de la Garantía Lleve el producto .a un centro de servicio autorizado Sunbeam. Puede obtener una lista de centros de servicio y otras instrucciones de reparación /reemplazo llamando al teléfono: (800) 458-8407 0 envíe un mensaje por correo electrónico a: Consumeraffairs@consumer.sunbeam.com Por favor incluya su nombre, dirección, número de teléfono, número de modelo del producto y una descripción del problema. NO DEVUELVA ESTE PRODUCTO AL LUGAR DONDE LO COMPRÓ.