BUREADMAKER M R MÁQUINA PARA ACER PAN H I R M SER ANUAL WITH ECIPES ANUAL DE NSTRUCCIONES CON ECETAS ©2001 Sunbeam Products, Inc. All rights reserved. SUNBEAM® is a registered trademark of Sunbeam Products, Inc. ExpressBake™ is a trademark of Sunbeam Products, Inc. Distributed by Sunbeam Products, Inc., Boca Raton, Florida 33431. ©2001 Sunbeam Products, Inc. Todos los derechos reservados. SUNBEAM® es una marca registrada de Sunbeam Inc. ExpressBake™ es una marca comercial de Sunbeam Products, Inc.
CONGRATULATIONS! You are the owner of a SUNBEAM® Breadmaker. Please read all of the instructions in this manual carefully before you begin to use this appliance. Proper care and maintenance will ensure the long life of this appliance and its trouble-free operation. Save these instructions and refer to them often for cleaning and care tips. Table of Contents Congratulations . . . . . . . . . . . . . . . . . . . . . . . . . . . . . . . . . . 2 Special Cord Set Instructions . . . . . . . . . . . . . . . . . .
CONGRATULATIONS! You are the owner of a SUNBEAM® Breadmaker. Please read all of the instructions in this manual carefully before you begin to use this appliance. Proper care and maintenance will ensure the long life of this appliance and its trouble-free operation. Save these instructions and refer to them often for cleaning and care tips. Table of Contents Congratulations . . . . . . . . . . . . . . . . . . . . . . . . . . . . . . . . . . 2 Special Cord Set Instructions . . . . . . . . . . . . . . . . . .
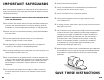
IMPORTANT SAFEGUARDS When using electrical appliances, to reduce the risk of fire, electric shock, and/or injury to persons, basic safety precautions should always be followed, including the following: ❑ Avoid contact with moving parts. ❑ Do not use attachments not recommended by the manufacturer; they may cause fire, electric shock or injury. ❑ Do not use outdoors or for commercial purposes. ❑ READ ALL INSTRUCTIONS, PRODUCT LABELS AND WARNINGS BEFORE USING THE BREADMAKER.
IMPORTANT SAFEGUARDS When using electrical appliances, to reduce the risk of fire, electric shock, and/or injury to persons, basic safety precautions should always be followed, including the following: ❑ Avoid contact with moving parts. ❑ Do not use attachments not recommended by the manufacturer; they may cause fire, electric shock or injury. ❑ Do not use outdoors or for commercial purposes. ❑ READ ALL INSTRUCTIONS, PRODUCT LABELS AND WARNINGS BEFORE USING THE BREADMAKER.
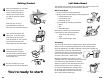
Getting Started 1 Let’s Bake Bread The simplest way to learn how to bake bread is to follow a basic recipe. The following recipe is easy and the bread is delicious. Place the breadmaker on a counter where the plug will reach an outlet. DO NOT yet plug the machine into the wall outlet. You will be shown later when to do this. Before You Begin: • Be sure to start with fresh ingredients. • Be sure to have the following measuring equipment: — Liquid measuring cup 1.0 lb.
Getting Started 1 Let’s Bake Bread The simplest way to learn how to bake bread is to follow a basic recipe. The following recipe is easy and the bread is delicious. Place the breadmaker on a counter where the plug will reach an outlet. DO NOT yet plug the machine into the wall outlet. You will be shown later when to do this. Before You Begin: • Be sure to start with fresh ingredients. • Be sure to have the following measuring equipment: — Liquid measuring cup 1.0 lb.
The SECOND most important secret of making bread: Add ingredients into the bread pan in the exact order given in the recipe. This means: — FIRST, liquid ingredients — SECOND, dry ingredients — LAST, yeast Also, make sure ingredients are at room temperature, unless otherwise noted (that is, between 75°– 85°F or 24°– 30°C). Temperatures too cool or too high can affect the way the bread rises and bakes. Last, it’s a good idea to start with fresh ingredients (especially fresh flour and yeast).
The SECOND most important secret of making bread: Add ingredients into the bread pan in the exact order given in the recipe. This means: — FIRST, liquid ingredients — SECOND, dry ingredients — LAST, yeast Also, make sure ingredients are at room temperature, unless otherwise noted (that is, between 75°– 85°F or 24°– 30°C). Temperatures too cool or too high can affect the way the bread rises and bakes. Last, it’s a good idea to start with fresh ingredients (especially fresh flour and yeast).
❃ IMPORTANT: Use the “Timer” button to delay the baking of your bread. You may delay the start time up to 13 hours. ❃ IMPORTANT: Press the “Start/Stop” button and your machine will start making bread. If delay bake is selected, the remaining time will count down in one-minute increments. ❃ IMPORTANT: The breadmaker has an automatic “keep warm” setting that will keep your bread warm for up to one hour. To turn warmer off, press the “Start/Stop” button and hold until you hear a beep.
❃ IMPORTANT: Use the “Timer” button to delay the baking of your bread. You may delay the start time up to 13 hours. ❃ IMPORTANT: Press the “Start/Stop” button and your machine will start making bread. If delay bake is selected, the remaining time will count down in one-minute increments. ❃ IMPORTANT: The breadmaker has an automatic “keep warm” setting that will keep your bread warm for up to one hour. To turn warmer off, press the “Start/Stop” button and hold until you hear a beep.
3 Display 1 Basic The Display shows the following settings: • The number of the bread setting cycle This setting is probably used more than any other because it gives you the best results with just about any recipe. • The crust color setting 2 Whole Wheat • The time remaining while your bread is kneading or baking The whole wheat setting offers a longer rise time for breads that contain more then 50% whole wheat flour.
3 Display 1 Basic The Display shows the following settings: • The number of the bread setting cycle This setting is probably used more than any other because it gives you the best results with just about any recipe. • The crust color setting 2 Whole Wheat • The time remaining while your bread is kneading or baking The whole wheat setting offers a longer rise time for breads that contain more then 50% whole wheat flour.
ExpressBake™ Setting: Making Bread In Under 1 Hour ExpressBake™ Setting Tips and Hints Yeast ® Your SUNBEAM breadmaker can bake great bread in under 1 hour. This is called the “ExpressBake™” setting. ExpressBake™ loaves are a little different from loaves baked on other settings. Always use a fast-rising yeast. DO NOT use active dry yeast for ExpressBake™ settings because the loaves will be much shorter when baked.
ExpressBake™ Setting: Making Bread In Under 1 Hour ExpressBake™ Setting Tips and Hints Yeast ® Your SUNBEAM breadmaker can bake great bread in under 1 hour. This is called the “ExpressBake™” setting. ExpressBake™ loaves are a little different from loaves baked on other settings. Always use a fast-rising yeast. DO NOT use active dry yeast for ExpressBake™ settings because the loaves will be much shorter when baked.
ExpressBake™ Traditional-Style White Bread 1.5-Pound Loaf 1 cup and 2 tablespoons 1 teaspoon salt (9 ounces total) of hot water 3 cups bread machine flour (115°–125°F or 46°–52°C) 2 tablespoons canola or vegetable oil 5 teaspoons bread machine yeast 2 tablespoons sugar 1 Attach the kneading blade in the bread pan. 2 Place ingredients into the bread pan in the following order: water, oil, sugar, salt and flour.
ExpressBake™ Traditional-Style White Bread 1.5-Pound Loaf 1 cup and 2 tablespoons 1 teaspoon salt (9 ounces total) of hot water 3 cups bread machine flour (115°–125°F or 46°–52°C) 2 tablespoons canola or vegetable oil 5 teaspoons bread machine yeast 2 tablespoons sugar 1 Attach the kneading blade in the bread pan. 2 Place ingredients into the bread pan in the following order: water, oil, sugar, salt and flour.
Using the Delay Timer Tips and Hints You can delay the time your breadmaker starts to have fresh bread ready when you get up in the morning or when you come from work. Experienced cooks consider breadmaking to be as much art as science. Keep in mind that some recipes may require a little experimentation before they are exactly the way you want them. Just don’t give up. We recommend that before you use the Delay Timer, you try out a few recipes.
Using the Delay Timer Tips and Hints You can delay the time your breadmaker starts to have fresh bread ready when you get up in the morning or when you come from work. Experienced cooks consider breadmaking to be as much art as science. Keep in mind that some recipes may require a little experimentation before they are exactly the way you want them. Just don’t give up. We recommend that before you use the Delay Timer, you try out a few recipes.
Check the Doughball This is a secret well known to people who make bread the old-fashioned way. While hand kneading the mixture, they adjust the consistency of the dough by adding a little flour or a little water until the doughball is just right. Although the breadmaker kneads the dough for you, this secret is still true. Here’s what you should do: If the Doughball Is Too Wet For Baking at High Altitudes During the second kneading cycle, check the consistency of the doughball.
Check the Doughball This is a secret well known to people who make bread the old-fashioned way. While hand kneading the mixture, they adjust the consistency of the dough by adding a little flour or a little water until the doughball is just right. Although the breadmaker kneads the dough for you, this secret is still true. Here’s what you should do: If the Doughball Is Too Wet For Baking at High Altitudes During the second kneading cycle, check the consistency of the doughball.
Taking Care of Your Bread Machine ☞ CAUTION: Do not put the breadmaker in water or in a dishwasher. Do not use benzene, scrubbing brushes or chemical cleaners as these will damage the machine. Use only a mild, non-abrasive cleanser to clean the breadmaker. Measurement Equivalency Chart General Cleaning 1 Remove all bread crumbs by wiping them away with a slightly damp cloth. 2 DO NOT bend the heating element which is located on the inside of the breadmaker.
Taking Care of Your Bread Machine ☞ CAUTION: Do not put the breadmaker in water or in a dishwasher. Do not use benzene, scrubbing brushes or chemical cleaners as these will damage the machine. Use only a mild, non-abrasive cleanser to clean the breadmaker. Measurement Equivalency Chart General Cleaning 1 Remove all bread crumbs by wiping them away with a slightly damp cloth. 2 DO NOT bend the heating element which is located on the inside of the breadmaker.
Troubleshooting If you experience difficulties when operating the breadmaker, review the troubleshooting information in this section to find a solution. If you are unable to find a solution, please call our Consumer Relations Department at 1-800-458-8407. If you have a power outage: BAKING PROBLEM The bread has a floured top. This is usually a result of using too much flour or not enough water. Try using less flour (a tsp. less at a time), or try using more water (1/4 tsp. more at a time).
Troubleshooting If you experience difficulties when operating the breadmaker, review the troubleshooting information in this section to find a solution. If you are unable to find a solution, please call our Consumer Relations Department at 1-800-458-8407. If you have a power outage: BAKING PROBLEM The bread has a floured top. This is usually a result of using too much flour or not enough water. Try using less flour (a tsp. less at a time), or try using more water (1/4 tsp. more at a time).
B AKING P ROBLEM S OLUTION The bread has a heavy, thick texture. Try using less flour (a tsp. at a time), or more yeast (1/4 tsp. at a time). This could also be the result of using old flour or the wrong type of flour for the recipe. The bread is not baked completely in the center. Try using more flour (a tsp. more at a time), or less water or liquid (a tsp. less at a time). Do not lift the lid too often during baking. The bread has a coarse texture.
B AKING P ROBLEM S OLUTION The bread has a heavy, thick texture. Try using less flour (a tsp. at a time), or more yeast (1/4 tsp. at a time). This could also be the result of using old flour or the wrong type of flour for the recipe. The bread is not baked completely in the center. Try using more flour (a tsp. more at a time), or less water or liquid (a tsp. less at a time). Do not lift the lid too often during baking. The bread has a coarse texture.
Su ga r 1 Attach the kneading blade in the bread pan. 2 Place ingredients into the bread pan in the following order: water, butter or margarine, sugar, milk powder, salt and flour. Flour 3 With finger, make a small indentation on one side of the flour. Add yeast to indentation, making sure it does not come into contact with the liquid ingredients. Dr Mi y lk 4 Carefully insert bread pan into breadmaker and gently close the lid. 5 Plug the power cord into a wall outlet.
Su ga r 1 Attach the kneading blade in the bread pan. 2 Place ingredients into the bread pan in the following order: water, butter or margarine, sugar, milk powder, salt and flour. Flour 3 With finger, make a small indentation on one side of the flour. Add yeast to indentation, making sure it does not come into contact with the liquid ingredients. Dr Mi y lk 4 Carefully insert bread pan into breadmaker and gently close the lid. 5 Plug the power cord into a wall outlet.
Whole Wheat Setting Recipe French Setting Recipe Whole Wheat Bread Classic French Bread 1.5-POUND LOAF INGREDIENTS 1 POUND LOAF 1 cup + 2 Tbsp. 1 Tbsp. + 1-1/2 tsp. 1/4 cup 1-1/4 tsp. 3-1/2 cups 2-1/4 tsp. 1 cup minus 1 Tbsp. 1 Tbsp. 2 Tbsp. + 1-1/2 tsp. 1/2 tsp. 2-1/3 cups 1-1/2 tsp. Water (75°– 85°F or 24°– 30°C) Butter or margarine, softened Firmly packed light brown sugar Salt Whole wheat flour Bread machine yeast INGREDIENTS 1.5-POUND LOAF 1 cup + 2 Tbsp. 2 tsp. 3-1/4 cups 1 Tbsp. 1-1/2 tsp.
Whole Wheat Setting Recipe French Setting Recipe Whole Wheat Bread Classic French Bread 1.5-POUND LOAF INGREDIENTS 1 POUND LOAF 1 cup + 2 Tbsp. 1 Tbsp. + 1-1/2 tsp. 1/4 cup 1-1/4 tsp. 3-1/2 cups 2-1/4 tsp. 1 cup minus 1 Tbsp. 1 Tbsp. 2 Tbsp. + 1-1/2 tsp. 1/2 tsp. 2-1/3 cups 1-1/2 tsp. Water (75°– 85°F or 24°– 30°C) Butter or margarine, softened Firmly packed light brown sugar Salt Whole wheat flour Bread machine yeast INGREDIENTS 1.5-POUND LOAF 1 cup + 2 Tbsp. 2 tsp. 3-1/4 cups 1 Tbsp. 1-1/2 tsp.
Sweet Setting Recipe ExpressBake™ Setting Recipe Banana-Pecan Bread ExpressBake™ Traditional-Style White Bread 1.5-POUND LOAF INGREDIENTS 2/3 cup 3/4 cup 2 Tbsp. 1 large 3-1/4 cups 3 Tbsp. 1-1/4 2-1/2 tsp. 1/2 cup Water (75°– 85°F or 24°– 30°C) Mashed ripe banana Butter or margarine, softened Egg, lightly beaten Bread flour Sugar Salt Bread machine yeast Chopped pecans 1 POUND LOAF 1/2 cup 1/3 cup 1 Tbsp. 1 medium 2 cups 2 Tbsp. 1/2 tsp. 1-1/2 tsp.
Sweet Setting Recipe ExpressBake™ Setting Recipe Banana-Pecan Bread ExpressBake™ Traditional-Style White Bread 1.5-POUND LOAF INGREDIENTS 2/3 cup 3/4 cup 2 Tbsp. 1 large 3-1/4 cups 3 Tbsp. 1-1/4 2-1/2 tsp. 1/2 cup Water (75°– 85°F or 24°– 30°C) Mashed ripe banana Butter or margarine, softened Egg, lightly beaten Bread flour Sugar Salt Bread machine yeast Chopped pecans 1 POUND LOAF 1/2 cup 1/3 cup 1 Tbsp. 1 medium 2 cups 2 Tbsp. 1/2 tsp. 1-1/2 tsp.
Quick Breads Setting Recipe Dough Setting Recipe Chock Full o’ Chocolate Walnut-Zucchini Bread Orange-Anise Braided Ring 1/2 cup chopped walnuts 3/4 cup sugar 1/2 cup semi-sweet chocolate pieces 1 tsp. ground cinnamon 2 cups all-purpose flour, divided 1 tsp. grated orange zest 3 large eggs, lightly beaten 1/2 tsp. salt 1/3 cup canola or other vegetable oil 1/2 tsp. ground allspice 2 tsp. baking powder 2-1/2 cups shredded zucchini, about 2 medium zucchini 1 tsp.
Quick Breads Setting Recipe Dough Setting Recipe Chock Full o’ Chocolate Walnut-Zucchini Bread Orange-Anise Braided Ring 1/2 cup chopped walnuts 3/4 cup sugar 1/2 cup semi-sweet chocolate pieces 1 tsp. ground cinnamon 2 cups all-purpose flour, divided 1 tsp. grated orange zest 3 large eggs, lightly beaten 1/2 tsp. salt 1/3 cup canola or other vegetable oil 1/2 tsp. ground allspice 2 tsp. baking powder 2-1/2 cups shredded zucchini, about 2 medium zucchini 1 tsp.
Bagel Dough Setting Recipes European Bread Setting Recipe Honey-Whole Wheat Bagels Russian Black Bread 1 cup water (75°-85°F) 1-1/2 Tbsp. honey 2 cups bread flour 1 cup whole wheat flour 1-1/2 tsp. salt 1-1/2 tsp. bread machine yeast 1 Attach the kneading blade in the bread pan. 2 Place ingredients into the bread pan in the following order: water and honey, then bread flour, wheat flour and salt. 3 With your finger, make a small indentation on one side of the flour.
Bagel Dough Setting Recipes European Bread Setting Recipe Honey-Whole Wheat Bagels Russian Black Bread 1 cup water (75°-85°F) 1-1/2 Tbsp. honey 2 cups bread flour 1 cup whole wheat flour 1-1/2 tsp. salt 1-1/2 tsp. bread machine yeast 1 Attach the kneading blade in the bread pan. 2 Place ingredients into the bread pan in the following order: water and honey, then bread flour, wheat flour and salt. 3 With your finger, make a small indentation on one side of the flour.
Jam Setting Recipe Year ‘Round Spiced Peach Jam 1 cup sugar Glazes After rolls rise, just before baking, gently apply desired glaze with a pastry brush. Bake as directed in the recipe. 1 Tbsp. low-sugar fruit pectin • For a shiny golden crust, use Egg Glaze or Egg Yolk Glaze. 2 cups thawed frozen sliced peaches • For a shiny chewy crust, use Egg White Glaze (crust will be lighter in color). Jam 1/2 tsp. ground cloves 1/4 tsp. ground nutmeg Egg Glaze 2 tsp.
Jam Setting Recipe Year ‘Round Spiced Peach Jam 1 cup sugar Glazes After rolls rise, just before baking, gently apply desired glaze with a pastry brush. Bake as directed in the recipe. 1 Tbsp. low-sugar fruit pectin • For a shiny golden crust, use Egg Glaze or Egg Yolk Glaze. 2 cups thawed frozen sliced peaches • For a shiny chewy crust, use Egg White Glaze (crust will be lighter in color). Jam 1/2 tsp. ground cloves 1/4 tsp. ground nutmeg Egg Glaze 2 tsp.
Citrus Glaze Choco-Banana Spread Mix until thin enough to drizzle: Mix: 1/2 cup powdered sugar 1/3 cup mashed ripe banana 1/2 cup semi-sweet chocolate chips, melted 1 tsp. grated lemon or orange peel 2 tsp. lemon or orange juice Ham and Swiss Spread Mix: 1 package (3 oz.) cream cheese, softened Creamy Vanilla Glaze 2 Tbsp. finely chopped, fully cooked, smoked ham Mix until thin enough to drizzle: 1 Tbsp. shredded Swiss cheese 1/2 cup powdered sugar 1/2 tsp. prepared mustard 1/4 tsp.
Citrus Glaze Choco-Banana Spread Mix until thin enough to drizzle: Mix: 1/2 cup powdered sugar 1/3 cup mashed ripe banana 1/2 cup semi-sweet chocolate chips, melted 1 tsp. grated lemon or orange peel 2 tsp. lemon or orange juice Ham and Swiss Spread Mix: 1 package (3 oz.) cream cheese, softened Creamy Vanilla Glaze 2 Tbsp. finely chopped, fully cooked, smoked ham Mix until thin enough to drizzle: 1 Tbsp. shredded Swiss cheese 1/2 cup powdered sugar 1/2 tsp. prepared mustard 1/4 tsp.
Recipe Index 1-YEAR LIMITED WARRANTY PAGE Homestyle White Bread . . . . . . . . . . . . . . . . . . . . . . . . . . . 8 ExpressBake™ Traditional-Style White Bread . . . . . . . . . . . . . 16 Whole Wheat Bread . . . . . . . . . . . . . . . . . . . . . . . . . . . . . . . . 30 Classic French Bread . . . . . . . . . . . . . . . . . . . . . . . . . . . . . . . . 31 Banana-Pecan Bread . . . . . . . . . . . . . . . . . . . . . . . . . . . . . . . . 32 ExpressBake™ Traditional-Style White Bread . . . . . . . .
Recipe Index 1-YEAR LIMITED WARRANTY PAGE Homestyle White Bread . . . . . . . . . . . . . . . . . . . . . . . . . . . 8 ExpressBake™ Traditional-Style White Bread . . . . . . . . . . . . . 16 Whole Wheat Bread . . . . . . . . . . . . . . . . . . . . . . . . . . . . . . . . 30 Classic French Bread . . . . . . . . . . . . . . . . . . . . . . . . . . . . . . . . 31 Banana-Pecan Bread . . . . . . . . . . . . . . . . . . . . . . . . . . . . . . . . 32 ExpressBake™ Traditional-Style White Bread . . . . . . . .
¡FELICITACIONES! Es usted el dueño de una Máquina para Hacer Pan SUNBEAM®. Por favor sírvase leer cuidadosamente todas las instrucciones en este manual, antes de que inicie a utilizar este electrodoméstico. Los cuidados y el mantenimiento adecuado, asegurarán una larga vida útil a este aparato y una operación libre de complicaciones. Guarde estas instrucciones y consulte con frecuencia las sugerencias de cuidado y limpieza. INSTRUCCIONES PARA CABLE ESPECIAL 1.
¡FELICITACIONES! Es usted el dueño de una Máquina para Hacer Pan SUNBEAM®. Por favor sírvase leer cuidadosamente todas las instrucciones en este manual, antes de que inicie a utilizar este electrodoméstico. Los cuidados y el mantenimiento adecuado, asegurarán una larga vida útil a este aparato y una operación libre de complicaciones. Guarde estas instrucciones y consulte con frecuencia las sugerencias de cuidado y limpieza. INSTRUCCIONES PARA CABLE ESPECIAL 1.
PRECAUCIONES IMPORTANTES ❑ Evite el contacto con las partes en movimiento. ❑ Cuando use aparatos eléctricos, para reducir el riesgo de incendio, descargas eléctricas, y/o lesiones personales, algunas precauciones de seguridad básicas siempre deben de seguirse, incluyendo las siguientes: El uso de accesorios o aditamentos no recomendados por el fabricante pueden causar incendios, descargas eléctricas o lesiones. ❑ No se use en exteriores o para propósitos comerciales.
PRECAUCIONES IMPORTANTES ❑ Evite el contacto con las partes en movimiento. ❑ Cuando use aparatos eléctricos, para reducir el riesgo de incendio, descargas eléctricas, y/o lesiones personales, algunas precauciones de seguridad básicas siempre deben de seguirse, incluyendo las siguientes: El uso de accesorios o aditamentos no recomendados por el fabricante pueden causar incendios, descargas eléctricas o lesiones. ❑ No se use en exteriores o para propósitos comerciales.
Comenzando 1 Empecemos a Hornear Pan La manera más simple de aprender a hornear pan es seguir la receta básica. La siguiente receta es fácil y el panes delicioso. Coloque la Máquina para Hacer Pan sobre un mostrador donde tenga al alcance una toma de corriente eléctrica. NO lo enchufe todavía. Más a delante se le indicará la manera en que debe hacerlo. Antes de Comenzar: • • 1.0 lb. 6 Quick 1 Basic 7 Dough 2 Whole Wheat 8 Bagel Dough 3 French 9 European 4 Sweet 5 ExpressBake™ 10 Jam 11 Bake Timer 1.
Comenzando 1 Empecemos a Hornear Pan La manera más simple de aprender a hornear pan es seguir la receta básica. La siguiente receta es fácil y el panes delicioso. Coloque la Máquina para Hacer Pan sobre un mostrador donde tenga al alcance una toma de corriente eléctrica. NO lo enchufe todavía. Más a delante se le indicará la manera en que debe hacerlo. Antes de Comenzar: • • 1.0 lb. 6 Quick 1 Basic 7 Dough 2 Whole Wheat 8 Bagel Dough 3 French 9 European 4 Sweet 5 ExpressBake™ 10 Jam 11 Bake Timer 1.
El SEGUNDO secreto más importante para preparar pan es: Añada los ingredientes en el recipiente para preparar pan, en el orden exacto en el que se indican en la receta. Esto significa: — PRIMERO, los ingredientes líquidos — SEGUNDO, los ingredientes secos — POR ÚLTIMO, la levadura 6 Presione el botón de Menú hasta que el programa básico “Basic” sea seleccionado. 7 Presione el botón de color de la corteza “Crust Color” para seleccionar el nivel de dorado deseado.
El SEGUNDO secreto más importante para preparar pan es: Añada los ingredientes en el recipiente para preparar pan, en el orden exacto en el que se indican en la receta. Esto significa: — PRIMERO, los ingredientes líquidos — SEGUNDO, los ingredientes secos — POR ÚLTIMO, la levadura 6 Presione el botón de Menú hasta que el programa básico “Basic” sea seleccionado. 7 Presione el botón de color de la corteza “Crust Color” para seleccionar el nivel de dorado deseado.
I MPORTANTE : Use el botón de cronómetro “Timer” para retrasar el ❃ horneado de su pan. Usted puede retrasar el inicio del horneado ❃ ❃ ❃ ❃ hasta por 13 horas. I MPORTANTE : Presione el botón de iniciar/detener “Start/Stop” y su máquina iniciará a preparar el pan. Si usted ha seleccionado el retraso del horneado, iniciará la cuenta regresiva del tiempo remanente, en decrementos de un minuto para iniciar el horneado.
I MPORTANTE : Use el botón de cronómetro “Timer” para retrasar el ❃ horneado de su pan. Usted puede retrasar el inicio del horneado ❃ ❃ ❃ ❃ hasta por 13 horas. I MPORTANTE : Presione el botón de iniciar/detener “Start/Stop” y su máquina iniciará a preparar el pan. Si usted ha seleccionado el retraso del horneado, iniciará la cuenta regresiva del tiempo remanente, en decrementos de un minuto para iniciar el horneado.
3 Pantalla La pantalla muestra lo siguiente: • El número del ciclo de pan seleccionado • El color de la corteza seleccionado • El tiempo remanente mientras su pan se está amasando y horneando Una vez que presione el botón de iniciar/detener “Start/Stop” para comenzar, la pantalla mostrará el tiempo que queda hasta que su pan se hornee. Cuando la pantalla indique “0:00”, el pan está listo.
3 Pantalla La pantalla muestra lo siguiente: • El número del ciclo de pan seleccionado • El color de la corteza seleccionado • El tiempo remanente mientras su pan se está amasando y horneando Una vez que presione el botón de iniciar/detener “Start/Stop” para comenzar, la pantalla mostrará el tiempo que queda hasta que su pan se hornee. Cuando la pantalla indique “0:00”, el pan está listo.
Función ExpressBake™: Preparando Pan en Menos de 1 Hora Los y Sugerencias para la Función ExpressBake™ Levadura Su máquina para hacer pan SUNBEAM®, puede hornear un excelente pan en menos de 1 hora. A esta función se le llama la función “ExpressBake™”. Las piezas de pan preparadas con la función ExpressBake™ son un poco diferentes de aquellas horneadas en una función que no sea ExpressBake™. Siempre utilice una levadura de acción rápida.
Función ExpressBake™: Preparando Pan en Menos de 1 Hora Los y Sugerencias para la Función ExpressBake™ Levadura Su máquina para hacer pan SUNBEAM®, puede hornear un excelente pan en menos de 1 hora. A esta función se le llama la función “ExpressBake™”. Las piezas de pan preparadas con la función ExpressBake™ son un poco diferentes de aquellas horneadas en una función que no sea ExpressBake™. Siempre utilice una levadura de acción rápida.
ExpressBake™ Pan Blanco Tradicional Pieza de Pan de 1.5 lb. 1 taza y 2 Cucharadas (total 9 onzas) 1 cucharadita de sal de agua caliente (115°–125°F 3 tazas de harina para preparar or 46°–52°F) pan en máquina 2 Cucharadas de aceite vegetal 5 cucharaditas de levadura para o de canola preparar pan en máquina 2 Cucharadas de azúcar 1 Coloque la cuchilla amasadora dentro del recipiente para pan.
ExpressBake™ Pan Blanco Tradicional Pieza de Pan de 1.5 lb. 1 taza y 2 Cucharadas (total 9 onzas) 1 cucharadita de sal de agua caliente (115°–125°F 3 tazas de harina para preparar or 46°–52°F) pan en máquina 2 Cucharadas de aceite vegetal 5 cucharaditas de levadura para o de canola preparar pan en máquina 2 Cucharadas de azúcar 1 Coloque la cuchilla amasadora dentro del recipiente para pan.
Para Retrasar el Cronómetro Usted puede retrasar el tiempo en el que el aparato comienza a operar, para tener pan fresco cuando usted despierta en las mañanas o cuando regresa del trabajo. Nosotros recomendamos que antes de seleccionar la función para retrasar el horneado “Delay Timer”, usted pruebe algunas recetas. Utilice recetas que le hayan dado buenos resultados anteriormente.
Para Retrasar el Cronómetro Usted puede retrasar el tiempo en el que el aparato comienza a operar, para tener pan fresco cuando usted despierta en las mañanas o cuando regresa del trabajo. Nosotros recomendamos que antes de seleccionar la función para retrasar el horneado “Delay Timer”, usted pruebe algunas recetas. Utilice recetas que le hayan dado buenos resultados anteriormente.
Revise la Bola de Masa Este es el secreto de la gente que sabe de hacer pan. Cuando amasan manualmente la mezcla, ellos ajustan la consistencia de la masa al añadir un poco de harina o agua hasta que la bola de masa tenga la consistencia correcta. Aunque la máquina para hacer pan lo hace por usted, este secreto es verdadero. Aquí está lo que debe hacer. Si la Masa Está Demasiado Húmeda Durante el segundo ciclo de amasado, revise la consistencia de la masa.
Revise la Bola de Masa Este es el secreto de la gente que sabe de hacer pan. Cuando amasan manualmente la mezcla, ellos ajustan la consistencia de la masa al añadir un poco de harina o agua hasta que la bola de masa tenga la consistencia correcta. Aunque la máquina para hacer pan lo hace por usted, este secreto es verdadero. Aquí está lo que debe hacer. Si la Masa Está Demasiado Húmeda Durante el segundo ciclo de amasado, revise la consistencia de la masa.
Cómo Cuidar Su Máquina para Hacer Pan ☞ CUIDADO: No coloque su Máquina para Hacer Pan en el agua o dentro de la lavadora de platos. No utilice cepillos, limpiadores o químicos abrasivos para limpiar su electrodoméstico, ya que pueden dañar el aparato. Use solamente un limpiador suave y no abrasivo para limpiar el aparato. Limpieza General 1 2 Cuadro con Equivalencia de Medidas NO doble elemento calefactor, localizado en el interior del aparato.
Cómo Cuidar Su Máquina para Hacer Pan ☞ CUIDADO: No coloque su Máquina para Hacer Pan en el agua o dentro de la lavadora de platos. No utilice cepillos, limpiadores o químicos abrasivos para limpiar su electrodoméstico, ya que pueden dañar el aparato. Use solamente un limpiador suave y no abrasivo para limpiar el aparato. Limpieza General 1 2 Cuadro con Equivalencia de Medidas NO doble elemento calefactor, localizado en el interior del aparato.
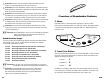
Solución de Problemas que Puedan Presentarse Si usted tiene dificultades cuando ponga en operación su Máquina para Hacer Pan, revise la información en esta sección de solución de problemas. Si usted no pueden encontrar una solución, por favor llame a nuestro Departamento de Relaciones con el Cliente al 1-800-458-8407. Si sufre una interrupción en la electricidad: PROBLEMAS CON EL HORNEADO El pan tiene harina en la parte superior.
Solución de Problemas que Puedan Presentarse Si usted tiene dificultades cuando ponga en operación su Máquina para Hacer Pan, revise la información en esta sección de solución de problemas. Si usted no pueden encontrar una solución, por favor llame a nuestro Departamento de Relaciones con el Cliente al 1-800-458-8407. Si sufre una interrupción en la electricidad: PROBLEMAS CON EL HORNEADO El pan tiene harina en la parte superior.
PROBLEMAS SOLUCIÓNES El pan tiene una textura pesada y espesa. Utilice menos harina (una cuta. a la vez), o más levadura (1/4 de cuta. a la vez). Esto también puede ser el resultado de usar harina que no esté fresca o el tipo incorrecto de harina en la receta. El pan no se horneó completamente y el centro está crudo. Use más harina (una cuta. a la vez), o menos agua o líquido (una cuta. a la vez). No levante la tapa demasiadas veces durante el horneado. El pan tiene una textura gruesa.
PROBLEMAS SOLUCIÓNES El pan tiene una textura pesada y espesa. Utilice menos harina (una cuta. a la vez), o más levadura (1/4 de cuta. a la vez). Esto también puede ser el resultado de usar harina que no esté fresca o el tipo incorrecto de harina en la receta. El pan no se horneó completamente y el centro está crudo. Use más harina (una cuta. a la vez), o menos agua o líquido (una cuta. a la vez). No levante la tapa demasiadas veces durante el horneado. El pan tiene una textura gruesa.
1 Coloque la cuchilla amasadora dentro del recipiente para pan. 2 Coloque los ingredientes dentro del recipiente para pan en el siguiente orden: agua, mantequilla o margarina, azúcar, leche en polvo, sal y harina. Az úc ar Harina 3 Con el dedo, haga un pequeño orificio en un lado de la harina. Añada la levadura dentro del orificio, verifique que no entre en contacto con los ingredientes líquidos. 4 Inserte cuidadosamente el recipiente para hornear el pan dentro del aparato y cierre lentamente la tapa.
1 Coloque la cuchilla amasadora dentro del recipiente para pan. 2 Coloque los ingredientes dentro del recipiente para pan en el siguiente orden: agua, mantequilla o margarina, azúcar, leche en polvo, sal y harina. Az úc ar Harina 3 Con el dedo, haga un pequeño orificio en un lado de la harina. Añada la levadura dentro del orificio, verifique que no entre en contacto con los ingredientes líquidos. 4 Inserte cuidadosamente el recipiente para hornear el pan dentro del aparato y cierre lentamente la tapa.
R ECETAS PARA LA F UNCIÓN DE T RIGO E NTERO “W HOLE W HEAT ” R ECETAS PARA LA F UNCIÓN DE PAN F RANCÉS “F RENCH B READ ” Pan de Trigo Entero Pan Francés Clásico INGREDIENTES DE PIEZA DE PAN DE 1.5 LB. PIEZA DE 1 LB. INGREDIENTES DE PIEZA DE PAN DE 1.5 LB. PIEZA DE 1 taza + 2 Cu. de agua (75°– 85°F ó 24°– 30°C) 1 taza meno 1 Cu. de agua 1 taza + 2 Cu. de agua (75°– 85°F ó 24°– 30°C) 3/4 taza 1 Cu. + 1-1/2 cuta. de mantequilla o margarina, suave 1 Cu. 2 cuta.
R ECETAS PARA LA F UNCIÓN DE T RIGO E NTERO “W HOLE W HEAT ” R ECETAS PARA LA F UNCIÓN DE PAN F RANCÉS “F RENCH B READ ” Pan de Trigo Entero Pan Francés Clásico INGREDIENTES DE PIEZA DE PAN DE 1.5 LB. PIEZA DE 1 LB. INGREDIENTES DE PIEZA DE PAN DE 1.5 LB. PIEZA DE 1 taza + 2 Cu. de agua (75°– 85°F ó 24°– 30°C) 1 taza meno 1 Cu. de agua 1 taza + 2 Cu. de agua (75°– 85°F ó 24°– 30°C) 3/4 taza 1 Cu. + 1-1/2 cuta. de mantequilla o margarina, suave 1 Cu. 2 cuta.
R ECETAS PARA LA F UNCIÓN DE PAN D ULCE “S WEET ” R ECETAS PARA LA F UNCIÓN DE PAN E XPRESS B AKE Pan de Nueces y Plátano Pan Blanco Estilo Tradicional ExpressBake™ INGREDIENTES DE PIEZA DE PAN DE 1.5 LB. PIEZA DE 1 LB. 2/3 taza de agua (75°– 85°F ó 24°– 30°C) 1/2 taza 3/4 taza de plátanos maduros hechos puré 1/3 taza 2 Cu. de mantequilla o margarina, suave 1 Cu. 1 huevo grande ligeramente batido 1 huevo mediano 3-1/4 tazas de harina para pan 2 tazas 3 Cu. de azúcar 2 Cu. 1-1/4 cuta.
R ECETAS PARA LA F UNCIÓN DE PAN D ULCE “S WEET ” R ECETAS PARA LA F UNCIÓN DE PAN E XPRESS B AKE Pan de Nueces y Plátano Pan Blanco Estilo Tradicional ExpressBake™ INGREDIENTES DE PIEZA DE PAN DE 1.5 LB. PIEZA DE 1 LB. 2/3 taza de agua (75°– 85°F ó 24°– 30°C) 1/2 taza 3/4 taza de plátanos maduros hechos puré 1/3 taza 2 Cu. de mantequilla o margarina, suave 1 Cu. 1 huevo grande ligeramente batido 1 huevo mediano 3-1/4 tazas de harina para pan 2 tazas 3 Cu. de azúcar 2 Cu. 1-1/4 cuta.
R ECETA PARA LA F UNCIÓN DE PANES R ÁPIDOS “Q UICKBREAD ” R ECETA PARA LA F UNCIÓN DE P REPARAR B ASA “D OUGH” Pan de Chocolate y Nuez Rosca Trenzada de Naranja y Anís 1/2 taza de nueces picadas 3/4 taza de azúcar 1/2 taza de piezas de chocolate semi amargo 1 cuta. de canela molida 2 tazas de harina, divididas 1 cuta. de ralladura de cáscara de naranja 3 huevos grandes, ligeramente batidos 1/2 cuta. de sal 1/3 taza de aceite vegetal o de canola 1/2 cuta. de pimienta inglesa 2 cuta.
R ECETA PARA LA F UNCIÓN DE PANES R ÁPIDOS “Q UICKBREAD ” R ECETA PARA LA F UNCIÓN DE P REPARAR B ASA “D OUGH” Pan de Chocolate y Nuez Rosca Trenzada de Naranja y Anís 1/2 taza de nueces picadas 3/4 taza de azúcar 1/2 taza de piezas de chocolate semi amargo 1 cuta. de canela molida 2 tazas de harina, divididas 1 cuta. de ralladura de cáscara de naranja 3 huevos grandes, ligeramente batidos 1/2 cuta. de sal 1/3 taza de aceite vegetal o de canola 1/2 cuta. de pimienta inglesa 2 cuta.
R ECETAS PARA LA F UNCIÓN DE B AGEL “B AGEL ” R E C E TA PA R A L A F U N C I Ó N D E PA N E S T I L O E U R O P E O “E U R O P E A N B R E A D ” Bagels de Miel y Trigo Entero Pan Negro 1 taza de agua (75°– 85°F or 24°– 30°C) 1 taza de harina de trigo entero 1-1/2 Cu. de miel 1-1/2 cuta. de sal 2 tazas de harina para preparar pan 1-1/2 cuta. de levadura para preparar pan en máquina 1 2 3 4 5 6 7 8 9 10 11 12 13 14 15 16 17 18 19 78 Coloque la cuchilla amasadora dentro del recipiente para pan.
R ECETAS PARA LA F UNCIÓN DE B AGEL “B AGEL ” R E C E TA PA R A L A F U N C I Ó N D E PA N E S T I L O E U R O P E O “E U R O P E A N B R E A D ” Bagels de Miel y Trigo Entero Pan Negro 1 taza de agua (75°– 85°F or 24°– 30°C) 1 taza de harina de trigo entero 1-1/2 Cu. de miel 1-1/2 cuta. de sal 2 tazas de harina para preparar pan 1-1/2 cuta. de levadura para preparar pan en máquina 1 2 3 4 5 6 7 8 9 10 11 12 13 14 15 16 17 18 19 78 Coloque la cuchilla amasadora dentro del recipiente para pan.
Recetas para la Función de Jaleas “Jam” Jalea de Durazno o Melocotón 1 taza de azúcar Glasees Una vez que la masa de los rollos o panqués se leve, justo antes de hornear, aplique ligeramente el glaseado que desee utilizando un pincel de repostería. Hornee como lo indica la receta. • Para un glaseado dorado brilloso, use un glaseado de huevo o de yema de huevo. • Para un glaseado brilloso y crujiente, use glaseado de clara de huevo (el glaseado tendrá de un color más claro). 1 Cu.
Recetas para la Función de Jaleas “Jam” Jalea de Durazno o Melocotón 1 taza de azúcar Glasees Una vez que la masa de los rollos o panqués se leve, justo antes de hornear, aplique ligeramente el glaseado que desee utilizando un pincel de repostería. Hornee como lo indica la receta. • Para un glaseado dorado brilloso, use un glaseado de huevo o de yema de huevo. • Para un glaseado brilloso y crujiente, use glaseado de clara de huevo (el glaseado tendrá de un color más claro). 1 Cu.
Glaseado de Cítricos Crema de Chocolate y Plátano para Untar Mezcle hasta que tenga una consistencia lo suficientemente ligera como para rociar: Mezcle: 1/3 taza de plátano maduro hecho puré 1/2 taza de chispas de chocolate semi amargo, derretidas 1/2 taza de azúcar en polvo 1 cuta. de ralladura de cáscara de limón o naranja Crema de Jamón y Queso para Untar 2 cuta.
Glaseado de Cítricos Crema de Chocolate y Plátano para Untar Mezcle hasta que tenga una consistencia lo suficientemente ligera como para rociar: Mezcle: 1/3 taza de plátano maduro hecho puré 1/2 taza de chispas de chocolate semi amargo, derretidas 1/2 taza de azúcar en polvo 1 cuta. de ralladura de cáscara de limón o naranja Crema de Jamón y Queso para Untar 2 cuta.
Índice de la Recetas PÁGINA Pan Blanco Estilo Casero . . . . . . . . . . . . . . . . . . . . . . . . . . . 50 ExpressBake™ Pan Blanco Tradicional . . . . . . . . . . . . . . 58 Pan de Trigo Entero . . . . . . . . . . . . . . . . . . . . . . . . . . . . 72 Pan Francés Clásico . . . . . . . . . . . . . . . . . . . . . . . . . . . . 73 Pan de Nueces y Plátano . . . . . . . . . . . . . . . . . . . . . . . . 74 Pan Blanco Estilo Tradicional ExpressBake™ . . . . . . . . . 75 Pan de Chocolate y Nuez . . . . . . .
Índice de la Recetas PÁGINA Pan Blanco Estilo Casero . . . . . . . . . . . . . . . . . . . . . . . . . . . 50 ExpressBake™ Pan Blanco Tradicional . . . . . . . . . . . . . . 58 Pan de Trigo Entero . . . . . . . . . . . . . . . . . . . . . . . . . . . . 72 Pan Francés Clásico . . . . . . . . . . . . . . . . . . . . . . . . . . . . 73 Pan de Nueces y Plátano . . . . . . . . . . . . . . . . . . . . . . . . 74 Pan Blanco Estilo Tradicional ExpressBake™ . . . . . . . . . 75 Pan de Chocolate y Nuez . . . . . . .
More Recipes / Más Recetas 86 More Recipes / Más Recetas 87
More Recipes / Más Recetas 86 More Recipes / Más Recetas 87
BUREADMAKER M R MÁQUINA PARA ACER PAN H I R M SER ANUAL WITH ECIPES ANUAL DE NSTRUCCIONES CON ECETAS ©2001 Sunbeam Products, Inc. All rights reserved. SUNBEAM® is a registered trademark of Sunbeam Products, Inc. ExpressBake™ is a trademark of Sunbeam Products, Inc. Distributed by Sunbeam Products, Inc., Boca Raton, Florida 33431. ©2001 Sunbeam Products, Inc. Todos los derechos reservados. SUNBEAM® es una marca registrada de Sunbeam Inc. ExpressBake™ es una marca comercial de Sunbeam Products, Inc.