Pro Glide 8300 Steam Generator ® Instruction Booklet SR8300 Please read these instructions carefully and retain for future reference.
Contents Sunbeam’s Safety Precautions Features of your Pro Glide® 8300 Steam Generator Using your Pro Glide® 8300 Steam Generator Care and Cleaning of your Pro Glide® 8300 Steam Generator Ironing Tips & Tricks Ironing Chart 3 4 7 11 13 14 Important instructions – retain for future use.
Sunbeam’s Safety Precautions SAFETY PRECAUTIONS FOR YOUR IRON • Do not leave a hot iron within reach of children. If they come into contact with a hot iron it could lead to serious burns. • Iron only on an ironing board. Do not place the steam generator on carpet during use. • The iron must not be stored whilst it is connected to the supply. The electronic switch provided is for functional use only during operation, and is not intended to provide disconnection from the supply.
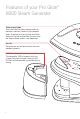
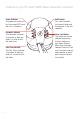
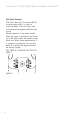
Features of your Pro Glide® 8300 Steam Generator Steam release button Press and hold the steam release button to produce a constant stream of high-powered steam to reduce your ironing time and effort. Steam will not be emitted from the iron when the steam release button is not depressed. Iron rest Place the iron on the heat resistant iron rest between garments. Refillable water tank cover The removable 1400ml capacity tank has a large filling hold to make it easy to refill.
Thermostat light The thermostat light illuminates to indicate that the iron sole plate is heating, and goes out when it has reached the temperature selected on the temperature dial. The thermostat light cycles on and off during ironing as the iron sole plate maintains the selected temperature. Variable temperature dial The variable temperature dial adjusts the temperature of the iron sole plate, allowing you to select the desired temperature for each garment.
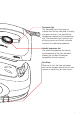
Features of your Pro Glide® 8300 Steam Generator continued Power On Button The power on button will be illuminated RED when the unit is turned on. Low water indicator The low water indicator illuminates to alert you when it is time to refill the water tank. Calc Clean Indicator The Calc Clean indicator illuminates to alert you when its is time to flush the boiler. 6 On/Off Switch This switch controls the internal boiler and the element in the iron soleplate.
Using your Pro Glide® 8300 Steam Generator Before first use Remove any adhesive stickers, plastic covers or cardboard sleeves from the soleplate. Ensure that all adhesive is removed by rubbing the soleplate with a cloth dampened with methylated spirits. Fill the water tank and empty the water. This will rinse out any foreign particles remaining in the water tank from the manufacturing process. NOTE: When turned on for the first time, your new iron may give off vapours for up to 10 minutes.
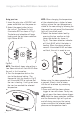
Using your Pro Glide® 8300 Steam Generator (continued) Using your iron 1. Insert the plug into a 230/240 volt power outlet and turn the power on. 2. Select the power button to turn the unit on. The Power On light illuminates RED as shown in Fig 1. The boiler and soleplate will begin heating and the low steam selection light flashes BLUE. Figure 1 NOTE: The default steam rate setting is Low Steam which will flash BLUE when the unit is first turned on. 3.
Using your Pro Glide® 8300 Steam Generator (continued) NOTE: To prevent water dripping from the soleplate, only use the steam function on higher temperature settings (•• / silk setting and above). Once you have finished ironing, switch the iron and boiler off by pressing the power button. Switch the power off at the power outlet and remove the plug. Wait for the iron to cool completely and empty water tank before storing. Warning: Never touch the soleplate at any time when it is hot.
Using your Pro Glide® 8300 Steam Generator (continued) Calc Clean Reminder The Calc Clean light illuminates BLUE to remind you when it is time to flush the boiler. The Calc Clean light illuminates after approximately 8 hours of use. Mineral deposits in tap water solidify when the water is heated and can build up in the steam holes and boiler system which can affect steam performance. It is important to regularly flush out the boiler to maintain the performance of the ironing system.
Care and Cleaning After each use 1. Turn the power off and remove the plug from the power outlet. 2. Allow the iron to cool before winding the cord around the built-in cord wrap. Storage Empty the tank before storage. Always store the iron on the base of the steam generator. Cleaning To clean the exterior of your iron, wipe over with a damp soft cloth and wipe dry. Caution: Do not use harsh abrasives, chemical cleaners or solvents to clean the exterior of your iron as these will damage the surface.
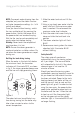
Care and Cleaning (continued) Figure 7 5. Remove the boiler cap completely. See fig 7 6. Place the unit on its side and carefully pour the descaling solution into the boiler. Replace the cap. 7. Return the unit to the upright position and leave for 2 minutes. 8. Shake the unit back and forth to dislodge any scale build up on the base of the boiler. Leave for 10 minutes. 9. Shake the unit again to swirl the solution around inside the boiler. 10.
Ironing Tips and Tricks Tip # 1 - Iron shirts like a pro Start with the collar, working from the outer edges into the middle. Iron the shoulder next, followed by the cuffs and sleeves. Place the collar at the narrow end of the board so that one front panel of the shirt is extended flat. Iron the front panel from shoulder to shirt tail. Rotate to iron the back of the shirt. Rotate and complete the remaining front panel. Tip # 2 - Tips for T-shirts Straighten seams on t-shirts before hanging out to dry.
Ironing Chart Fabric 14 Temperature Setting Ironing recommendation Acrylic • Dry iron on wrong side Acetate • Dry iron on wrong side while still damp or use spray to dampen Silk •• Iron on wrong side. Use an ironing cloth to prevent shine marks Nylon •• Iron on wrong side while still damp or use spray to dampen Polyester •• Iron on wrong side while still damp or use spray to dampen Rayon •• Iron on wrong side of fabric Viscose •• Mainly dry iron.
2 Year Replacement Guarantee In the unlikely event that this appliance develops any malfunction within 2 years of purchase (3 months commercial use) due to faulty materials or manufacture, we will replace it for you free of charge. Should you experience any difficulties with your appliance, please phone our customer service line for advice on 1300 881 861 in Australia, or 0800 786 232 in New Zealand. Alternatively, you can send a written claim to Sunbeam at the address listed below.
Need help with your appliance? Contact our customer service team or visit our website for information and tips on getting the most from your appliance. In Australia Visit www.sunbeam.com.au Or call 1300 881 861 In New Zealand Visit www.sunbeam.co.nz Or call 0800 786 232 is a registered trademark. ‘Solus’ and ‘Resilium’ are registered trademarks of Sunbeam Corporation. Made in China. Due to minor changes in design or otherwise, the product may differ from the one shown in this leaflet. © Copyright.