Open All ™ Electric Can Opener Instruction Booklet CA2800 Please read these instructions carefully and retain for future reference.
Contents Sunbeam’s Safety Precautions 1 Safety Precautions for your Open All 1 Features of your Open All 2 Using your Sunbeam Open All 4 Care and Cleaning of your Open All 6 Important instructions – retain for future use.
Sunbeam’s Safety Precautions SAFETY PRECAUTIONS FOR YOUR SUNBEAM OPEN ALL. • Keep fingers well away from blade when in use. • Do not place any part of this appliance in a dishwasher. • Use extreme care when handling off-cuts. • Use extreme care when handling blades. • • • • • • • • • Sunbeam is very safety conscious when designing and manufacturing consumer products, but it is essential that the product user also exercise care when using an electrical appliance.
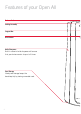
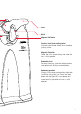
Features of your Open All Release Button Cutting Assembly Support Bar Drive Wheel Knife Sharpener Built in ceramic knife sharpener will ensure that your knives remain sharp at all times. Cord Storage Handy cord storage keeps the benchtop tidy by storing unwanted cord.
Lever Blade Magnetic Lid Holder Stainless steel blade cutting action Stainless steel blade allows for a smoother cutting action. Magnetic lid holder Holds the lid in place during and after the can is fully opened. Removable lever For easy cleaning, slide the release button and remove the cutting assembly/lever. Automatic operation Simply lift the lever and position the blade inside the rim of the can. Press the lever down and the Open All™ can opener will automatically stop when the can is fully opened.
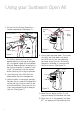
Using your Sunbeam Open All 1. Ensure that the Cutting Assembly is correctly positioned. (See figure 1.) Release Button Support Bar Lever Drive Wheel Keyhole Drive Wheel Figure 1 The Cutting Assembly fits into the keyhole opening at the top of the Open All™ can opener, above the Drive Wheel. Slide the Release Button to the right as the Cutting Assembly is inserted, it will “click” into position, with the release button returning to its original position. Figure 2 4. Firmly press the Lever down.
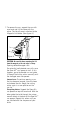
. To remove the can, support the can with one hand and lift the Lever with the other. The lid will remain attached to the Magnetic Lid Holder. (See figure 4.) Figure 4 CAUTION: Be careful when removing the lid from the magnet as the cut edge is sharp. Opening dented/damaged cans: Occasionally, badly dented cans will cause the Open All™ can opener to stall. If this happens, grasp the dented can and guide it through the cutting action manually until the damaged areas are opened.
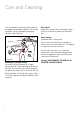
Care and Cleaning Turn the power off and unplug the cord from the power outlet before cleaning. The Cutting Assembly is easily removed for thorough cleaning. (See figure 5.) Release Button Motor Housing: Wipe over with a damp cloth. Keyhole Do not use harsh abrasives or cleaners to clean any parts of your Open All™ can opener, as these may scratch the parts. Drive Wheel Figure 5 Removing the Cutting Assembly: Raise the Cutting Assembly to its most upright position.
Notes
Notes
12 Month Replacement Guarantee In the unlikely event that this appliance develops any malfunction within 12 months of purchase (3 months commercial use) due to faulty materials or manufacture, we will replace it for you free of charge. Should you experience any difficulties with your appliance, please phone our customer service line for advice on 1300 881 861 in Australia, or 0800 786 232 in New Zealand. Alternatively, you can send a written claim to Sunbeam at the address listed below.
Need help with your appliance? Contact our customer service team or visit our website for information and tips on getting the most from your appliance. In Australia Visit www.sunbeam.com.au Or call 1300 881 861 In New Zealand Visit www.sunbeam.co.nz Or call 0800 786 232 is a registered trademark. ‘Open All’ is a trademark of Sunbeam Corporation. Made in China. Due to minor changes in design or otherwise, the product may differ from the one shown in this leaflet. © Copyright.