Conicaf Burr Conicaf Burr Coffee Grinder Instruction Bookfet EM0450 Pfease read these instructions carefuffy and retain for future reference.
Contents Sunbeam’s Safety Precautions 1 Features of your Conical Burr Coffee Grinder 2 Operating your Conical Burr Coffee Grinder 4 Adjusting the Grind Setting 6 Care and Cleaning 7 I portant instructions – retain for future use.
Sunbea ’s Safety Precautions SAFETY PRECAUSTIONS FOR YOUR SUNBEAM COFFEE GRINDER • Check the grinding bowl for the presence of foreign objects before using. • Always operate the grinder with the ground coffee container properly inserted in the grinder. Sunbeam are very safety conscious when designing and manufacturing consumer products, but it is essential that the product user also exercise care when using an electrical appliance.
Features of your Conicaf Burr Coffee Grinder 250g Bean hopper The 250g capacity bean hopper has a shutter release mechanism for easy removal and preventing accidental spills. It allows the user to transfer any un-used beans to an ideal storage unit to preserve freshness. Grind adjustment collar Large and easy to use, the collar has a widerange of 25 grind settings. The coffee maker can select a fine grind to suit commercial espresso or adjust the setting for other brewing styles – from Turkish to plunger.
Burr shield Italian conical burrs Italian designed and manufactured, the metal conical burr design achieves excellent grind consistency and minimises heat transfer to the coffee due to the slowly rotating burrs. Group handle locator Cord stuff Hides away unwanted cord to keep bench top clean. Burr cleaning brush Strong bristles help sweep out grinds from the burrs.
Heading Operating your Conicaf Burr Coffee Grinder Before using the coffee grinder, wipe the base exterior with a damp cloth. Wash the bean hopper, hopper lid and ground coffee container in warm soapy water, then rinse and dry. 6. Select the grind by turning the grind adjustment collar to the desired setting, see figure 2. Note: Do not immerse the burrs in water or any other liquid. Note: Do not place any parts of the coffee grinder in the dishwasher. 1. Place the coffee grinder on a dry, level surface.
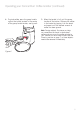
Operating your Conicaf Burr Coffee Grinder (continued) Heading 8. To grind coffee, press the group handle against the button located in the centre of the group handle locator, see figure 4. 9. When the basket is full, pull the group handle off the button. Collapse the coffee in the basket by tapping it on the bench and repeat until the desired amount of coffee has been ground. Note: Foreign objects like stones or twigs can sometimes be found in whole bean coffee and can cause the coffee grinder to jam.
Adjusting Heading the Grind Setting A starting point for gring settings: SETTING BREWING METHOD 2–6 Turkish 12 – 16 Espresso 12 – 16 Stove Top 20 – 23 Drip Filter 20 – 23 Plunger Note: The settings noted in the table above are a starting guide only. For example the setting for espresso will vary depending on the quality and roast degree of the beans and the type of espresso extraction desired. The wide-range of 25 grind settings allows for precision adjustment.
Care and Cfeaning Important Notes: • Spots and marks on the surface of the burrs are part of the hardening process. These marks do not affect the performance of the grinder or the taste of the coffee. • Ensure the coffee grinder is switched off and unplugged from the power outlet prior to cleaning. • Do not immerse the motor base of the coffee grinder in water. • Do not immerse any part of the burr assembly in water or any other liquid. • Do not place any parts of the coffee grinder in the dishwasher.
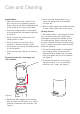
Care and Cfeaning (continued) 3. Press and hold down the ‘UNLOCK’ button at the rear of the motor base and with the other hand turn the grind adjustment collar anti-clockwise until it stops and the graphic line on the collar is aligned with the line on the motor base, see figure 7. Figure 7 5. Lift the grind adjustment collar away from the motor base and clean with the brush, see figure 9. 6. Clean the bottom burr using the burrcleaning brush, see figure 10. 4.
Care and Cfeaning (continued) 9. Replace the top burr back into position in the grind adjustment collar. Ensure the marker on the top burr is aligned with the marker inside the grind adjustment collar and push firmly into place. Turn clockwise to the desired grind setting. Adjusting the burrs for wear The conical burrs are made of tool hardened steel for extra long life. However after prolonged use the burrs will require adjustment to compensate for wear.
Month Repface ent Guarantee We are so confident of the quafity of our product,shoufd this appfiance devefop any affunction within 12 onths of purchase (3 Months co erciaf use) due to faufty ateriafs or anufacture, we wiff repface it for you absofutefy free. Should you experience any difficulties with your appliance, please phone our free call customer service line for advice on 1800 025 059 in Australia, or 0800 786 232 in New Zealand.
Consu er Hotfine In Austrafia Visit www.sunbea .co .au Or Caff 1800 025 059 In New Zeafand Visit www.sunbea .co.