Slice + Ice Fresh Food Slicer and Frozen Dessert Maker Two in One Instruction/Recipe Booklet FC2000 Please read these instructions carefully and retain for future reference.
Contents Sunbeam’s Safety Precautions 1 Features of your Slice + Ice - Slicing Attachment 2 Using your Slicing Attachment 4 Features of your Slice + Ice - Frozen Dessert Attachment 7 Using your Frozen Dessert Attachment 8 Care and Cleaning 10 Recipes - Slicing Attachment 11 Recipes - Frozen Dessert Maker Attachment 15 Important instructions – retain for future use.
Sunbeam’s Safety Precautions • • • • • • • • • • • • • • SAFETY PRECAUTIONS FOR YOUR SUNBEAM FOOD SLICER & FROZEN DESSERT MAKER Avoid contact with moving parts. Do not touch the blades while it is in operation, as it is very sharp. Turn the power off and disconnect from supply before changing blades and accessories or approaching parts that move. Care should be taken when handling sharp cutting blades, emptying the bowl and during cleaning.
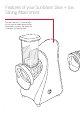
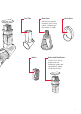
Features of your Sunbeam Slice + Ice: Slicing Attachment Motor Unit The one motor unit is used for both the slicing and frozen dessert maker attachments, ensuring the appliance is compact and easy to store 2
Feed Tube Blade Cone Blade Cover Houses the specific blade for your slicing needs. Interchange the blades as need. Blades Blades with Food Pusher Thick & thin slicing blades and the shredding blades are conveniently stored inside the pusher.
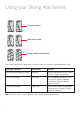
Using your Slicing Attachment Thin-slicing blades Thick-slicing blades Coarse grating/shredding blades The Slicing Attachment comes with 3 various blades for a range of food preparation tasks. Blade type (one pair) Blade colour Ideal for: Coarse grating/shredding blades Dark red Grating vegetables such as carrots, zucchini, peppers or potatoes Thin slicing blades Light blue Slicing vegetables and fruit such as zucchini, carrots, potatoes, cucumbers, lettuce, cabbage, apples or onions.
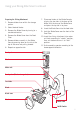
Using your Slicing Attachment continued Preparing the Slicing Attachment 1. Remove blades from within the storage pusher. 2. Select desired blades. 3. Remove the Blade Cover by turning to a clockwise direction. 4. Remove the Blade Cone from the Feed Tube. 5. Remove blades currently in the Blade Cone by pressing down on the tab at the top of the cone and pulling forward. 6. Repeat on opposite side. 7.
Using your Slicing Attachment continued Using the Slicing Attachment 12. Prepare your ingredients, such as potato or carrot, by peeling if needed, and cutting into a suitable size to fit in the Feed Tube. 13. Choose the blade type according to your need (refer to table on page 5), assemble the blade as per instruction 1 – 11. Please ensure you assemble one pair of blades with the same colour. 14. Plug in the appliance to the power source, then press the switch to “ON” position.
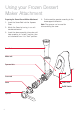
Features of your Sunbeam Slice + Ice: Frozen Dessert Maker Attachment Motor Unit The one motor unit is used for both the slicing and frozen dessert maker attachments, ensuring the appliance is compact and easy to store Squeeze Tube with Screw Rod Cover Food pusher 7
Using your Frozen Dessert Maker Attachment Preparing the Frozen Dessert Maker Attachment 1. Insert the Screw Rod into the Squeeze Tube. 2. Attach the Cover by turning in an anticlockwise direction 4. To disassemble, operate according to the above opposite direction. Note: The spanner can be used for disassembling the cover. 3. Insert the above assembly into motor unit hole according to “unlock” position, then anti-clockwise turns it to “lock” position.
Using your Frozen Dessert Maker Attachment continued Using the Frozen Dessert Maker Attachment 5. The Frozen Dessert Maker works with frozen fruits, small ice cubes, yoghurt, icecream and sorbets. 6. Prepare your ingredients by removing the frozen fruits from the freezer around 10 mins prior to processing. For best results, use frozen banana as the base of your frozen dessert. You can also add additional soft fruits, such as apple, strawberry, mango etc.
Heading Care & Cleaning 1. Ensure all attachments and parts are well cleaned after use. 2. Unplug the power cord before cleaning the motor body To clean the motor body, wipe with a damp cloth. Note: Never immerse the motor unit in the water for cleaning. 3. Disassemble all the accessories such as feed tube, feed tube cover, blade cone, blades, food pusher, food pusher cover, squeeze tube and screw rod. Caution: Ensure that the motor unit is unplugged when disassembling.
Heading - Slicing Attachment Recipes Chinese Chop Salad with Peanut Sesame Dressing - Vegan, Dairy Free, Gluten Free 6. Pour dressing over the salad ingredients. Toss to combine. TIP: This salad is great in sandwich or wraps.
Recipes - Slicing Attachment continued Crunchy Kale Salad - Paleo, Vegan, Dairy Free, Gluten Free Lightly Pickled Carrot and Mint Salad ¼ head red cabbage ¼ cup olive oil 2 granny smith apples, halved, core removed 1 ½ teaspoons coriander seeds 1 avocado, peeled, roughly chopped ½ teaspoon cumin seeds ½ bunch kale, finely sliced 10 fresh mint leaves, finely sliced 1 cup roasted almonds, roughly chopped 1 cup dried cranberries 1 long red chilli, seeds removed, finely chopped Dressing: 2 tablesp
Recipes - Slicing Attachment continued Crowd Pleasing Coleslaw Red Cabbage Slaw 2 stalks celery 1 head savoy cabbage 2 apples, halved, core removed, cut into quarters 1 red onion, quartered 1 red onion, halved 1 cup flat-leaf parsley, roughly chopped ½ red cabbage ¼ cup chives, roughly chopped 1 cup walnuts, roughly chopped ¼ cup poppy seeds Dressing: 3 hardboiled eggs, peeled, roughly chopped ½ cup olive oil Dressing: ¹⁄³ cup apple cider vinegar ²⁄³ cup mayonnaise 1 tablespoon Dijon musta
Recipes - Slicing Attachment continued Upside Down Carrot and Ginger Cake Base: 3 carrots, peeled ½ cup shredded coconut ½ cup roasted walnuts, roughly chopped ¼ cup brown sugar ¼ cup coconut oil 2 tablespoons honey 2 teaspoons freshly ground ginger Cake: 2 carrots, peeled 1 cup plain flour ½ cup shredded coconut ¹⁄³ cup roasted walnuts, roughly chopped ½ teaspoon baking powder ½ teaspoon baking soda 1 teaspoon ground cinnamon ½ teaspoon ground nutmeg ½ teaspoon ground cloves ½ cup caster sugar ½ cup veget
Recipes - Frozen Dessert Maker Attachment When making the desserts with coconut cream we recommend pouring the liquid mixture into ice trays. This makes it easy to pop the frozen liquid out and place down the chute. If you don’t have an ice tray, freeze in a shallow dish. This way it can easily be broken up before processing. The Test Kitchen also recommends alternating the ingredients when placing down the Feed Tube, for a more mixed result.
Recipes - Frozen Dessert Maker Attachment continued Raspberry and Lime Sorbet - Paleo, Vegan, Gluten Free, Dairy Free Peach, Mint and Ginger Shaved Ice - Paleo, Began, Gluten Free, Dairy Free 3 bananas, peeled, chopped 1 cup raspberries 4 ripe white peaches, stone removed, roughly chopped 2 tablespoons lime zest 2 bananas, peeled, roughly chopped 1. Combine all ingredients. Place in freezer and freeze for 3-4 hours or until frozen. 2. Assemble frozen dessert maker.
Recipes - Frozen Dessert Maker Attachment continued Banana and Date Faux Ice Cream - Paleo, Vegan, Gluten Free, Dairy Free Sugar Free Chocolate Ice Cream - Paleo, Vegan, Gluten Free, Dairy Free 4 ripe bananas, peeled, roughly chopped 4 ripe bananas, peeled, roughly chopped 4 medjool dates, stone removed, roughly chopped 1 cup coconut milk 1. Combine all ingredients. Place in freezer and freeze for 3-4 hours or frozen. 2. Assemble frozen dessert maker.
Recipes - Frozen Dessert Maker Attachment continued Extreme Brownie Ice Cream Peanut Butter Chocolate Swirl Ice Cream 2 scoops vanilla ice cream 2 scoops vanilla ice cream 1 cup of roughly chopped chocolate brownie ½ cup chopped chocolate cake or soft chocolate cookies ½ cup dark chocolate chips ¹⁄³ cup chopped walnuts ¼ cup peanut butter Extra chopped brownie, to serve 2 tablespoons chopped salted peanuts 1. Combine all ingredients. 2. Assemble frozen dessert maker.
Recipes - Frozen Dessert Maker Attachment continued Salted Caramel and Vanilla Crunch Ice Cream 2 scoops vanilla ice cream ½ cup roughly chopped vanilla cookies ¼ cup salted caramel * 1 teaspoon vanilla extract ½ teaspoon ground nutmeg ½ teaspoon sea salt Extra salted caramel, to serve 1. Combine all ingredients. 2. Assemble frozen dessert maker. Place a bowl at the base of the feed tube to catch frozen dessert. Turn on. 3. Place ice cream mixture down the chute.
Notes
12 Month Warranty This Sunbeam product is covered by a 12 month replacement or repair warranty, which is in addition to your rights under the Australian Consumer Law (if your product was purchased in Australia) or New Zealand Consumer Guarantees Act (if your product was purchased in New Zealand). Should you experience any difficulties with your product during the warranty period, please contact our customer service line for advice on 1300 881 861 in Australia, or 0800 786 232 in New Zealand.
Need help with your appliance? Contact our customer service team or visit our website for information and tips on getting the most from your appliance. In Australia Visit www.sunbeam.com.au Or call 1300 881 861 In New Zealand Visit www.sunbeam.co.nz Or call 0800 786 232 is a registered trademark. Made in China. Due to minor changes in design or otherwise, the product may differ from the one shown in this leaflet. © Copyright. Sunbeam Corporation Limited 2012.