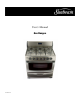
User’s Manual Gas Ranges PTT051107
Table of Contents CONTENTS PAGE IMPORTANT SAFETY INSTRUCTIONS 3 GROUNDING INSTRUCTIONS 5 COOK-TOP USE 6 OVEN USE 7 HOW TO OPERATE THE OVEN 8 SETTING THE CLOCK AND TIMER (on some models) 8 GENERAL CARE AND CLEANING 10 BEFORE YOU CALL FOR SERVICE 13 REPLACEMENT PARTS 13 2
IMPORTANT SAFETY INSTRUCTIONS READ ALL INSTRUCTIONS BEFORE USING THIS UNIT SAVE THESE INSTRUCTIONS FOR FUTURE REFERENCE This manual contains important safety symbols and instructions. Please read and follow all instructions given: WARNING! This word will alert you to situations that may cause seriously harm, death or property damage if you do not follow instructions. CAUTION! This word will alert you to situations that may cause injury or property damage if you do not follow instructions.
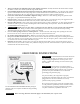
ANTI-TIP DEVICE WARNING! • • • • All ranges can tip. Injury to persons could result. Install anti-tip device packed with range. See Installation Instructions. WARNING! To reduce the risk of tipping, the range must be secured by properly installed anti-tip bracket provided with the range. Please refer to the anti-tip bracket installation instructions for proper installation.
• • • • • • • • • • Always turn knob to the full LITE position when igniting top burners. Visually check that the burner has lit. Adjust the flame so it does not extend beyond the edge of the utensil.
COOK-TOP USE SETTING SURFACE CONTROLS IMPORTANT: In the event of an electrical power outage, the surface burners can be lit manually. To light a surface burner, hold a lit match to the burner head, and slowly turn the Surface Control knob to LITE. After the burner lights, push in and turn knob to desire setting. Use CAUTION when lighting surface burners manually. • Your range may be equipped with 2 different sized surface burners.
OVEN USE BEFORE SETTING OVEN CONTROL Oven Vent Location • The oven vent is located below the back guard. When the oven is on, warm air is release through this vent. This venting is necessary for proper air circulation in the oven and good baking results. • DO NOT BLOCK OVEN VENT. Arranging Oven Racks • ALWAYS ARRANGE OVEN RACKS WHEN THE OVEN IS COOL (PRIOR TO OPERATING THE OVEN) • Always uses oven mitts when using the oven.
HOW TO OPERATE THE OVEN Baking Before baking, positions racks and bake ware according to “Arranging Oven Racks” and “Air Circulation in the Oven” sections. 1. Push in and turn the Temperature Control knob to the desire temperature. 2. Preheat the oven for 10 to 12 minutes before baking. Preheating is not necessary when roasting, cooking casseroles or broiling most foods. 3. When cooking is finished, turn the Temperature Control knob to OFF.
GENERAL CARE AND CLEANING IMPORTANT: Before cleaning, make sure all controls are OFF and the range is cool. Always follow label instructions on cleaning products. Soap, water and a soft cloth or sponge are suggested first unless otherwise noted. SURFACES Porcelain enamel surfaces and burner grates Painted surfaces Control panel and knobs Lift-off oven door HOW TO CLEAN • The porcelain enamel finish is sturdy but breakable if misused. This finish is acid-resistant.
Oven cavity Oven heating elements Oven racks Broiler pan Oven light (on some models) Broiler drawer (on some models) • • Do not use oven cleaners. Soap and water will normally do the job. Heavy spattering or spillovers may require cleaning with a mild abrasive cleaner. Soap-filled, steel wool pads may also be used. • Be sure to wear rubber gloves to protect your hands. • To clean the oven bottom, gently lift the bake element. This will allow easier access to the oven bottom for cleaning.
CLEANING THE CONTOURED WELL AREAS, BURNER CAPS, AND BURNER HEADS The contoured well areas, burner caps and burner heads should be routinely cleaned. Keeping the burner ports clean will prevent improper ignition and an uneven flame. To clean the recessed and contoured areas of the cook-top: • If a spill occurs on or in the recessed or contoured areas, blot up spill with an absorbent cloth. Rinse with a clean, damp cloth and wipe dry.
BEFORE YOU CALL FOR SERVICE IMPORTANT: Before you call for service, review this list. It may save you time and expense. The list includes common occurrences that are not the result of defective workmanship or materials in this appliance.
© 2007 Sunbeam Products, Inc. doing business as Jarden Consumer Solutions. All rights reserved. Sunbeam is a registered trademark of Sunbeam Products, Inc. used under license. Distributed by Petters Consumer Brands, LLC. 4400 Baker Road, Minnetonka, MN 55343. ® For service, support and warranty information, visit www.sunbeammajorappliances.com or in the US call 1-866-866-6283.