Food Processor 1100 watt processor with wide chute Instruction Booklet LC7900 Please read these instructions carefully and retain for future reference.
Contents Sunbeam’s Safety Precautions 3 Features of your Food Processor 4 Attachments for your Food Processor 6 Using your Food Processor 7 Fitting/using the tools on your Food Processor 9 Storing your Food Processor 11 Handy hints for processing 13 Care and cleaning 15 Recipes 16 Important instructions – retain for future use.
Sunbeam’s Safety Precautions SAFETY PRECAUTIONS FOR YOUR SUNBEAM FOOD PROCESSOR LC7900. • Always use extreme care when handling blades and cutting discs. These are extremely sharp and may cause injury if handled incorrectly. Always store blades and cutting discs in their respective covers or processing containers. • Unplug from power outlet when not in use, before putting on or taking off attachments, and before cleaning. • Do not put hot liquids into the processing bowl.
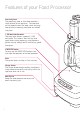
Features of your Food Processor Processing cover The processing cover or lid of bowl provides a safety feature to the appliance. The appliance will not operate unless the bowl, cover and large feed pusher are correctly positioned and locked into place. 1,100 watt induction motor The heavy base houses a powerful 1,100 watt motor. This motor is ideal for high load applications during processing, and provides a greater starting strength whilst maintaining speed throughout.
Food Pushers The food pushers assist in guiding the food through the chute to ensure ingredients hit the blade vertically for best processing results. Three food pushers are included, depending on the size of the chute being used and the size of foods. For thinner foods, use the smaller internal pusher for consistent even slicing. This pusher also doubles as a measuring cup. Wide Chute At 14cm’s wide, the extra wide chute eliminates the need to cut most ingredients, to fit into the chute.
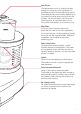
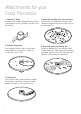
Attachments for your Food Processor 1. Universal 's' blade Stainless steel smooth edged processing blade is designed for cutting, kneading, whisking and emulsifying. 4. Reversible shredding disc - fine and coarse Ideal control, the reversible stainless steel shredding blades allow for the choice of fine or coarse results. 2. Variable slicing blade The variable stainless steel slicing blade allows foods to be sliced to a variety of thicknesses, up to 7mm. 5.
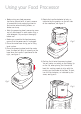
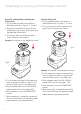
Using your Food Processor • B efore using your food processor, familiarise yourself with all parts, remove all promotional and packaging materials. Use caution when handling blades, as blades are sharp. 3. Rotate the handle clockwise to lock, as indicated by the graphics on the left side of the motorbase, see figure 2. • W ash the processing bowl, processing cover and all attachments in warm water using a mild detergent. Dry each part thoroughly before use.
Using your Food Processor continued Important: If the processing bowl, processing cover and large pusher are not correctly assembled, the food processor will not operate. This is a safety feature. Using your Food Processor 1. Plug the power cord into a 230-240V AC power outlet and turn the power ‘ON’. 2. Using the START/STOP button on the control panel, press once to start processing. The Pulse function remains on as long as the Pulse button is pressed down.
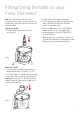
Fitting/Using the tools on your Food Processor Note: All attachments must be firmly attached to the spindle. Always adjust the attachments until you are sure that they are correctly fitted. Placing the spindle 1. Fit the spindle onto the drive shaft, see figure 4. 3. Place food into the processing bowl. 4. Fit the processing cover to the processing bowl, see figure 3 and place the food pusher in the feed chute. 5. Plug the power cord into a 230-240V AC power outlet and turn the power ‘ON’. 6.
Fitting/Using the tools on your Food Processor continued Reversible grating/shaving, shredding and julienne discs 1. Fit the processing bowl and spindle as detailed previously, in figures 1, 2 and 4. 2. Select the 'reversible' disc of your choice – shredding (fine or coarse), grating/shaving or the dedicated julienne disc. Variable slicing blade 1. Fit the processing bowl and spindle as detailed previously in figures 1, 2 and 4. 2.
Storing your Food Processor The food processor was designed so that all attachments can be stored within the unit itself, see figure 8. 2. Place one of the 'reversible discs' in storage drawer as indicated in figure 10. Fig 10 3. Place the 'julienne disc' in the storage drawer as indicated in figure 11. Fig 8 Storage drawer The 'julienne blade', 'reversible shredding' disc, 'reversible grating and shaving' disc are all stored in the storage drawer. 1.
Storing your Food Processor continued 6. Close storage drawer, see figure 13. Fig 13 Processing bowl storage, see figure 14. 1. Place the processing bowl onto the base of the food processor. 2. Fit the spindle over the drive shaft. 3. Fit the universal 's' blade over spindle. 4. Place the 'variable slicing' blade over the spindle and then fit the processing cover to the processing bowl. Cord storage The power cord can be stored by pushing it into the back of the motor base, see figure 15.
Handy hints for Processing Chopping For the best, most consistent results, you should try to process pieces of food that are approximately equal in size. When you break, cut or tear food into uniform pieces before you begin processing, the finished results will be more uniform. More consistent processing results are achieved if the container is not overloaded. Mincing Pre-cut meat into cubes approximately 2cm square.
Handy hints for Processing continued Preparing longer slices Pack food items horizontally in the feed tube, see figure 16. Fig 16 Preparing shorter slices Pack the food items vertically in the feed tube, see figure 17. Fig 17 14 Food Pusher Use the food pushers to help guide food through the chute for even, consistent processing. Use the smaller food pushers for smaller, thinner foods for best results.
Care and cleaning When you have finished processing, unplug the food processor from the power outlet. All accessories and processor tools can be washed in hot soapy water except for the processor body. Clean the processor body by wiping with a damp cloth. Warning: Care must be taken when handling the metal blades as these items are extremely sharp. Note: Always unplug the food processor before cleaning.
Recipes - Pastry & Dough Basic White Loaf Pizza Dough Makes: 1 loaf ¹⁄³ cup lukewarm milk ½ cup warm milk 2 teaspoons yeast ¼ cup warm water 1 teaspoon caster sugar 1 tablespoon caster sugar 2 cups plain flour 1 teaspoon yeast 2 teaspoons salt 1 ¾ cups plain flour 1 egg 60g butter, melted 60g butter, melted 1 teaspoon salt 1. In a small bowl combine milk, yeast and sugar. Allow to stand in a warm place until mixture begins to foam. 1. In a small bowl combine milk, water, sugar and yeast.
Pastry & Dough continued Short Crust Pastry Sweet Short Crust Pastry 2 cups plain flour 2 cups plain flour 125g butter, room temperature ½ cup icing sugar 1 egg yolk 125g butter, room temperature 1 tablespoon iced water 2 egg yolks 1. Using the processing bowl fitted with the universal ‘s’ blade process flour, butter, egg yolk and water until mixture forms a ball. 1 tablespoon iced water 2. Knead pastry until smooth shaping into a disk.
Dips & Sauces Basil and Cashew Pesto Hummus Spread on a thick piece of bread for a quick snack. Makes: 2 cups Makes: 2 cups 2 400g cans chickpeas, drained, rinsed 1 bunch fresh basil 1 clove garlic 1 bunch fresh flat-leaf parsley ¹⁄³ cup olive oil 1 clove garlic 1 tablespoon lemon juice 1 ½ cups cashew nuts, roasted 1 tablespoon tahini 1 cup baby spinach ¼ cup water ¹⁄³ cup olive oil Salt and freshly ground black pepper, to taste 1 tablespoon lemon juice 1.
Dips & Sauces continued Roasted Beetroot Dip Mayonnaise Makes: 3 cups Makes: 2 cups 3 large beetroot 4 egg yolks 1 clove garlic 1 tablespoon white wine vinegar 2 tablespoons olive oil 2 teaspoons Dijon mustard 1 tablespoon lemon juice 2 ¼ cups vegetable oil ½ teaspoon ground coriander Salt and freshly ground black pepper, to taste ½ teaspoon ground cumin 1. Using the processing bowl fitted with the universal ‘s’ blade process egg yolks, vinegar and mustard until combined.
Salads Shaved Fennel Salad Smoked Salmon Salad Serves: 3-4 This salad is great for an afternoon snack! 2 small fennel bulbs Serves: 2 2 large zucchinis 1 English cucumber ¹⁄³ cup lemon juice 1 bunch radishes ¹⁄³ cup olive oil 1 red onion ¼ cup fresh dill, roughly chopped ¼ cup olive oil 1 tablespoon honey 2 tablespoons freshly chopped dill 200g baby rocket 2 tablespoons lemon juice ½ cup pine nuts, roasted 1 teaspoon honey 150g feta cheese, crumbled 250g smoked salmon Salt and freshly
Mains/Sides/Soups Vegetarian Lasagne Serves: 8-10 Olive oil spray 2 eggplants 2 large zucchinis 2 medium sweet potatoes, peeled 1 large red onion 1 red capsicum, deseeded 5. In a medium saucepan melt butter. Whisking add flour to form a paste. Slowly add milk, stirring constantly to prevent lumps forming. Cook until sauce has thickened. Remove from heat and stir through mozzarella. 6. In a greased baking dish layer roasted vegetables, tomato sauce, white sauce and lasagne sheets. Repeat.
Mains/Sides/Soups continued Herb Crusted Chicken Roasted Pumpkin and Sweet Potato Soup Serves: 4-6 Makes: 8 cups 10 slices white bread 2 onions 1 clove garlic 500g carrot, peeled 1 tablespoon fresh chives 500g sweet potato, peeled 1 tablespoon fresh flat leaf parsley 2 tablespoons vegetable oil 2cm piece lemon rind 2 cloves garlic 8 chicken thigh fillets 2 teaspoons ground cumin 2 cups plain flour 1 teaspoon ground coriander 4 eggs, lightly beaten 5 cups chicken stock ¼ cup vegetable oi
Mains/Sides/Soups continued Caramelized Onion, Olive and Goats Cheese Tart Fish Cakes Makes: 1 tart Makes: 10 1 recipe short crust pastry 1kg Sebago potatoes, peeled, chopped 1 tablespoon olive oil 600g salmon fillet, skinned, deboned 4 onions 6 long green onions 1 tablespoon balsamic vinegar 2 tablespoons fresh dill 2 eggs 1 ½ teaspoons lemon rind ½ cup milk ½ cup plain flour ½ cup thickened cream 1 egg 150g goat’s cheese 2 cups panko bread crumbs Salt and freshly ground black pepper,
Heading Mains/Sides/Soups continued Oven Baked Hot Chips Chorizo and Basil Pizza Serves: 3-4 Makes: 2 pizzas 1.5kg coliban potatoes, washed ¼ cup vegetable oil 1 basic pizza dough, rolled into 2 26cm circles 2 tablespoons chopped fresh rosemary 1 cup tomato sauce 1 tablespoon sea salt 200g mozzarella Salt and freshly ground black pepper, to taste 2 chorizo sausages 1. Preheat oven to 180°C. Line a baking tray with baking paper. ¼ cup pine nuts, roasted 2.
Sweets and Desserts White Chocolate and Raspberry Cheesecake Buttermilk Pancakes Serves: 8-10 Serves: 3-4 200g digestive biscuits 1 cup buttermilk 80g butter, melted 1 cup self raising flour 500g cream cheese, room temperature 2 tablespoons caster sugar 180g white chocolate, melted ½ teaspoon bicarbonate of soda 1 cup thickened cream 1 egg, lightly beaten ²⁄³ cup icing sugar 60g butter, melted ¼ cup boiling water Butter, for cooking 2 teaspoons powdered gelatine 1.
Sweets and Desserts continued Basic Butter Cake Super Moist Chocolate Cake Serves: 8-10 Serves: 8-10 185g butter, room temperature 200g dark chocolate 1 cup caster sugar 175g butter, room temperature ½ teaspoon vanilla essence ²⁄³ cup brown sugar 3 eggs 100g blanched almonds 2 cups self-raising flour ½ cup cocoa powder ¼ cup milk 4 eggs 1. Preheat oven to 180°C. Grease and line a 23cm cake pan. 2.
Sweets and Desserts continued Banana Cake with Cream Cheese Icing Cream Cheese Icing Serves: 8-10 Makes: 3 cups 160g butter, melted 500g cream cheese, room temperature 1 ½ cups mashed banana 100g butter, room temperature 1 cup caster sugar 2 teaspoons vanilla essence ¾ cup sour cream 1 ½ cups icing sugar ½ cup brown sugar 1. Using the processing bowl fitted with the universal ‘s’ blade process cream cheese, butter and vanilla. Gradually add the icing sugar. Process until smooth.
Sweets and Desserts continued Chocolate Chip Cookies Lime and Mint Granita Makes: 24 Makes: 4-6 125g butter, room temperature 4 lemons ½ cup brown sugar ¼ cup fresh mint leaves ½ cup caster sugar 4 cups water ½ teaspoon vanilla essence ¼ cup caster sugar 1 egg Fresh mint, to serve. 1¾ cups self-raising flour 1. Peel lemons and remove any excess pith. 1 cup milk chocolate chips 2. Using the processing bowl fitted with the universal ‘s’ blade process the lemon and mint until smooth.
Notes
Notes
12 Month Replacement Guarantee In the unlikely event that this appliance develops any malfunction within 12 months of purchase (3 months commercial use) due to faulty materials or manufacture, we will replace it for you free of charge. Should you experience any difficulties with your appliance, please phone our customer service line for advice on 1300 881 861 in Australia, or 0800 786 232 in New Zealand. Alternatively, you can send a written claim to Sunbeam at the address listed below.
Need help with your appliance? Contact our customer service team or visit our website for information and tips on getting the most from your appliance. In Australia Visit www.sunbeam.com.au Or call 1300 881 861 In New Zealand Visit www.sunbeam.co.nz Or call 0800 786 232 is a registered trademark. ‘Food Processor’ is a trademark of Sunbeam Corporation. Made in China. Due to minor changes in design or otherwise, the product may differ from the one shown in this leaflet. © Copyright.