
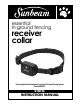
Owner's Manual


5
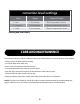
OPERATING INSTRUCTIONS
BATTERY INSTALLATION
IMPORTANT: Thisstepistobecompletedwhenthecollar
isNOTonyourdog.
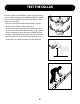
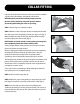
•Removetwoscrewssecuringthebatterycompartmentusing
acrossheadorPhillipsheadscrewdriver.(g.1)
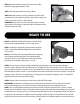
•LiftbatterycompartmentfrommainbodyofReceiverCollar.
(g.2)
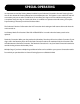
•InserttwoCR2032Lithiumcoinbatteriesintobattery
compartment.Batteriesshouldbeplacedwiththepositive
sidefacingdown.
IMPORTANT: Followorientationasdescribedongraphics
illustratedonbatterycompartment.(g.3)
•ReplacebatterycompartmentwithtwoCR2032Lithiumcoin
batteriesbackintomainbody.Note:Thebatterycompartment
canonlybeassembledinoneorientation,donotforceclosed.
Seemarkingsonthebatterydoor.
•Tightenthetwoscrewsusingthecross-headscrewdriver,donot
overtighten.
•Totesttheunitturnonbypressingandholdingthecontrol
buttonfor4seconds.Youwillhearonelongbeepfollowedby
asequenceofshortbeepsandashinggreenLEDindicating
whichcorrectionlevelisinuse.TheReceiverCollarwillrecallthe
lastsettingorthedefaultsetting(level1orlow).
•Toturnotheunit,pressandholdthecontrolbuttonfor
4seconds.Youwillhearshortbeepsindicatingthecurrent
correctionlevelfollowedbyalongbeepindicatingtheunitiso.
•Beforereplacingbatteriesyoumustcompletelydischargethe
ReceiverCollar.BesuretheunitisintheOFFpositionandplace
themetalportionofaplastichandlescrewdriveracrossboth
stainlesssteelprobesfor5seconds.Disposeofbatteriesper
local,stateandnationallawsandregulations.
gure 1
gure 2
gure 3