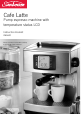
Cafe Latte Pump espresso machine with temperature status LCD Instruction Booklet EM5600 Please read these instructions carefully and retain for future reference.
Sub Heading Body copy with not indent applied.
Contents Sunbeam’s Safety Precautions 2 About espresso coffee 3 Features of your Sunbeam Café Latte 4 Using the control panel 7 Reference guide to using your espresso machine 9 Preparing your espresso machine before use 14 Guide to the perfect espresso 15 Guide to milk texturing 17 Using the hot water function 18 Espresso recipes 19 Care and cleaning 21 Descaling 23 Trouble shooting guide 25 Important instructions – retain for future use.
Sunbeam’s Safety Precautions • • • • • • • • • • • • • SAFETY PRECAUTIONS FOR YOUR SUNBEAM ESPRESSO MACHINE. Always place the unit on a flat, level surface. Do not operate without water in reservoir. Fill reservoir with only clean and cold water. Observe maximum filling volume is 2.1 litres. Do not remove the filter handle during the espresso pour or water flow as the unit is under pressure. Removing the filter handle during either of these operations can lead to a scalding or injury.
About espresso coffee Congratulations on the purchase of your Sunbeam Café Latte espresso machine. Sunbeam's experience in designing appliances for the home has produced a range of pump espresso machines that are as beautiful as they are functional. The Sunbeam Café Latte makes producing cafe-quality coffee at home easier than ever before.
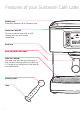
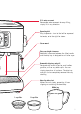
Features of your Sunbeam Café Latte Warming plate Effectively pre-warms up to 9 espresso cups. Control panel with LCD Easy to use control panel with an LCD showing the status of the water temperature. Group head Brass and phenolic filter handle Water level indicator The water level indicator floats through the drip tray grid indicating how full the drip tray is. The top of the indicator has a red band for easy identification.
2.1L water reservoir Removable water reservoir for easy filling, simply lift in any direction. Operating dial Easy to operate – turn to the left for espresso/ hot water, or to the right for steam. Steam wand Extra cup height clearance Additional clearance between the filter handle and the drip tray is designed to suit taller cups. Removable drip tray and grill Designed with no dirt traps for small coffee granules, milk or any other spills. You can simply wipe clean all surfaces.
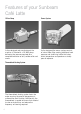
Features of your Sunbeam Café Latte 15 Bar Pump Crema System Italian designed and manufactured, the machine is fitted with a 15 BAR pump delivering the pressure required for a complete extraction of oils, coffee solids and aroma. Italian designed the cream system consists of a dual-floor filter creating additional back pressure and stabilising baffle that helps retain temperature and produces a steady pour of espresso.
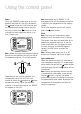
Using the control panel Power Press the ‘POWER’ button once to turn the espresso machine on. The light located on the power button will illuminate red and the temperature indicator line on the LCD will start to flash from symbol; this is to indicate that your espresso machine is on and is heating up. Note: Before turning on the espresso machine ensure that the operating dial on the side of the espresso machine is in the off position.
Using the control panel (continued) Once the espresso machine is heated to the correct temperature, the temperature indicator line will stop flashing and and 'READY' will appear on the LCD, the coffee maker is then able to use the espresso machine. Note: Should the espresso machine not be in steam mode, so the orange light on the steam button is not on, the coffee maker needs to press the steam button to activate the steam mode. By design the temperature of the espresso machine will adjust as necessary.
Reference guide to using your espresso machine The diagrams below and on the following pages are to assist you in operating your Café Latte espresso machine. Each of the diagrams is numbered. Throughout this instruction booklet reference will be made to these diagrams so each of them has been numbered for convenience and ease of use. For example: Fill the water reservoir (1) (2) (3) (4) (5) with cold tap water... Each time you see these numbers please refer back to the diagrams.
Reference guide to using your espresso machine (continued) 10 Place filter handle onto group head. 11 Turn filter handle to the right, as far as it will go. 12 Place large container under both pouring spouts. Making the espresso 14 15 Select appropriate filter and place into handle. Hold filter handle and purge with water to preheat. 17 18 13 Turn the operating dial to the espresso setting and allow water to run through. 16 Place finely ground coffee into filter. 10 Tamp the coffee grinds.
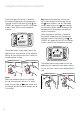
Reference guide to using your espresso machine (continued) 19 Place filter handle onto group head. 20 Turn filter handle to the right, as far as it will go. 22 Turn the operating dial to start and stop the espresso pour. 21 Place glasses/cups below pouring spouts. 23 Remove filter handle by turning to the left. 24 Discard the used coffee grinds. Texturing milk 26 25 Purge the steam wand by turning dial to the steam setting. Turn off steam by turning dial to the off position.
Reference guide to using your espresso machine (continued) 28 29 30 Place steam wand into milk, approx. 1cm below surface and activate the steam function. Angle jug to rest steam wand on spout and place nozzle just below surface of the milk. Raise the jug until nozzle is in the centre of milk. 31 32 33 Close the steam by turning dial to the off position. 34 Close the hot water by turning dial to the off position. 12 Wipe steam nozzle and wand with damp cloth and purge a small amount of steam.
Reference guide to using your espresso machine (continued) 37 Remove drip tray. 38 Ensure plastic lining is clipped back into position in the drip tray. 40 Remove the GREY cleaning pin from the base of the espresso machine where the water reservoir sits. 43 Remove the BLACK steam nozzle cleaning pin from the base of the espresso machine, where the water reservoir sits. 41 Insert the cleaning pin into the single hole in the base of the filter. 39 Remove water reservoir.
Preparing your espresso machine before use 1. Place the espresso machine onto a dry, stable benchtop. 2. Ensure the drip tray and grill are in place. 3. Fill the espresso machine with water. There are a couple of ways in which the water reservoir can be filled; a) Simply lift the lid of the water reservoir at the top of the espresso machine (1) and using a jug, fill with fresh cold water or filtered water (2). b) Alternatively the water reservoir can be removed and filled with fresh cold water.
Guide to the perfect espresso Before starting to prepare for making espresso, ensure the espresso machine is in espresso/hot water mode, so the red light on the power button and the orange light on the button are illuminated. Note: Should the espresso machine not be in espresso/hot water mode so the orange light on the button is not on, the coffee maker needs to press the button to activate the espresso/hot water mode. Preheat Glasses 1.
Guide to the perfect espresso (continued) Tip: After each use of the espresso machine we recommend that a small amount of water is cycled through the group head as this will wash out any old or used coffee grinds stuck to the underside of the group head. Simply turn the operating dial to the espresso setting and allow some water to run through. Standby Mode After 1 hour of non-use the espresso machine will automatically switch to standby mode.
Guide to milk texturing Milk texturing is the steaming of milk. The steam does two things, firstly it heats the milk and secondly the steam mixes air with the milk to form an ‘emulsion’ of tiny bubbles that gives a silky velvet texture. Similar to making an espresso, perfecting the art of milk texturing takes time and practice. Tip: Remember espresso is the foundation for all café style drinks and the milk is the variable.
Guide to milk texturing (continued) 11. With the jug in hand tap the jug on the bench top to release the trapped air bubbles and then swirl the jug in a circular motion until the milk becomes shiny and no bubbles remain, this helps the milk and froth combine for an even consistency. By swirling the milk you can see the foam in the jug swirling with your movement this will enable you to judge the thickness of your foam.
Espresso Recipes ESPRESSO (SHORT BLACK) MACCHIATO Espresso is a concentrated, full bodied coffee with a stable layer of cream on top – known as ‘crema’. An espresso is the foundation of all café coffee. Variations are achieved by adding different amounts of milk and froth. Macchiato, Italian for ‘to stain or mark’. Traditionally served as a standard espresso with a dash of milk and a small dollop of froth into the middle of the ‘crema’.
Espresso Recipes (continued) CAFFE LATTE CAFFE MOCHA An espresso with steamed milk, typically served in a glass. The layer of frothed milk on top should be 10mm to seal the coffee. • 220mL glass or cup Made in a similar way to a cappuccino but with the addition of drinking chocolate. Simply stir the chocolate into the espresso prior to adding the steamed milk and froth.
Care and Cleaning The coffee making process involves extracting oils out of coffee grinds to make espresso coffee. Deposits of these oils build up over time and affect the taste of the coffee and operation of the espresso machine. Regular cleaning to remove these oils is essential and will maintain the quality of the coffee the espresso machine produces and result in less maintenance being required.
Care and Cleaning (continued) Steam wand Keeping the steam arm clean is essential to ensure maximum efficiency of the steam function. A build up of caramelised/dried milk on the steam wand will impair the steaming and texturing ability of the espresso machine. Important: Wipe the steam wand clean with a damp cloth immediately after each use and purge a small amount of steam.
Descaling Scale is a surface build up of minerals that naturally occur over time in all appliances that are involved with the heating of water. Therefore the espresso machine will require occasional descaling. It is recommended that the espresso machine is descaled every 4-6 months, this will vary depending on the frequency of use. Descaling solution Use any of the following when descaling the espresso machine: Sunbeam Espresso Machine Descaling Tablets Sunbeam Liquid Descaler, or Vinegar Solution.
Descaling (continued) 10. Leave the machine off for 10-15 minutes to allow the descaler solution to take affect. 11. Press the power button once to turn the espresso machine on. 12. Turn the operating dial to the espresso setting and allow the remaining solution to cycle through the group head. 13. Remove the water reservoir from the machine and rinse thoroughly under running water, ensuring that all traces of the descaling solution is removed. Fill with clean water and replace the reservoir. 24 14.
Trouble Shooting guide Problem Possible cause What to do Coffee runs down the side of Filter handle is not attached correctly, Ensure the handle is firmly positioned the filter handle. or has not been tigtened sufficiently. onto the group head. See “Guide to the perfect espresso” pg 15. Edge of filter insert is not free Clean around the top edge of the of coffee granules. filter and wipe the group head clean of coffee. The group head is dirty.
Trouble Shooting guide (continued) Espresso does not have any Not enough coffee in filter. Crema. See "Guide to the perfect espresso" pg 15. Handle comes off during group. Coffee tamped too hard. Tamp the coffee grounds lighter. Coffee grind is too fine. Change to a coarser grind of coffee. Filter handle is not attached correctly, or has not been tightened sufficiently. Ensure the handle is firmly positioned onto the group head. See "Guide to the perfect espresso" pg 15.
Trouble Shooting guide (continued) Uneven cup filling. Defective baffle in filter handle. Contact a Sunbeam Service Centre. Espresso tastes burnt. Type of coffee being used. Experiment with different brands of coffee. Appliance has not been rinsed after descaling. Pump makes an unusually load noise. Run a reservoir full of water properly through the machine before making another coffee. No water in reservoir. Fill the water reservoir. Water reservoir not correctly positioned.
Notes
12 Month Replacement Guarantee In the unlikely event that this appliance develops any malfunction within 12 months of purchase (3 months commercial use) due to faulty materials or manufacture, we will replace it for you free of charge. Should you experience any difficulties with your appliance, please phone our customer service line for advice on 1300 881 861 in Australia, or 0800 786 232 in New Zealand. Alternatively, you can send a written claim to Sunbeam at the address listed below.
Need help with your appliance? Contact our customer service team or visit our website for information and tips on getting the most from your appliance. In Australia Visit www.sunbeam.com.au Or call 1300 881 861 In New Zealand Visit www.sunbeam.co.nz Or call 0800 786 232 is a registered trademark. ‘Cafe Latte’ is a trademark of Sunbeam Corporation. Made in China. Due to minor changes in design or otherwise, the product may differ from the one shown in this leaflet. © Copyright.