® Home Vacuum Packaging System Instruction Booklet VAC660 - VS6600 Please read these instructions carefully and retain for future reference.
Contents Important Safeguards 4 Important Tips 5 Features of your FoodSaver® VAC660 6 Using your FoodSaver® VAC660 8 How to Vacuum Package using FoodSaver Canisters, Bottle Stoppers & Deli Containers 10 ® Care and Cleaning Instructions 12 Vacuum Packaging Non-Food Items 13 Food Preparation and Storage Guide 14 Guidelines for Vacuum Packaging 15 Preservation Guidelines 17 Troubleshooting 19 Important instructions – retain for future use.
Sunbeam’sSafeguards Important Safety Precautions Read the Instructions Carefully. For Your Own Safety, Always Follow These Basic Precautions When Using the FoodSaver® Appliance: 1. Do not use the appliance on wet or hot surfaces, or near a heat source. 2. Do not immerse any part of the appliance, supply cord or plug in water or other liquid. 3. To disconnect, unplug the supply cord from the electrical outlet. Do not disconnect by pulling on the cord. 4.
Important Tips When Vacuum Packaging: 1. Vacuum packaging is NOT a substitute for refrigeration. 2. Use ONLY bags, rolls and canisters manufactured by FoodSaver®. 3. Do not allow the Vacuum Channel to fill up with liquids. This will render the machine unusable. To prevent it, avoid overfilling the bags and freeze liquids first. 4. You can prevent liquids from being drawn into the appliance by placing a folded paper towel at the top of the bag, but below the seal area, before vacuum packaging. 5.
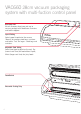
VAC660 28cm vacuum packaging system with multi-fuction control panel Fast Accessory Port Mo Normal Dry Attach accessory hose here and use to vacuum package with FoodSaver® Canisters and bottle stoppers. Speed Setting Select speed to optimise the vacuum 'Normal' for average sized bags, canisters and bottle. 'Fast' for larger - sized bags and canisters. Adjustable Food Setting Select food type to optimise the seal. Dry (normal seal time) for food without liquid; Moist (longer seal time) for juicy foods.
Vacuum & Seal Button oist AUTO FUNCTION Vacuum & Seal Cancel MANUAL FUNCTION Canister Pulse Seal This button has two uses: 1. Press to vacuum package and seal with a single touch. Shuts off automatically. 2. Press to cancel process at any time. Canister Vacuum Button Press to achieve best vacuum results for canisters and bottle stoppers. Seal Button This button has three uses: 1. Press to immediately stop the vacuum process and begin sealing the bag. 2.
Using your FoodSaver VAC660 ® How to make a Bag from a FoodSaver® Roll 1. Place appliance on a flat, dry surface and plug the supply cord into a standard electrical outlet. 2. Pull out enough bag material to hold item to be vacuum packaged. 3. Cut Roll to desired length, plus 7.5cm. 4. Open FoodSaver® lid. The lid may be locked. To unlock by lifting the side latch. Fast Moist AUTO FUNCTION Vacuum & Seal Normal Dry How to Vacuum Package with FoodSaver® Bags 1.
Using your FoodSaver® VAC660 continued Tips on Sealing a Bag Tips on Removing Air from a Bag Make sure you've locked the appliance lid. When making a bag from a roll, place bag material on Sealing Strip, close lid and ensure latch is locked. Make sure you've locked the appliance lid. When vacuuming and sealing a bag or canister, ensure latch is locked. Prevent moisture or liquid from being pulled into the Vacuum Channel or trapped in the seal.
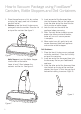
How to Vacuum Package using FoodSaver® Canisters, Bottle Stoppers and Deli Containers 1. Place the appliance on a flat, dry surface and plug the supply cord into a standard electrical outlet. 2. Canisters: place the item(s) to be vacuum packaged inside the canister. Place the lid on top of the canister. See figure 1. Fast Normal Moist AUTO FUNCTION Vacuum & Seal Dry MANUAL FUNCTION Canister Pulse Cancel Seal Figure 1 Bottle Stoppers: insert the Bottle Stopper into the neck of the bottle.
How to Vacuum Package using FoodSaver® Canisters, Bottle Stoppers and Deli Containers - Continued 4. Place the container adaptor over the grey vacuum valve on the container lid. See figure 4. How to Open the FoodSaver® Canister To open, press and hold down the grey rubber button in the centre of the lid. This will release the vacuum – a hissing sound can be heard as the air rushes in.
Care and Cleaning Instructions The FoodSaver® Appliance 1. Always unplug the appliance before cleaning. 2. Clean using a mild dishwashing soap and a warm, damp cloth. Do not immerse the appliance in water. Dry thoroughly before using. 3. Do not use abrasive products or materials to clean any of the appliance components. Drip Tray Remove from appliance for easy clean. Clean drip tray in warm soapy water. FoodSaver® Bags IMPORTANT: Do not reuse bags after storing meats, fish or greasy foods. 1.
Vacuum Packaging Non-Food Items Your FoodSaver® appliance also protects non-food items from oxidation, corrosion and moisture. Just follow the directions for vacuum packaging using the FoodSaver® Bags, Canisters and Accessories. • Camping and hiking gear stays dry and compact. Vacuum packaging your clothes and equipment will help save space in your bag. Vacuum package matches, maps and anything you want to stay dry. • For picnics, fill a FoodSaver® Bag with ice and seal.
Food Preparation and Storage Guide Guidelines for Vacuum Packaging Food Vacuum packaging is not a substitute for canning nor can it reverse deteriorating quality; it can only slow down changes in quality. It is impossible to predict how long a specific food will have top-quality flavour, appearance and texture, because it depends on the age and condition of the food on the day it was vacuum packaged. Foods that are extremely fresh will last longer than foods that are already deteriorating.
Guidelines for Vacuum Packaging Preparation Guidelines for Meat and Fish For best results, pre-freeze meat and fish for 1-2 hours before vacuum packaging in a FoodSaver® Bag. This helps retain the juice and shape and guarantees a better seal. If it's not possible to pre-freeze, place a folded paper towel between meat or fish and top of bag but below seal area. Leave paper towel in bag to absorb excess moisture and juices during vacuum packaging process.
Guidelines for Vacuum Packaging continued Preparation Guidelines for Baked Goods Preparation Guidelines for Marinating To vacuum package soft or airy baked goods, we recommend using a FoodSaver® Canister so they will hold their shape. If using a bag, pre-freeze for 1-2 hours or until solidly frozen. To save time, make cookie dough, pie shells, whole pies, or mix dry ingredients in advance and vacuum package for later use.
Preservation Guidelines Foods Where to Store Recommended FoodSaver® Storage Storage Life with FoodSaver® Normal Storage Life Meat Beef, Pork, Lamb Freezer FoodSaver® Bag 2-3 years 6 months Ground Meat Freezer FoodSaver Bag 1 year 4 months Poultry Freezer FoodSaver Bag 2-3 years 6 months Fish Freezer FoodSaver® Bag 2 years 6 months ® ® Hard Cheeses Cheddar, Swiss Refrigerator FoodSaver® Bag, Canister 4-8 months 1-2 weeks Parmesan Refrigerator FoodSaver Bag, Canister 4-8 months
Preservation Guidelines continued Foods Where to Store Recommended FoodSaver® Container Storage Life with FoodSaver® Normal Storage Life Baked Goods Freezer FoodSaver® Bag 1-3 years 6-12 months Almonds, Peanuts Pantry FoodSaver® Bag, Canister 2 years 6 months Sunflower Seeds Pantry FoodSaver Bag, Canister 2 years 6 months Coffee Beans Freezer FoodSaver® Bag 2-3 years 6 months Coffee Beans Pantry FoodSaver Bag, Canister 1 year 3 months Ground Coffee Freezer FoodSaver Bag 2 ye
Troubleshooting Nothing happens when the on button is pressed: • Check to see that the appliance is plugged in. Test electrical outlet by plugging in another appliance. • The appliance will shut off automatically if overheated. Allow to cool down for 20 minutes and try again. • Check supply cord and plug for damage. If damaged, do not use the appliance. Air is not removed from the bag: • To seal properly, open end of bag should be resting entirely inside Vacuum Channel area.
Notes
Notes
Notes
12 Month Replacement Guarantee In the unlikely event that this appliance develops any malfunction within 12 months of purchase (3 months commercial use) due to faulty materials or manufacture, we will replace it for you free of charge. Should you experience any difficulties with your appliance, please phone our customer service line for advice on 1300 881 861 in Australia, or 0800 786 232 in New Zealand. Alternatively, you can send a written claim to Sunbeam at the address listed below.
Need help with your appliance? Contact our customer service team or visit our website for information and tips on getting the most from your appliance. In Australia Visit www.sunbeam.com.au Or call 1300 881 861 In New Zealand Visit www.sunbeam.co.nz Or call 0800 786 232 Distributed by: Sunbeam Corporation Limited ABN 45 000 006 771 Sunbeam Corporation is a division of GUD Holdings Ltd. is a registered trademark. www.sunbeam.com.