
Installation Guide


4
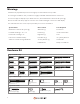
Technical Support
For technical support, please call 866-357-8688 or visit https://www.sunbritetv.com/support/services/contact-support, fill out
the support request form, and our support team will respond via email.
Visit tech.control4.com/technician for discussions, instructional videos, news, and more.
Warranty and Legal Notices
Find details of the product’s Limited Warranty and other resources such as regulatory notices and patent and safety
information, at snapone.com/legal or request a paper copy from Customer Service at 866.424.4489.
Copyright ©2022, Snap One, LLC. All rights reserved. Snap One and its respective logos are registered trademarks or
trademarks of Snap One, LLC, in the United States and/or other countries. Control4 and SunBriteTV are also registered
trademarks or trademarks of Snap One, LLC. Other names and brands may be claimed as the property of their respective
owners. Snap One makes no claim that the information contained herein covers all installation scenarios and contingencies,
or product use risks. Information within this specification subject to change without notice.
220308-1400
Part # 200-SB-WM-FT-XL-BLK-A
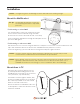
Hang the TV on the Wall Plate
Carefully lift the TV to hook the arms over the top lip of the wall plate. Allow the lower portion of the
arms to swivel in under the bottom lip of the wall plate. Do not release the TV until it is completely
seated.
Adjustments
Forward Tilt Adjustment (SB-WM-T-M-BL only)
Using the included long hex wrench, loosen the tilt adjustment locks (circled) on the
sides of the arms enough to allow movement.
Set the tilt to the desired angle, then tighten the locks. If the locks cannot be
tightened enough, remove the TV from the wall for better access.
Horizontal Adjustment
The arms feature tilt adjustment
screws toi help fine-tuine the display’s
alignemnt. Use provided hex wrench
to adjust the screw for perfect leveling.
Pro Tip: Due to display weight, it may
be easier to lift the panel
slightly while adjusting the
screw.
Locking
To lock the arms to the wall bracket, twist the locking tabs until the
edge catches behind the bracket. The hex wrench can be used as a
tool to help with this step. Add a padlock (not included) if desired.
±5° Horizontal
Adjustment
Tilt
Adjustment
Screw
Locking
Tab