
Operating Guide


5
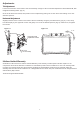
Attach TV to Arm Assembly
ATTENTION: This procedure requires two persons to perform. The instructions in this step are the same for
all TV sizes.
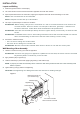
1. Pull the head of the arm assembly out from the wall and move the tilt adjustment down as much as possible. (Fig.5)
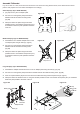
2. Insert two bolts (Y) into the top two holes of the TV adapter plate. Leave approximately 1/4” of exposed thread (do not
fully tighten). (Fig.6)
3. Lift the display and hook it over the mounting head by lowering the exposed portion of the top screws into the open key
slots on top of the arm assembly head. (Fig.7)
4. Insert two bolts (Y) through the bottom two holes of the assembly head and thread them into the adapter plate. (Fig.8)
5. Fully tighten all four bolts (Y). Tilt the TV up and down while watching the back to make sure that all 4 bolts are fully
tightened.
Figure 5
Figure 6 Figure 7 Figure 8
Cable Cover Attachment
Route the electrical and data cables along the arm assembly and secure in place using the provided cable covers
(Fig.9).
NOTE: Ensure enough slack is provided to allow for vertical and horizontal move before attaching the Cable
Covers.
Optional Adhesive Rubber Pad
Included with the hardware pack are adhesive rubber pads for cushioning impact of the arm against the wall when
retracting the mount. Place the pads on the opposite side from the cable covers where possible impact points will
occur (Fig.10).
Cable Covers
Adhesive
Rubber Pads
Figure 9 Figure 10