
Quick Start Guide


Step 5: Install the receiver
Take one of the included
rubber grommets and push it
around the 15-foot HD cable
near where it enters the receiver. Move
the grommet to where it aligns with the
slotted plastic piece on the underside
of the receiver, and slide it in so the
plastic pieces enters the groove around
the grommet.
Repeat this with the AC power cable
going into the receiver. Replace the
cover, making sure that it fits into the
grooves around the grommets, and
secure it with the retaining screw.
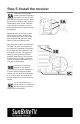
Now mount the receiver in a place that
will allow it to get a clear signal from
the transmitter. Preferably it should be
line-of-sight with the transmitter, such
as through a window. The signal can
usually go through one wall with no
problems, depending on how the wall
is constructed. If possible, mount the
receiver a couple of feet above the TV
so it gets a clearer signal.
You have two mounting
options for the receiver.
You can attach it directly to
a vertical surface using the keyhole
mounts, with two wood screws spaced
2-1/4 inches apart, and installed so
that the heads are 1/4-inch above the
surface.
Or you can attach the re-
ceiver directly to a horizontal
surface using the mounting
screw holes on the bottom.