Operator’s Manual Pro 2 Series 1K/4K Model SB-P2-32-1K SB-P2-43-1K SB-P2-49-4K SB-P2-55-4K SB-P2-65-4K Revision 20200401_0900 PN: MSP-002-00
Recycling Programs For California, Connecticut, Hawaii, Illinois, Indiana, Maine, Maryland, Michigan, Minnesota, Missouri, North Carolina, New Jersey, New York, Oklahoma, Oregon, Pennsylvania, Rhode Island, South Carolina, Texas, Utah, Virginia, Vermont, Washington, Washington D.C., Wisconsin, and West Virginia Consumers Only: For the recycling of SunBrite brand TV’s and other brand TV’s, please contact customer service at 866-357-8688 for details.
Important Safety Instructions Dear SunBriteTV Customer: Congratulations on the ownership of your SunBriteTV all-weather outdoor LCD TV, and welcome to the family of satisfied SunBrite customers. You are in great company, with thousands of homeowners and esteemed commercial facilities such as Yankee Stadium, Fenway Park, Disney World, and Sea World who have trusted us to deliver superior performance, lasting durability and the enjoyment of superb television viewing in the great outdoors.
Important Safety Instructions Cleaning Instructions: See “Care of SunBriteTV” on page 36. Attachments: Do not use attachments not specifically recommended by the manufacturer. Use of improper attachments can result in accidents. Power Source: SunBriteTV must operate on a power source indicated on the specification label. If you are not sure of the type of power supply used in your home, consult your dealer or local power company.
Important Safety Instructions Ventilation: Adequate ventilation must be maintained to ensure reliable and continued operation and to protect the television from overheating. There must be at least 1.5” of space on all sides. Power cord protection: The power cord must be routed properly to prevent people from stepping on it, or objects from resting on it. Check the cords at the plugs and product. Power source: This product must operate on a power source specified on the specification label.
Table of Contents Important Safety Instructions 2 Table of Contents 5 Supplied Accessories 6 TV Installation Choose a Location for the TV 7 Rear Panel Internal Connect Source 8 Rear Panel Connection Diagrams 9 Side Panel and Front Panel Controls 18 Remote Control Guide 20 On-Screen Display Controls 21 Adjusting On-Screen Displays Channel Menu 25 Picture Menu 27 Sound Menu 28 Time Menu 29 Lock Menu 30 Option Menu 31 Media Menu 35 Information Menu 37 Troubleshooting 38 Care
Supplied Accessories Unpacking After unpacking the SunBriteTV television, please make sure that the following items are included in the carton and that they are in good condition. If items are damaged or missing, contact your dealer immediately.
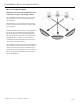
TV Installation - Choose a Location for the TV Choose a Location for the TV Important: The TV must be installed at least 5 feet from pool, spa, or other body of water. The TV should be installed so the screen is not facing direct sunlight, or can be easily turned away from direct sunlight. Ideal placement is in an area where the TV is shaded by trees, landscape and/or structures, or under a patio cover or gazebo. Remember that the position of the sun changes during the day, as seen in the drawing at right.
TV Installation – Rear Panel Internal Connect Source - Cable routing WARNING: Do not connect the power source before making connections. Internal Connect Source through the cable access door. The Internal Connect Source allows you to easily connect to the Audio, Video, VGA, HDMI, Audio Out, and RF connectors. The internal connect Source are inside the cable cover located on the back of the unit (Figure1). 1. Unscrew the two Thumb Screws (Figure1), and pull the cover towards you. 2.
TV Installation – Rear Panel Connections Connections 1 3 2 4 5 7 6 14 8 9 10 11 12 13 1. 2.5mm power jack - 12v @ 3amps Auxillary power supply 2. 5 pin din jack - SunBriteTV optional speaker bar connection output. 3. Direct IR input 3.5mm Jack 4. IR WINDOW - Rear IR receiver, allows IR emitter to be installed inside the cable compartment. 5. RS232 - 3.5mm Stereo Jack - For remote control using RS232 commands. 6. Ethernet- Network Connection - IP Control.
TV Installation – Rear Panel Connections Connections continued 19 18 20 18. HDbaseT - HD/UHD extender receiver.
TV Installation – Rear Panel Connections Connection Descriptions: Cable Descriptions: Red Green Blue Yellow Green Red White Legacy component input, 3.
TV Installation – Rear Panel Connections Switching Sources for Ports: Your SunBrite TV offers several options when connecting your devices to the TV. The chart below will help you understand which source you switch to for each of the ports. CONNECTING TO AN ANTENNA Connecting to Digital Cable without Cable Box or Antenna Connecting to Cable or Antenna 1. Make sure the power to the TV is turned off. 1. Make sure the power of the TV is turned off. 2.
TV Installation – Rear Panel Connection Diagrams CONNECTING TO AN ANTENNA--(Continued) Connecting to Cable or Antenna through VCR 1. Make sure the power of the TV is turned off. 2. Make sure there is an antenna or cable connection to the VCR already. 3. Use a Coaxial RF cable and connect from your VCR’s Antenna Out or Output to TV to the ATSC/ NTSC port of your TV. 4. Turn on the TV. 5.
TV Installation – Rear Panel Connection Diagrams CONNECTING TO A DVD PLAYER (Continued) Connecting with Composite (Fair) 1. 2. 3. 4. 5. 6. Make sure the power of the TV and your DVD player is turned off. Obtain a Yellow Video Cable. Connect the Yellow Video connector to both your DVD player and Composite’s Yellow Video connector port off the back of your TV. Obtain a RCA Audio Cable. Connect the white color connector to both your DVD player and Composite’s white connector port off the back of your TV.
TV Installation – Rear Panel Connection Diagrams CONNECTING TO A SATELLITE OR CABLE SET-TOP BOX Connecting with HDMI (Best) Connecting with Component (Better) 1. 2. 3. 4. Make sure the power of the TV and your set-top box is turned off. Connect a HDMI cable to the HDMI output of your set-top box and the other end to the HDMI port off the back of your TV. Turn on the TV and your set-top box. Use the remote control’s source button or the source button on the right side of the TV to switch to HDMI 1.
TV Installation – Rear Panel Connection Diagrams CONNECTING TO A SATELLITE OR CABLE SET-TOP BOX (Continued) Connecting with Composite (Fair) 1. 2. 3. 4. 5. 6. Make sure the power of the TV and your DVD player is turned off. Obtain a Yellow Video Cable. Connect the Yellow Video connector to both your DVD player and Composite’s Yellow Video connector port off the back of your TV. Connect the white color connector to both your DVD player and Composite’s white connector port off the back of your TV.
TV Installation – Rear Panel Connection Diagrams CONNECTING TO AN EXTERNAL AMPLIFIER OR AMPLIFIED SPEAKERS Connecting with Optical Digital (Best) Connecting with RCA Audio Analog (Good) 1. 2. 1. 2. 3. Make sure the power of the TV and your receiver is turned off. Obtain a optical cable, connect it to your receiver’s optical digital input and the optical audio out jack on the TV. Turn on the TV and your receiver. Please Note : 1. 2. 3.
TV Installation – Rear Panel Connection Diagrams CONNECTING TO A PC (Continued) Connecting with VGA Analog (Good) 1. 2. 3. 4. 5. Make sure the power of the TV and your PC is turned off. Obtain a 15-pin D-Sub VGA cable, connect to the VGA output of your PC and the other end to the VGA port off the back of your TV. Obtain a 3.5 mm Mini-jack, connect to the audio out of your PC and the other end to the VGA Stereo Input port. Turn on the power of the TV and your PC.
TV Installation - Connecting the Power Cord Connecting the Power Cord WARNING: TV AND GFCI RECEPTACLE MUST BE INSTALLED AT LEAST 5 FEET AWAY FROM STANDING WATER, SUCH AS (BUT NOT LIMITED TO) A POOL OR SPA. Connect the power cord after you have made connections to your video equipment. Connect the power cord to a GFCI-protected AC outlet with “in-use” waterproof cover. Warning: TV must be installed at least 5 feet away from standing water, such as (but not limited to) a pool or spa.
Remote Control Guide When programming a DirectTV, local cable universal remote control or Control system, you may find that SunBriteTV may not be on the list of TV manufacturers. If that is the case, your SunBriteTV supports SONY’s TV universal remote code. ON – Powers the TV On. OFF – Powers the TV Off. 0~9 – Allows you to set the channels directly. To access a digital channel, use these buttons with the (-) button to switch channels. Dash (-) – Insert the dash for selecting digital channels directly.
On-Screen Display Functions Via the Remote Control Adjusting the On Screen Display (OSD) from the Remote Control Via the TV Side Panel Buttons Adjusting the On Screen Display from the TV Side Panel Buttons Menu - This button opens the OSD CH + p - This button changes the channel to a higher number and also functions the up direction of OSD buttons to move the cursor to the item to be selected. This button is the UP direction in the OSD. This button functions as the DOWN direction in the OSD.
On-Screen Display Menu Your TV has been factory-set to plug-in and enjoy your programming. In the event you turn on the TV and get the message, “Please run Channel Auto Scan,” press your remote’s Menu button, press the Channel function and press Auto Scan. Note: To run the Channel function, you must be in the TV Source. To access the TV source, click Input on the TV’s side panel or Source button on the Remote Control. Press TV from the Input Select option. Home Menu.
On-Screen Display Menu (continued) Sound Menu.
On-Screen Display Menu (continued) Option Menu (page 1 of 2) This menu manages Setup functions including: Menu Language Transparency (menu) Energy Mode CEC Control HDMI EDID Color Range Network Configuration Network Upgrade Local Dimming IMCP Enable Option Menu (page2 of 2) This menu manages Setup functions including: Quick Start Mode Power on mode Restore Factory Default Ambient Light Sensor Ambient Sensor Value Auto Backlight Floor Backlight Sensor Floor Page 24
Adjusting On-Screen Displays – Channel Menu 1. Press the qp buttons on the remote or CH+/CH- on the TV) to move the cursor to the item to be selected. 2. Press the t u buttons on the remote or VOL+/VOL- on the TV to make the desired adjustments. 3. When your adjustments are complete, press MENU or EXIT on the remote or MENU on the TV to exit the main menu. The Channel Menu (figure 25-1) is available only when TV is selected as the source.
Adjusting On-Screen Displays – Channel Menu (continued) Channel Edit Press the qp buttons to highlight the desired channel and Press The channel will be displayed Using the Addq button on the remote you can change the text name of the learned channel. Using the Deletep button on the remote you can skip the channel when using Ch +/-. You will see a character appear next to the channel in the list.
Adjusting On-Screen Displays – Picture Menu 1. Press qp buttons on the remote or CH+/CH- on the TV) to move the cursor to the item to be selected. 2. Press t u buttons on the remote or VOL+/VOL- on the TV to make the desired adjustments. 3. When your adjustments are complete, press MENU or EXIT on the remote or MENU on the TV to exit the main menu.
Adjusting On-Screen Displays – Sound Menu 1. Press qp buttons on the remote or CH+/CH- on the TV) to move the cursor to the item to be selected. 2. Press t u buttons on the remote or VOL+/VOL- on the TV to make the desired adjustments. 3. When your adjustments are complete, press MENU or EXIT on the remote or MENU on the TV to exit the main menu. Sound Mode Press the qp buttons to highlight Sound Mode, then use t u to select presets Standard, Music, Movie, Sports or User sound mode.
Adjusting On-Screen Displays – Time Menu 1. Press qp buttons on the remote or CH+/CH- on the TV) to move the cursor to the item to be selected. 2. Press t u buttons on the remote or VOL+/VOL- on the TV to make the desired adjustments. 3. When your adjustments are complete, press MENU or EXIT on the remote or MENU on the TV to exit the main menu. Auto Sync Press the qp buttons to highlight the Auto Sync adjustment, then use t u to turn auto sync on and off.
Adjusting On-Screen Displays – Lock Menu 1. Press qp buttons on the remote or CH+/CH- on the TV) to move the cursor to the item to be selected. 2. Press t u buttons on the remote or VOL+/VOL- on the TV to make the desired adjustments. 3. When your adjustments are complete, press MENU or EXIT on the remote or MENU on the TV to exit the main menu. System Lock Press the qp buttons to highlight System Lock, then use t u to enter the Password menu shown at lower left.
Adjusting On-Screen Displays – Option Menu 1. Press qp buttons on the remote or CH+/CH- on the TV) to move the cursor to the item to be selected. 2. Press t u buttons on the remote or VOL+/VOL- on the TV to make the desired adjustments. 3. When your adjustments are complete, press MENU or EXIT on the remote or MENU on the TV to exit the main menu. Menu Language Press the qp buttons to highlight Menu Language, then use t u to select English, French or Spanish.
Adjusting On-Screen Displays – Option Menu (continued) Color Range Press the qp buttons to highlight Color Range, then use to select Auto, 16-235, or 0-255. Auto, the TV will select color range based on the input and source content. 0-255, typically used for PC content 16-235, typically used for TV content Network Configuration Press the qp buttons to highlight the Network Configuration, then use to select, then or wired network.
Adjusting On-Screen Displays – Option Menu Page 2 (continued) Quick Start Mode Press the qp buttons to highlight the Quick Start Mode, then use t u to turn select on and off. Quick start mode, On by default, allows the TV to turn on quicly and start displaying content. Quick start mode, must be On to have full IP control to turn on the TV when in Standby. Quick start mode, Off, will consume less power when in Standby, and IP control will not function to turn the TV on.
Adjusting On-Screen Displays – Option Menu Page 2 (continued) Ambient Light Sensor Note the Ambient sensor function is only available when the User Picture mode is selected. Press the qp buttons to highlight the Ambient Light Sensor adjustment, then use t u to turn the ambient light sensor on and off. The ambient light sensor automatically measures ambient light level and adjusts the backlight to the level preset using the Auto Backlight Floor adjustment explained below.
Menu - Media Photos Using the USB input on the rear panel of the TV, you can access material stored on a USB stick. The material can be MP3 or WAV music files, or JPEG or BMP pictures. The TV is not configured to play user Videos from a USB flash Drive. Accessing the USB input Press the Menu button on the remote or on the side control panel of the TV, then press qp buttons to highlight Media and press .
Menu - Media MP3 Audio Accessing the USB input Press the Menu button on the remote or on the side control panel of the TV, then press qp buttons to highlight Media and press . Select Music or Photo and press If a USB flash drive can be accessed by the TV it will display as shown, press to select it. Listening MP3 Audio from the USB Stick Use t u to highlight the MP3 file, then press to view that picture. Highligh a thumbnail and press to select photo.
Menu - Information TV Model The Sunbrite TV model number TV Serial Number Also referred to as the service tag, this is the product serial number which matches the serial number tag found inside the meda bay. Board Serial Number Unique ID number of the TV main board. IP Adress When properly connected to an ethernet wired network, the IP V4 network address will display. IP Adress Unique hardware address of the TV ethernet network port. Firmware Current build date and time of the TV firmware.
Troubleshooting The following table contains the common problems and the solutions to these problems. Please check this list before you contact the technicians. Trouble Solutions Trouble Solutions No picture Check the following: Power cord is connected correctly. Power is turned on. The video cable is connected correctly. You have selected the proper input signal source. If you have done the above, without resolve, unplug TV for at least 1 hour to perform Hard Reset.
Care of SunBriteTV Caring for the front Window: 1. Cleaning the front Panel: With your TV turned off, gently wipe the surface of the display panel with a damp (with water) microfiber, cotton or flannel cloth. (Do not use tissues, rags, sponges or paper towels because they may damage the screen and leave lint pieces behind).
Specifications LCD Screen 32-inch diagonal Color Active Matrix TFT LED LCD Resolution 1920 x 1080 FHD (4k input scaled to 1080p) Aspect Ratio 16:9 Blacklight Brightness - Surface Luminance, white 1500 nits (cd/m2) Contrast Ratio 3000:1 Front Window AG Laminate glass Response Time 8 milliseconds TV formats 2160p*,1080p, 1080i, 720p, 720i, 480p, 480i * using hdmi only Input Connectors: Tuner Model SB-P2-32-1K Pro 2 Series 4K Ultra HD Dimensions Side View Front View Antenna/CATV (ATSC/QAM/NT
Specifications LCD Screen 43-inch diagonal Color Active Matrix TFT LED LCD Resolution 1920 x 1080 FHD (4k input scaled to 1080p) Aspect Ratio 16:9 Blacklight Brightness - Surface Luminance, white 1500 nits (cd/m2) Contrast Ratio 3000:1 Front Window AG Laminate glass Response Time 8 milliseconds TV formats 2160p*,1080p, 1080i, 720p, 720i, 480p, 480i * using hdmi only Input Connectors: Tuner Model SB-P2-43-1K Pro 2 Series 4K Ultra HD Dimensions Front View Side View Antenna/CATV (ATSC/QAM/NT
Specifications LCD Screen 49-inch diagonal Color Active Matrix TFT LED LCD Resolution 3840 x 2160 UHD 4k Aspect Ratio 16:9 Blacklight Brightness - Surface Luminance, white 1000 nits (cd/m2) Contrast Ratio 4000:1 Front Window AG Laminate Glass Response Time 8 milliseconds TV formats 2160p*,1080p, 1080i, 720p, 720i, 480p, 480i * using hdmi only Input Connectors: Tuner Model SB-P2-49-4K Pro 2 Series 4K Ultra HD Dimensions Front View Antenna/CATV (ATSC/QAM/NTSC) x1 HDMI HDMI Input x 2 (supp
Specifications LCD Screen 55-inch diagonal Color Active Matrix TFT LED LCD Resolution 3840 x 2160 UHD 4k Aspect Ratio 16:9 Blacklight Brightness - Surface Luminance, white 1000 nits (cd/m2) Contrast Ratio 4000:1 Front Window AG Laminate Glass Response Time 8 milliseconds TV formats 2160p*,1080p, 1080i, 720p, 720i, 480p, 480i * using hdmi only Input Connectors: Tuner Model SB-P2-55-4K Pro2 Series 4K Ultra HD Dimensions Front View Side View Antenna/CATV (ATSC/QAM/NTSC) x1 HDMI HDMI Input
Specifications LCD Screen 65-inch diagonal Color Active Matrix TFT LED LCD Resolution 3840 x 2160 UHD 4k Aspect Ratio 16:9 Blacklight Brightness - Surface Luminance, white 1000 nits (cd/m2) Contrast Ratio 4000:1 Front Window AG Laminate Glass Response Time 8 milliseconds TV formats 2160p*,1080p, 1080i, 720p, 720i, 480p, 480i * using hdmi only Input Connectors: Tuner Model SB-P2-65-4K Pro2 Series 4K Ultra HD Dimensions Front View Antenna/CATV (ATSC/QAM/NTSC) x1 HDMI HDMI Input x 2 (suppor
Features Information and Instructions Programming Other Manufacturers’ Universal Remote Control Devices When programming a DirectTV, local cable universal remote control or Control system, you may find that SunBriteTV may not be on the list of TV manufacturers. If that is the case, your SunBriteTV supports SONY’s universal remote code. SunBriteTV Pixel Quality Policy SunBriteTV’s Pixel Quality Policy (Applicable to LCD TVs sold within USA and Canada only.
IR Emitter Installation To install the IR Emitter: The photo to the right shows an IR Emitter* installed. The end of the Emitter is to be mounted in front of the IR Emitter Window. IR Window Place the emitter on the white tie-down block and use the tie-down to secure it in place. Place the emitter cable over the bottom of the cable box and connect the other end of the emitter to the appropriate control block*.
Appendix B - RS232 Control Codes RS 232 Control codes SunbriteTV Com Spec: 9600,8,1,n Function ASCII HEX Model Class ID [ESC]? 1B 3F Firmware Version [ESC]? 1B 2E Power Status [ESC]! Power Toggle Power ON Power OFF Command Received Response from TV to control system Rev. 05/31/2016 Command Executed Response from TV to control system [B3220AHD-X.XX] or [B4610AHD-X.XX] XXXXX-X.
www.sunbritetv.