
Installation Instructions


OPERATION INSTRUCTIONS FOR THE FLUSH FIT
™
REGISTER BOOSTER
™
READ AND SAVE THESE INSTRUCTIONS
IMPORTANT NOTICE
With the use of any electrical appliance, it is important to observe all basic precautions to minimize the risk associated with use, such as electrical shock, fire,
or injury to persons. Read these instructions before using your Flush Fit
™
Register Booster
™
.
The rotary Set Point knob selects the
automatic on/off temperature setting for both
heating and cooling.
Press mode button to select operation:
OFF to stop operation.
ON for continuous running.
HEAT for automatic on/off to boost warm air.
COOL for automatic on/off to boost cool air.
Press the fan
speed button to
toggle from low,
medium and high
speed.
Speed Adjustment:
HEAT-COOL SETTING LOGIC
This device is designed to turn on and off from temperature rise and fall.
If you want the Flush Fit
™
Register Booster
™
to turn on with warm air from your furnace set the mode to HEAT. If you want the Flush Fit
™
Register Booster
™
to turn
on with the cool air from the A/C set the mode to COOL. In either mode the Flush Fit
™
Register Booster
™
will stop running when the temperature returns to the
initial set point.
7. Slowly turn the Set Point knob counterclockwise until the fans stop.
8. The Flush Fit
™
Register Booster
™
is now set to turn on when the warm air from the furnace reaches the register.
When the HEAT light is on the Flush Fit
™
Register Booster
™
will turn on as the temperature rises.
1. Perform operation settings with the Flush Fit
™
Register Booster
™
in the register and the forced air blower not running.
2. Remove the register and insert the Flush Fit
™
Register Booster
™
in the opening. Insert the small end of the transformer cord into the receptacle on the
Flush Fit
™
Register Booster
™
. Plug the transformer into your 110v outlet.
3. Press the mode button until the OFF light is lit.
4. Turn the rotary Set Point knob counterclockwise until it stops. DO NOT FORCE.
5. Press the mode button twice. The HEAT light will be lit and the fans will not be spinning.
6. Slowly turn the Set Point knob clockwise until the fans turn on.
7. Slowly turn the Set Point knob clockwise until the fans stop.
8. The Flush Fit
™
Register Booster
™
is now set to turn on when the cool air from the A/C reaches the register.
When the COOL light is on the Flush Fit
™
Register Booster
™
will turn on as the temperature drops.
1. Perform operation settings with the Flush Fit
™
Register Booster
™
in the register and the forced air blower not running.
2. Remove the register and insert the Flush Fit
™
Register Booster
™
in the opening. Insert the small end of the transformer cord into the receptacle on the
Flush Fit
™
Register Booster
™
. Plug the transformer into your 110v outlet.
3. Press the mode button until the OFF light is lit.
4. Turn the rotary Set Point knob clockwise until it stops. DO NOT FORCE.
5. Press the mode button three times. The COOL light will be lit and the fans will not be spinning.
6. Slowly turn the Set Point knob counterclockwise until the fans turn on.
1. The Flush Fit
™
Register Booster
™
will be as warm as the air that is delivered from the register of your forced air furnace and/or cooling system. The maximum
temperature for the register is 140° Fahrenheit or
60° Centigrade. Your Flush Fit
™
Register Booster
™
should never be exposed to higher temperatures or temperatures below freezing.
2. Do not in any way block the air grilles of the Flush Fit
™
Register Booster
™
.
3. Unplug the Flush Fit
™
Register Booster
™
when not in use. Turn the unit off before unplugging.
4. Do not operate the Flush Fit
™
Register Booster
™
with a damaged plug or cord, if the unit malfunctions, becomes noisy when operating, has been dropped or
otherwise damaged, or if the housing is damaged or broken. Discard or return the unit for inspection, replacement, or repair.
5. Do not run cord under carpeting. Do not cover cord with throw rugs, runners, or similar coverings. Do not route cord under furniture or appliances. Arrange
cord away from traffic area and where it will not be tripped over.
6. The Flush Fit
™
Register Booster
™
should never be exposed to moisture. Do not use the unit in an open window, bathroom, or laundry area where it may come
in contact with water.
7. The Flush Fit
™
Register Booster
™
is designed for indoor use only.
8. Place the Flush Fit
™
Register Booster
™
and the electrical cord where it will not be tripped over, and is out of the traffic pattern.
9. Never insert any object or allow any object to enter the Flush Fit
™
Register Booster
™
through the bottom or top grilles, as this may damage the unit or cause it
to malfunction.
10. Do not use the Flush Fit
™
Register Booster
™
near flammables such as gasoline, paint, or natural gas.
11. The Flush Fit
™
Register Booster
™
is intended for use as described in the instructions only. Other use may cause fire, electrical shock, damage to the unit, or
injury to persons and will void any warranty by the manufacturer.
12. If it is necessary to use an extension cord, use a minimum 18 gauge cord.
13. Pressure on the bottom or top grilles of the Flush Fit
™
Register Booster
™
may cause the fan impeller to contact these grilles and damage the unit.
14. Do not use strong detergents or flammable liquids to clean the Flush Fit
™
Register Booster
™
.
15. The housing of your Flush Fit
™
Register Booster
™
is sealed at the factory. THERE ARE NO
SERVICEABLE PARTS INSIDE. Attempting to open the housing will expose you to dangerous electricity, may cause fire and will void any and all warranty.
To shorten the length of time that your Flush Fit
™
Register Booster
™
continues to run after the forced air furnace or air conditioner has shut off, rotate the Set
Point knob control slightly further, as in Step Seven.
The Flush Fit
™
Register Booster’s
™
memory will retain all settings automatically (speed, function, and temperature set point). The HC500 has 3 speeds.
Before cleaning the Flush Fit
™
Register Booster
™
disconnect the power cord from the outlet. Dust may be removed from the exterior surfaces using a soft cloth,
the round brush attachment of your vacuum cleaner, or a cloth that has been lightly moistened with water and a mild, non-abrasive detergent. Dust accumulation
in the interior of the unit may be removed by using the small round brush attachment of your vacuum cleaner.
Accumulation of dust in the interior will be minimized by regular replacement of your furnace filter as
recommended by the manufacturer.
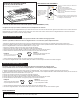
FLOOR REGISTER 4” X 10”
WALL REGISTER 4” X 10”
INSTALLATION
CLEANING AND MAINTENANCE
OPERATION SETTINGS
IMPORTANT NOTE
IMPORTANT WARNINGS
ONE YEAR LIMITED WARRANTY
Off On Heat Cool
Mode
Set Point
Fan Speed
High
Med
Low
Wall Mount Drill Hole Location
1. Plug the small molded end of the power cord into the top of the Flush Fit
™
Register Booster
™
.
2. Plug the wall transformer end of the power cord into a 120 Volt AC outlet.
3. Follow directions for OPERATION SETTINGS before placing in register.
4. Remove floor register and replace with the Flush Fit
™
Register Booster
™
.
1. Drill (two) holes with a 3/16” drill bit from the bottom side of the Flush Fit
™
Register Booste grille. The holes should be drilled in the pre-molded location
as pictured below.
2. Plug the small molded end of the power cord into the top of the Flush Fit
™
Register Booster
™
.
3. Plug the wall transformer end of the power cord into a 120 Volt AC outlet.
4. Follow directions for OPERATION SETTINGS before placing in register.
5. Remove the wall register and replace with the Flush Fit
™
Register Booster
™
.
6. Secure the Flush Fit
™
Register Booster
™
in place.
Adaptor plate sold separately.
FLOOR & WALL REGISTER:
4” X 12”, 6” X 10” & 6” X 12”
FOR HEATING
STEP 6
Turn counterclockwise
until the device turns on.
Turn clockwise until the
device turns off.
STEP 7
FOR COOLING
NEVER EXPOSE YOUR FLUSH FIT™ REGISTER BOOSTER™ TO TEMPERATURES OVER 140°F (60°C)
DO NOT INSTALL IN CEILING.
STEP 6
Turn clockwise until
the device turns on.
Turn counterclockwise until
the device turns off.
STEP 7
Subject to the following limitations, Suncourt Inc. (manufacturer) warrants that the Flush Fit
™
Register Booster
™
will, for 1 (one) year from date of original retail
purchase, but not exceeding 2 (two) years from date of manufacture, remain free from appearance of defects in workmanship or materials. This warranty is
subject to the following limitations: (a) manufacturer’s liability is limited to the replacement or repair of the unit, as decided by the manufacturer; (b) a defective unit
must be returned, prepaid, with proof of purchase, well packaged to avoid damage in transit; and (c) this warranty does not apply to defects resulting from the
alteration, abuse, accidental damage, unauthorized repair, or misuse of the unit. This warranty is given in lieu of all other warranties, guarantees, and conditions
on manufacturer’s part, and the manufacturer shall have no tortious or other liability in respect to this Flush Fit
™
Register Booster
™
. Ship unit to Suncourt Inc. only
after obtaining a Return Goods Authorization (RGA) number. Returns without this RGA number will not be accepted. Actual product appearance may differ from
illustrations. Suncourt reserves the right to modify any or all of its products' features, designs, components and specifications without notice.
Allow your unit to acclimate to room temperature before making initial settings.
Allow your unit to acclimate to room temperature before making initial settings.
MODEL: HC500
INSTRUCTIONS D'OPÉRATION POUR FLUSH FIT
™
REGISTER BOOSTER
™
LISEZ ET SAUVEZ CES INSTRUCTIONS
NOTIFICATION IMPORTANTE
N'EXPOSEZ JAMAIS LE VOTRE FLUSH FIT™ REGISTER BOOSTER™ À DES TEMPÉRATURES PLUS DE 140°F (60°C)
Avec l'utilisation de n'importe quel appareil électrique, il est important d'observer toutes les précautions de base pour réduire au minimum le risque lié à
l'utilisation, telle que le choc électrique, le feu, ou les dommages aux personnes. Lisez ces instructions avant utilisation votre Flush Fit
™
Register Booster
™
.
1. Branchez la petite extrémité moulée du cordon de secteur au dessus du
Flush Fit
™
Register Booster
™
.
2. Branchez l'extrémité de transformateur de mur du cordon de secteur à une
sortie à C.A. de 120 volts.
3. Suivez les directions pour des arrangements d'opération avant le placement
dans le registre.
4. Enlevez le registre de plancher et le remplacez par Flush Fit
™
Register
Booster
™
.
Le bouton de point de consigne rotatoire choisit
la température "Marche/Arrêt" automatique pour
le chauffage et le refroidissement.
Appuyez sur le bouton mode pour sélectionner
l'opération:
OFF: pour arrêter l'opération.
ON: pour le fonctionnement continu.
HEAT: pour que "Marche/Arrêt" automatique
amplifie l'air chaud.
COOL: pour que "Marche/Arrêt" automatique
amplifie l'air frais.
Appuyez sur le bouton
de vitesse de l'hélice
pour basculer rapide,
milieu ou lente la
vitesse.
Ajustement de vitesse:
1. L’Flush Fit
™
Register Booster
™
soyez aussi chaud que l'air qui est livré à partir du registre de votre four à air forcé et/ou système de refroidissement. La
température maximale pour le registre est 140° Fahrenheit or 60° Centigrade. Votre Flush Fit
™
Register Booster
™
devrait ne jamais être exposé aux températures
plus élevées ou aux températures au-dessous de zéro.
2. Ne bloquez pas de quelque façon les grilles du Flush Fit
™
Register Booster
™
.
3. Débranchez Flush Fit
™
Register Booster
™
si non utilisable. Mettre l'appareil a l’arret avant de débrancher.
4. N'actionnez pas Flush Fit
™
Register Booster
™
avec une prise ou une corde endommagée, si l'unité fonctionne mal, devient bruyant en fonctionnant, a été
laissé tomber ou autrement
endommagé, ou si le logement est endommagé ou cassé. Jeter ou retourner l'appareil pour inspection, remplacement ou réparation.
5. Ne courez pas la corde sous la pose de tapis. Ne pas recourir le cordon avec des tapis ou outres revêtements. Ne conduisez pas la corde sous des meubles
ou des appareils. Gardez le cordon loin des zones de traffic donc il ne va pas faire trébucher.
6. L’Flush Fit
™
Register Booster
™
ne doit jamais être exposé à l’humidité. Ne pas utiliser l’appareil dans une fenêtre ouverte, dans la salle de bain, à l’endroit où
vous lavez le linge où il pourrait être en contact avec de l’eau.
7. L’Flush Fit
™
Register Booster
™
est conçu pour l'usage d'intérieur seulement.
8. Placez Flush Fit
™
Register Booster
™
et la corde électrique où il ne va pas faire trébucher.
9. N'insérez jamais n'importe quel objet ou permettez à n'importe quel objet d'entrer dans Flush Fit
™
Register Booster
™
par les grils du fond ou de dessus, en tant
que ceci peut endommager l'unité ou la faire fonctionner mal.
10. Ne pas utiliser l’Flush Fit
™
Register Booster
™
près de produits inflammables tels que l’essence, la peinture ou le gaz naturel.
11. L’Flush Fit
™
Register Booster
™
est prévu pour l'usage comme décrit dans les instructions seulement. L'autre utilisation peut causer le feu, le choc électrique,
les dommages à l'unité, ou les dommages aux personnes et videra n'importe quelle garantie par le fabricant.
12. S'il est nécessaire d'employer une corde de prolongation, employez une corde de mesure du minimum 18.
13. Pression sur les grils du fond ou de dessus du Flush Fit
™
Register Booster
™
peut faire entrer en contact avec ces grils et endommager la roue à aubes de
ventilateur l'unité.
14. N'employez pas les détergents forts ou les liquides inflammables pour nettoyer Flush Fit
™
Register Booster
™
.
15. Le logement du votre Flush Fit
™
Register Booster
™
est scellé à l'usine. IL NE Y A AUCUNE PIÈCE UTILE À L'INTÉRIEUR. Essayer d'ouvrir le logement vous
en exposera à l'électricité dangereuse, peut causer le feu et videra et toute la garantie.
Pour raccourcir la durée qui votre Flush Fit
™
Register Booster
™
continue à courir après le four à air forcé ou le climatiseur a coupé, tourne la commande de
point de consigne de bouton légèrement autre, comme dans l'étape deux.
The Flush Fit
™
Register Booster’s
™
la mémoire maintiendra tous les arrangements automatiquement (vitesse, fonction, et température de point de consigne).
Le HC500 a 3 vitesses.
1. Forez (deux) trous avec a 3/16” peu de foret du côté inférieur du Flush Fit
™
Register Booster
™
gril. Les trous devraient être forés dedans l'endroit pré-moulé
comme décrit ci-dessous.
2. Branchez la petite extrémité moulée du cordon de secteur au dessus du
Flush Fit
™
Register Booster
™
.
3. Branchez l'extrémité de transformateur de mur du cordon de secteur à une
sortie à C.A. de 120 volts.
4. Suivez les directions pour des arrangements d'opération avant le placement
dans le registre.
5. Enlevez le registre de mur et le remplacez par Flush Fit
™
Register Booster
™
.
6. Fixez Flush Fit
™
Register Booster
™
en place.
Avant le nettoyage Flush Fit
™
Register Booster
™
démontez le cordon de secteur de la sortie. La poussière peut être enlevée des surfaces extérieures utilisant un
tissu mou, de l'attachement rond de brosse de votre aspirateur, ou d'un tissu qui a été légèrement humidifié de l'eau et d'un détergent doux et non-abrasif.
L'accumulation de la poussière à l'intérieur de l'unité peut être enlevée en utilisant le petit attachement rond de brosse de votre aspirateur. L'accumulation de la
poussière dans l'intérieur sera réduite au minimum par le remplacement régulier de votre filtre de four comme recommandé par le fabricant.
REGISTRE DE PLANCHER 4” X 10”
REGISTRE DE MUR 4” X 10”
INSTALLATION
NETTOYAGE ET ENTRETIEN
RÉGLAGES DE FONCTIONNEMENT
NOTE IMPORTANTE
AVERTISSEMENTS IMPORTANTS
UNE GARANTIE LIMITÉE D'UN AN
Off On Heat Cool
Mode
Set Point
Fan Speed
High
Med
Low
SUNCOURT INC.
P.O. Box 40
Durant, IA 52747-0040
1.800.999.FANS (3267)
www.suncourt.com
WNT500-1015-C05-HD
LOGIQUE DE RÉGLAGE POUR CHAUFFAGE (HEAT) - REFROIDISSEMENT (COOL)
Cet appareil est conçu pour allumer et éteindre, hausse de température et à l'automne.
Si vous voulez le Flush Fit™ Register Booster™ pour mettre en marche avec l'air chaud de votre fournaise, réglez le mode à HEAT. Si vous voulez le Flush Fit™
Register Booster™ pour mettre en marche avec l'air frais de l'a/c sur le mode COOL. Soit en mode la Flush Fit™ Register Booster™ cessera de fonctionner
lorsque la température revient à la valeur de consigne initiale.
7. Tourner lentement le Set Point bouton vers la gauche jusqu'à ce que cessent les fans.
8. Le Flush Fit™ Register Booster™ est maintenant défini pour mettre en marche lorsque l'air chaud du four atteint le registre.
Quand le voyant HEAT est allumée la Flush Fit™ Register Booster™ va commencer quand la temperature monte.
1. Effectuer les réglages de fonctionnement avec le Flush Fit™ Register Booster™ dans le registre et le ventilateur d'air pulsé ne fonctionne pas.
2. Enlevez le registre et insérez la Flush Fit™ Register Booster™ dans l'ouverture. Insérer la petite extrémité du câble transformateur dans la prise sur le
Flush Fit™ Register Booster™. Branchez le transformateur sur une prise 110v.
3. Appuyez sur le bouton mode jusqu'à ce que le OFF la lumière est allumée.
4. Tournez sens anti-horaire jusqu’à ce que le dispositive s’arrête. NE FORCEZ PAS.
5. Appuyez deux fois sur le bouton MODE. Le HEAT la lumière s'allume et ne fonctionnera pas les fans.
6. Tourner lentement le Set Point bouton dans le sens horaire jusqu'à ce que les fans fonctionne.
7. Tourner lentement le Set Point bouton dans le sens horaire jusqu'à ce que cessent les fans.
8. Le Flush Fit
™
Register Booster
™
est maintenant défini pour mettre en marche lorsque l'air frais de l'a/c atteint le registre.
Lorsque la lumière COOL est sur le Flush Fit
™
Register Booster
™
va commencer quand la temperature chutes.
1. Effectuer les réglages de fonctionnement avec le Flush Fit
™
Register Booster
™
dans le registre et le ventilateur d'air pulsé ne fonctionne pas.
2. Enlevez le registre et insérez la Flush Fit
™
Register Booster
™
dans l'ouverture. Insérer la petite extrémité du câble transformateur dans la prise sur le Flush Fit
™
Register Booster
™
. Branchez le transformateur sur une prise 110v.
3. Appuyez sur le bouton mode jusqu'à ce que le OFF la lumière est allumée.
4. Tournez sens horaire jusqu’a ce que le dispositive s’arrête. NE FORCEZ PAS.
5. Appuyez trois fois sur le bouton MODE. Le COOL la lumière s'allume et ne fonctionnera pas les fans.
6. Tourner lentement le Set Point bouton vers la gauche jusqu'à ce que les fans fonctionne.
l'étape 6
Tournez sens anti-horaire jusqu’à
ce que le dispositive commence.
Tournez sens horaire jusqu’a
ce que le dispositive s’arrête.
l'étape 7
l'étape 6
Tournez sens horaire jusqu’à ce
que le dispositive commence.
Tournez sens anti-horaire jusqu’à ce
que le dispositive s’arrête.
l'étape 7
POUR LE CHAUFFAGE (HEAT)
POUR LE REFROIDISSEMENT (COOL)
Sous réserve des limitations suivantes, Suncourt Inc. (le fabricant) garantie le ventilateur Flush Fit
™
Register Booster
™
contre tout défaut de pièce et de main
d'oeuvre pour une période d'un (1) an à partir de la date d'achat original, mais n'excédant pas deux ans à partir de la date de fabrication. Cette garantie est sous
réserve des limitations suivantes: (a) la responsabilité du fabricant est limitée au remplacement ou à la réparation de l'appareil, suivant la décision par le fabricant;
(b) un appareil défectueux doit être renvoyé, bien emballé pour éviter des dommages en transit, les frais de transport payés à l'avance et avec preuve d'achat; et
(c) cette garantie ne s'applique pas aux dommages causés par des modifications, l'abus, des dommages accidentels, des réparations pas autorisées, ou la
mauvaise utilisation de l'appareil. Cette garantie est donnée à la place de toutes autres garanties et conditions de la part du fabricant, et le fabricant n'aura aucune
autre responsabilité en ce qui concerne ce ventilateur Flush Fit
™
Register Booster
™
. Expédiez l'unité à Suncourt Inc seulement après l'obtention d'une autorisation
de retour de marchandise (RGA). Les retours sans ce numéro de RGA ne seront pas acceptées. L’apperance de produit peut différer des illustrations. Suncourt se
réserve le droit de modifier partiellement ou entierement les caractéristiques du produit, de conceptions, de composants et de caractéristiques sans préavis.
Permettre à votre unité de s'acclimater à la température ambiante avant d'effectuer des réglages initiaux.
Permettre à votre unité de s'acclimater à la température ambiante avant d'effectuer des réglages initiaux.
NE PAS INSTALLER DANS PLAFOND.
MODÈLE: HC500
Emplacement des trous pour
montage mural
Plaque adaptrice vendue séparément.
REGISTRE DE PLANCHER ET DE MUR:
4” X 12”, 6” X 10” & 6” X 12”